1KD-FTV ENGINE MECHANICAL CAMSHAFT(w/ Glow Plug Controller) INSTALLATION
CAUTION / NOTICE / HINT
- NOTICE:
- ·
When replacing the injectors (including shuffling the injectors between the cylinders), common rail or cylinder head, it is necessary to replace the injection pipes with new ones.
·When replacing the fuel supply pump, common rail, cylinder block, cylinder head, cylinder head gasket or timing gear case, it is necessary to replace the fuel inlet pipe with a new one.
·After removing the injection pipes, clean them with a brush and compressed air.
PROCEDURE

 1.INSTALL CAMSHAFT
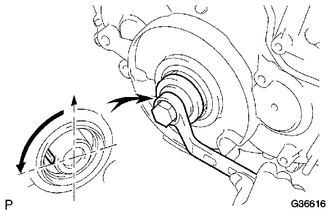
| *1 | Key |
Using the crankshaft pulley bolt, set the No. 1 cylinder to 90° BTDC/compression.
- HINT:
-
Set the No. 1 cylinder to 90° BTDC/compression to prevent the top of the piston from hitting against the valve head.
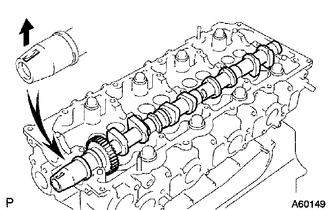
| *1 | Key Groove |
| *a | Upward |
Install the camshafts.
Apply engine oil to the thrust portion of the camshaft.
Place the camshaft on the cylinder head with the key groove facing upward.
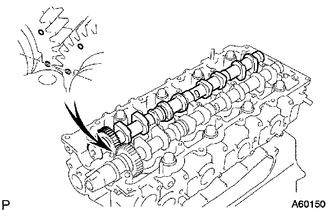
Align the timing marks (1-dot marks) of the camshaft drive and driven main gears and set the No. 2 camshaft in place.
Remove any old seal packing (FIPG material) from the camshaft bearing cap.
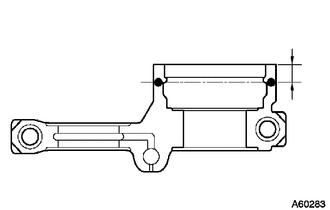
| *1 | Seal Packing |
| *2 | Oil Passage |
Apply seal packing to the specified areas shown in the illustration.
- Seal packing:
Toyota Genuine Seal Packing Black, Three Bond 1207B or equivalent
- Standard seal diameter:
4 mm (0.157 in.)
- NOTICE:
- ·
Do not allow seal packing to contact the oil passage of the bearing cap.
·After applying seal packing, install the camshaft bearing caps within 3 minutes and tighten the bolts within 15 minutes.
·Do not start the engine for at least 2 hours after installation.
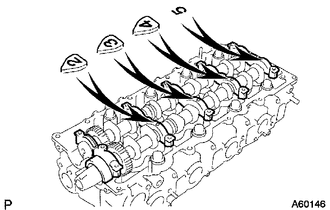
Install the 5 bearing caps to their proper locations.
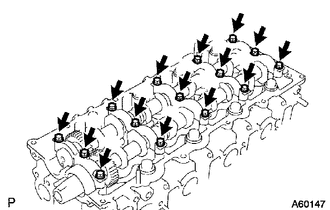
Apply a light coat of engine oil to the threads and under the heads of the bearing cap bolts.
Install and uniformly tighten the 15 bearing cap bolts in several passes in the sequence shown in the illustration.
- Torque:
- 19 N*m (194 kgf*cm, 14 ft.*lbf)
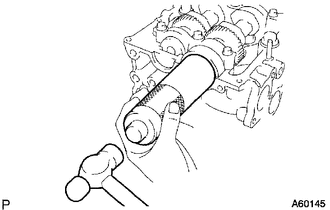
Install a new camshaft oil seal.
Apply MP grease to the lip of a new oil seal.
Using SST and a hammer, tap in the oil seal until its surface is flush with the surfaces of the camshaft bearing cap and cylinder head.
- SST
- 09608-06041
2.INSTALL NO. 2 TIMING BELT COVER
3.INSTALL CAMSHAFT TIMING PULLEY
4.INSTALL NO. 1 TIMING BELT IDLER SUB-ASSEMBLY
5.INSTALL TIMING BELT
6.INSPECT AND ADJUST VALVE CLEARANCE
7.INSTALL NO. 1 TIMING BELT COVER
8.INSTALL INJECTOR ASSEMBLY
9.INSPECT FOR FUEL LEAK
10.INSTALL CYLINDER HEAD COVER SUB-ASSEMBLY
11.INSTALL NO. 2 CYLINDER HEAD COVER SUB-ASSEMBLY
12.INSTALL WIRING HARNESS CLAMP BRACKET
13.INSTALL NO. 2 NOZZLE LEAKAGE PIPE ASSEMBLY
14.INSTALL NO. 3 NOZZLE LEAKAGE PIPE
15.INSTALL NO. 2 FUEL PIPE
16.INSTALL NO. 4 INJECTION PIPE SUB-ASSEMBLY
17.TEMPORARILY INSTALL ELECTRIC EGR CONTROL VALVE ASSEMBLY WITH NO. 2 EGR VALVE AND EGR COOLER
18.TIGHTEN ELECTRIC EGR CONTROL VALVE ASSEMBLY WITH NO. 2 EGR VALVE AND EGR COOLER
19.CONNECT NO. 3 WATER BY-PASS PIPE
20.CONNECT ENGINE WIRE
21.INSTALL THROTTLE BODY BRACKET
22.INSTALL WIRING HARNESS CLAMP BRACKET
23.INSTALL GAS FILTER BRACKET WITH GAS FILTER
24.INSTALL MANIFOLD ABSOLUTE PRESSURE SENSOR
25.INSTALL NO. 5 WATER BY-PASS PIPE
26.INSTALL NO. 1, NO. 2 AND NO. 3 INJECTION PIPE SUB-ASSEMBLY
27.INSTALL FUEL INLET PIPE SUB-ASSEMBLY
28.INSTALL NO. 3 CYLINDER HEAD COVER SUB-ASSEMBLY (for DPF)
29.INSTALL FUEL PIPE INSULATOR (for i-ART)
30.INSTALL MANIFOLD STAY WITH VACUUM SWITCHING VALVE
31.CONNECT WATER BY-PASS HOSE
32.INSTALL ENGINE OIL LEVEL DIPSTICK GUIDE
33.INSTALL FRONT FENDER SEAL
34.INSTALL FRONT FENDER APRON SEAL UPPER
35.INSTALL FRONT WHEEL LH
36.INSTALL DIESEL THROTTLE BODY ASSEMBLY
37.INSTALL INTERCOOLER ASSEMBLY
38.INSTALL INTAKE AIR TEMPERATURE SENSOR
39.INSTALL NO. 1 ENGINE COVER SUB-ASSEMBLY
40.INSTALL FAN SHROUD
41.INSTALL RADIATOR HOSE INLET
43.BLEED AIR FROM FUEL SYSTEM
44.ADD ENGINE COOLANT
45.INSPECT FOR COOLANT LEAK
46.INSPECT FOR OIL LEAK
47.INSPECT FOR FUEL LEAK
48.INSTALL NO. 1 ENGINE UNDER COVER
49.INSPECT ENGINE OIL LEVEL