DOOR / HATCH BACK DOOR REASSEMBLY
CAUTION / NOTICE / HINT
- HINT:
- ·
A bolt without a torque specification is shown in the standard bolt chart.
Click hereGeneral>SPECIFICATIONS>STANDARD BOLT>SPECIFIED TORQUE FOR STANDARD BOLTS
PROCEDURE

 68920
1.INSTALL POWER BACK DOOR UNIT SET ASSEMBLY LH
- NOTICE:
-
Do not apply any horizontal load to the power back door unit set assembly in order to prevent the piston rod from deforming.
Clean the bolt hole on the vehicle body.
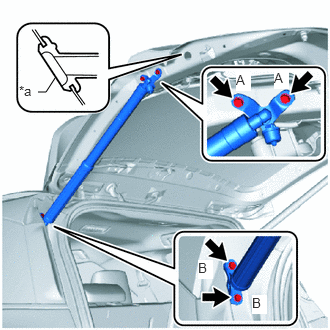
| *a | Grommet |
Install the 2 bolts (A).
- NOTICE:
-
Install the power back door unit set assembly while supporting the back door by hand.
- Torque:
- 7.5 N*m (76 kgf*cm, 66 in.*lbf)
Install the power back door unit set assembly with 2 new bolts (B).
- NOTICE:
-
Install the power back door unit set assembly while supporting the back door by hand.
- Torque:
- 7.5 N*m (76 kgf*cm, 66 in.*lbf)
Attach the grommet.
Connect the connector.
68910
2.INSTALL POWER BACK DOOR UNIT SET ASSEMBLY RH
- HINT:
-
Use the same procedure as for the LH side.
67837L
3.INSTALL DOOR DUST PROOF SEAL
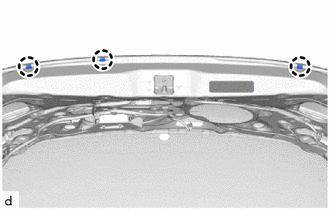
Attach the claw and install 3 new door dust proof seals.
67293A
4.INSTALL BACK DOOR STOPPER CUSHION
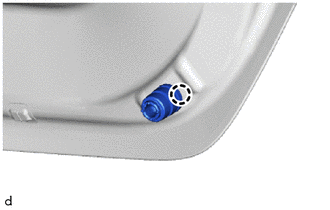
Attach the claw to install a new back door stopper cushion.
- HINT:
-
Use the same procedure as for the RH side.
67281F
5.INSTALL LOWER BACK DOOR STOPPER
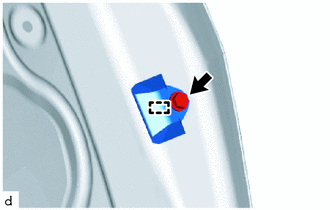
Attach the guide to install the lower back door stopper with the bolt.
- HINT:
-
Use the same procedure as for the RH side.
85110R
6.INSTALL REAR WIPER MOTOR ASSEMBLY
69350
7.INSTALL BACK DOOR LOCK ASSEMBLY (w/ Easy Closer)
69350
8.INSTALL BACK DOOR LOCK ASSEMBLY (w/o Easy Closer)
89747E
9.INSTALL POWER BACK DOOR WARNING BUZZER (w/ Power Back Door)
89222A
10.INSTALL MULTIPLEX NETWORK DOOR ECU (w/ Power Back Door)
89222A
11.INSTALL MULTIPLEX NETWORK DOOR ECU (w/ Easy Closer)
86790D
12.INSTALL REAR TELEVISION CAMERA ASSEMBLY (w/ Parking Assist Monitor System)
81690A
13.INSTALL LICENSE PLATE LIGHT ASSEMBLY LH
81270D
14.INSTALL LICENSE PLATE LIGHT ASSEMBLY RH
84840G
15.INSTALL BACK DOOR OPENER SWITCH ASSEMBLY
76801
16.INSTALL BACK DOOR OUTSIDE GARNISH SUB-ASSEMBLY
81590A
17.INSTALL REAR LIGHT ASSEMBLY LH
81580A
18.INSTALL REAR LIGHT ASSEMBLY RH
- HINT:
-
Use the same procedure as for the LH side.
899A0A
19.INSTALL NO. 2 INDOOR ELECTRICAL KEY ANTENNA ASSEMBLY (w/ Smart Entry and Start System)
67290
20.INSTALL BACK DOOR DAMPER ASSEMBLY
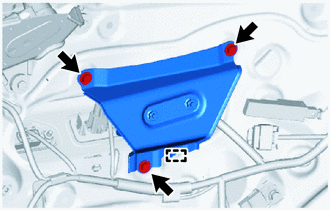
Attach the guide.
Install the back door damper assembly with the 3 bolts.
85345R
21.INSTALL REAR WASHER NOZZLE
22.INSTALL REAR SPOILER ASSEMBLY
64886B
23.INSTALL BACK DOOR GLASS CHANNEL LH
64885C
24.INSTALL BACK DOOR GLASS CHANNEL RH
- HINT:
-
Use the same procedure as for the LH side.
84280D
25.INSTALL POWER BACK DOOR SENSOR ASSEMBLY LH (w/ Power Back Door)
84270G
26.INSTALL POWER BACK DOOR SENSOR ASSEMBLY RH (w/ Power Back Door)
- HINT:
-
Use the same procedure as for the LH side.
67847A
27.INSTALL BACK DOOR SERVICE HOLE COVER (w/ Cover)
Apply new butyl tape to the back door panel.
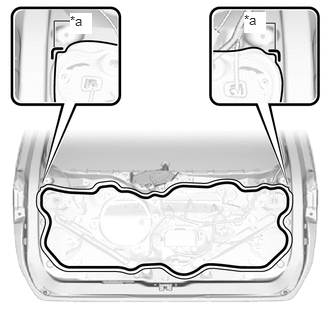
| *a | Reference Point |

|
Butyl Tape |
Install a new back door service hole cover, and then attach the back door service hole cover using the reference points on the back door panel.
- HINT:
- ·
Securely install the back door service hole cover to prevent wrinkles and air bubbles.
·There should be no wrinkles or folds after installing the back door service hole cover.
·After installing the back door service hole cover, check the seal quality.
67750
28.INSTALL BACK DOOR TRIM BOARD ASSEMBLY
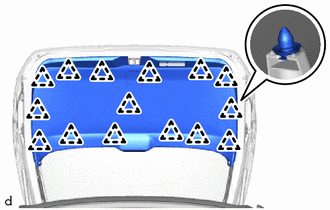
Attach the clip to install the back door trim board assembly.
84931C
29.INSTALL BACK DOOR CONTROL SWITCH (w/ Power Back Door)
55539
30.INSTALL SPARE SWITCH HOLE COVER (w/o Power Back Door)
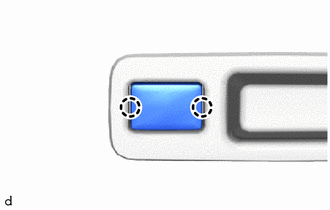
Attach the claw to install the spare switch hole cover.
74811D
31.INSTALL DOOR PULL HANDLE
w/ Power Back Door:
Connect the connector.
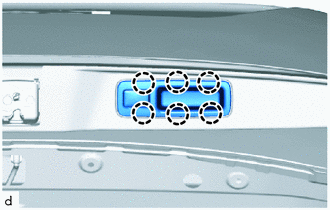
Attach the claw to install the door pull handle.
67938A
32.INSTALL BACK DOOR SIDE GARNISH LH
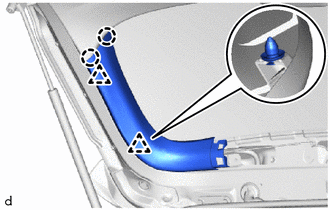
Attach the claw and clip to install the back door side garnish LH.
67937B
33.INSTALL BACK DOOR SIDE GARNISH RH
- HINT:
-
Use the same procedure as for the LH side.
67939B
34.INSTALL CENTER BACK DOOR GARNISH
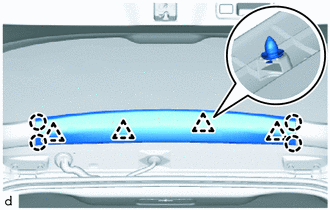
Attach the claw and clip to install the center back door garnish.
85143R
35.INSTALL REAR WIPER MOTOR GROMMET
36.INSTALL REAR WIPER ARM AND BLADE ASSEMBLY
85292A
37.INSTALL REAR WIPER ARM HEAD CAP
38.INSPECT POWER BACK DOOR SYSTEM (w/ Power Back Door)
39.INSPECT POWER BACK DOOR SYSTEM (w/ Easy Closer)