1GD-FTV ENGINE MECHANICAL CYLINDER HEAD GASKET REMOVAL
CAUTION / NOTICE / HINT
The necessary procedures (adjustment, calibration, initialization, or registration) that must be performed after parts are removed, installed, or replaced during the cylinder head gasket removal/installation are shown below.
| Replacement Part or Procedure | Necessary Procedures | Effects/Inoperative when not Performed | Link |
|---|---|---|---|
| Replacement of ECM | ·
Learning values save ·
Learning values write |
Engine starting | ·
( ·
w/ DPF: ( ·
for i-ART: ( |
| Code registration (Immobiliser system) | Engine start function | See the Service Bulletin for the registration method. | |
| Replacement of engine assembly | ·
Injector compensation code registration ·
Pilot quantity learning |
Engine starting | ·
( ·
w/ DPF: ( |
| Clear Crank Time Compensation Data | Engine starting | ·
( ·
w/ DPF: ( ·
for i-ART: ( |
|
| Replacement of crankshaft position sensor plate | Clear Crank Time Compensation Data | Crank time compensation data compensation amount is same as before replacement, affecting crank time compensation data | ·
( ·
w/ DPF: ( ·
for i-ART: ( |
except i-ART:
Replacement of injector assembly |
·
Injector compensation code registration ·
Pilot quantity learning |
Engine starting | ·
( ·
w/ DPF: ( |
·
Replacement of diesel throttle body assembly ·
Replacement of electric EGR control valve assembly ·
Replacement of turbocharger sub-assembly ·
Replacement of turbocharger sub-assembly or turbocharger variable nozzle motor |
Perform initialization | - | ·
( ·
w/ DPF: ( ·
for i-ART: ( |
for AC60F:
Replacement of automatic transmission assembly |
Reset memory | ·
Large shift shock ·
Engine overruns |
( ) |
for AC60F:
Replacement of automatic transmission fluid |
ATF thermal degradation estimate reset | The value of the Data List item "ATF Thermal Degradation Estimate" is not estimated correctly | |
for 4WD:
Front wheel alignment adjustment |
·
Clearing zero point calibration data ·
Yaw rate and acceleration sensor zero point calibration |
VSC malfunctioning | ()
|
- CAUTION:
-
-
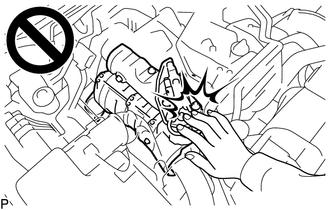
To prevent burns, do not touch the engine, exhaust manifold or other high temperature components while the engine is hot.
- NOTICE:
- ·
When replacing the parts in the following chart (A), replace the No. 1 injection pipe sub-assembly, No. 2 injection pipe sub-assembly and/or fuel inlet pipe sub-assembly with new ones.
Replaced Parts (A) Pipes Requiring New Replacement Injector assembly (including shuffling the injector assemblies between the cylinders) ·No. 1 injection pipe sub-assembly
·No. 2 injection pipe sub-assembly
Supply pump assembly Fuel inlet pipe sub-assembly ·Common rail assembly
·Cylinder block sub-assembly
·Cylinder head sub-assembly
·Cylinder head gasket
·Timing chain case assembly
·No. 1 injection pipe sub-assembly
·No. 2 injection pipe sub-assembly
·Fuel inlet pipe sub-assembly
·After removing the No. 1 injection pipe sub-assembly, No. 2 injection pipe sub-assembly and/or fuel inlet pipe sub-assembly, clean them with a brush and compressed air.
·The injector assembly is a precision instrument. Do not use the injector assembly if it is struck or dropped.
·The supply pump assembly is a precision instrument. Do not use the supply pump assembly if it is struck or dropped.
·Hold the supply pump assembly itself during removal and installation. Do not hold the pre-stroke control valve or fuel pipe, etc.
·Make sure foreign matter does not enter the fuel path.
PROCEDURE

 1.REMOVE CAMSHAFT
11310
2.REMOVE TIMING CHAIN COVER ASSEMBLY
13801
3.REMOVE NO. 1 VALVE ROCKER ARM SUB-ASSEMBLY
13750
4.REMOVE VALVE LASH ADJUSTER ASSEMBLY
11101
5.REMOVE CYLINDER HEAD SUB-ASSEMBLY
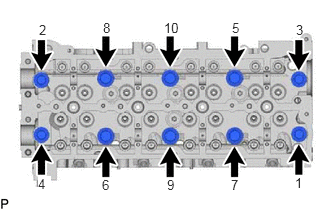
Uniformly loosen the 10 cylinder head set bolts in several passes in the sequence shown in the illustration. Then remove the 10 cylinder head set bolts and 6 cylinder head set bolt spacers.
- NOTICE:
- ·
Cylinder head sub-assembly warpage or cracking could result from removing bolts in the incorrect order.
·Be careful not to drop the cylinder head set bolt spacers into the cylinder head sub-assembly.
Lift the cylinder head sub-assembly from the ring pins on the cylinder block sub-assembly, and place the cylinder head sub-assembly on wooden blocks on a bench.
- NOTICE:
-
Be careful not to damage the contact surfaces of the cylinder head sub-assembly and cylinder block sub-assembly.
- HINT:
-
If the cylinder head sub-assembly is difficult to lift, use a screwdriver to pry between the cylinder head sub-assembly and cylinder block sub-assembly.
11115
6.REMOVE CYLINDER HEAD GASKET
11101A
7.INSPECT CYLINDER HEAD SET BOLT