2KD-FTV COOLING WATER PUMP(When Using the Variable Pin Wrench) REMOVAL
CAUTION / NOTICE / HINT
PROCEDURE

 1. PRECAUTION
- NOTICE:
-
After turning the ignition switch off, waiting time may be required before disconnecting the cable from the battery terminal. Therefore, make sure to read the disconnecting the cable from the battery terminal notice before proceeding with work.
-
Click hereGeneral>INTRODUCTION>REPAIR INSTRUCTION>PRECAUTION
2.DISCONNECT CABLE FROM NEGATIVE BATTERY TERMINAL
- NOTICE:
-
When disconnecting the cable, some systems need to be initialized after the cable is reconnected.
-
Click hereGeneral>INTRODUCTION>REPAIR INSTRUCTION>INITIALIZATION
51410
3.REMOVE NO. 1 ENGINE UNDER COVER ASSEMBLY
4.DRAIN ENGINE COOLANT
16571C
5.REMOVE NO. 1 RADIATOR HOSE
44360
6.DISCONNECT VANE PUMP OIL RESERVOIR ASSEMBLY
44369A
7.REMOVE OIL RESERVOIR BRACKET
16470
8.REMOVE RADIATOR RESERVOIR
16711
9.REMOVE FAN SHROUD
88320
10.DISCONNECT COOLER COMPRESSOR ASSEMBLY
11.REMOVE NO. 2 IDLE PULLEY ASSEMBLY
27020
12.REMOVE GENERATOR ASSEMBLY
12511C
13.REMOVE GENERATOR BRACKET
16620
14.REMOVE V-RIBBED BELT TENSIONER ASSEMBLY
11322A
15.REMOVE NO. 1 TIMING BELT COVER
13568
16.REMOVE TIMING BELT
13505
17.REMOVE NO. 1 TIMING BELT IDLER SUB-ASSEMBLY
13523
18.REMOVE CAMSHAFT TIMING PULLEY
Install SST (pin 7.5) to SST (variavle pin wrench arm assembly).
- SST
- 09960-10010 (09962-01000)
09963-00750
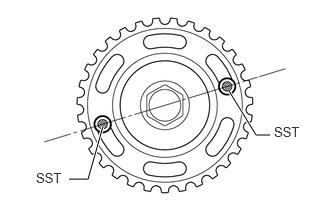
Set SST to the holes of the camshaft timing pulley.
- HINT:
-
Securely insert SST into the holes of the camshaft timing pulley so that SST is aligned with the center of the camshaft timing pulley set bolt.
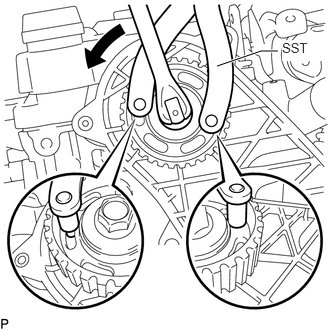

|
Turn |
While holding SST, remove the camshaft timing pulley set bolt.
Remove the bolt and camshaft timing pulley from the intake camshaft sub-assembly.
11322B
19.REMOVE NO. 2 TIMING BELT COVER
16100
20.REMOVE ENGINE WATER PUMP ASSEMBLY
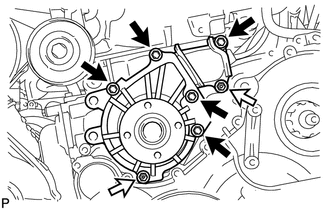
|
|
Bolt |

|
Nut |
Remove the 5 bolts, 2 nuts, engine water pump assembly and gasket.