INTERIOR PANELS / TRIM UPPER INSTRUMENT PANEL INSTALLATION
CAUTION / NOTICE / HINT
- HINT:
- ·
Use the same procedure for RHD and LHD vehicles.
·The procedure listed below is for LHD vehicles.
·A bolt without a torque specification is shown in the standard bolt chart (See page General>SPECIFICATIONS>STANDARD BOLT>SPECIFIED TORQUE FOR STANDARD BOLTS).
PROCEDURE

 1.INSTALL UPPER INSTRUMENT PANEL SUB-ASSEMBLY
for LHD:
for Automatic Air Conditioning System:
Connect the connector.
Attach the 5 guides and 6 claws to install the upper instrument panel.
Install the 4 screws <A>.
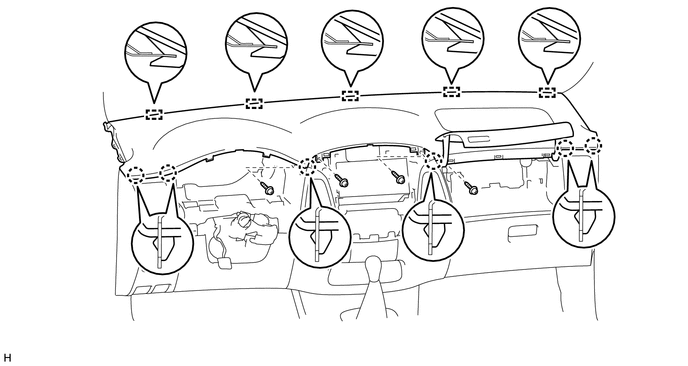
| *1 | Screw <A> | - | - |
for RHD:
Connect the connector.
Attach the 5 guides and 6 claws to install the upper instrument panel.
Install the 4 screws <A>.
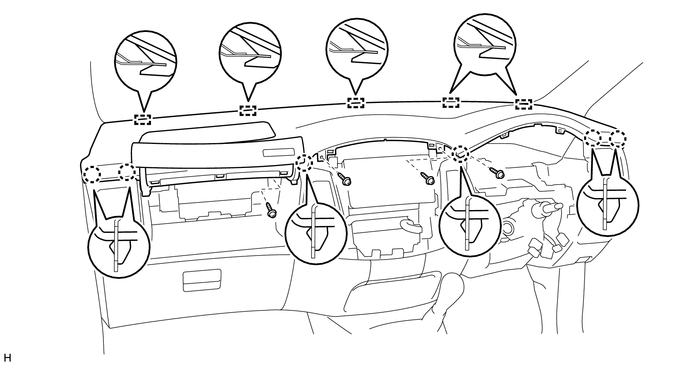
| *1 | Screw <A> | - | - |
2.INSTALL INSTRUMENT PANEL PASSENGER AIRBAG ASSEMBLY
3.INSTALL FRONT PILLAR GARNISH LH
Attach the 3 clips to install the front pillar garnish.
Install the front door opening trim.
4.INSTALL FRONT PILLAR GARNISH RH
- HINT:
-
Use the same procedure described for the LH side.
5.INSTALL LOWER FRONT PILLAR GARNISH LH
6.INSTALL LOWER FRONT PILLAR GARNISH RH
7.INSTALL INSTRUMENT PANEL FINISH PLATE
Attach the 6 claws to install the instrument finish plate.
8.INSTALL CENTER INSTRUMENT CLUSTER FINISH PANEL ASSEMBLY
for Manual Air Conditioning System:
Connect the connectors.
Attach the 4 claws to connect the air conditioning control.
Attach the 9 claws to install the center instrument cluster finish panel.
for Automatic Air Conditioning System:
Connect the connectors.
Attach the 9 claws to install the center instrument cluster finish panel.
9.INSTALL CENTER LOWER INSTRUMENT CLUSTER FINISH PANEL
Attach the 3 claws and 2 clips to install the center lower instrument cluster finish panel.
10.INSTALL COMBINATION METER ASSEMBLY
11.INSTALL NO. 1 INSTRUMENT CLUSTER FINISH PANEL
w/ Light Control Rheostat:
Connect the connector.
Attach the 9 claws to install the No. 1 instrument cluster finish panel.
Install the clip <B>.
12.INSTALL HEADLIGHT DIMMER SWITCH ASSEMBLY
13.INSTALL LOWER INSTRUMENT CLUSTER FINISH PANEL
Attach the 7 claws to install the lower instrument cluster finish panel.
14.CONNECT CABLE TO NEGATIVE BATTERY TERMINAL
- NOTICE:
-
When disconnecting the cable, some systems need to be initialized after the cable is reconnected (See page General>INTRODUCTION>REPAIR INSTRUCTION>INITIALIZATION).
15.CHECK SRS WARNING LIGHT