Home › Engine / Hybrid System › 2TR-FE (ENGINE CONTROL) › SFI SYSTEM › 2015.06–2017.08
RM27T0E _51 Engine / Hybrid System _053656 2TR-FE ENGINE CONTROL _0260420 SFI SYSTEM J

2TR-FE ENGINE CONTROL  SFI SYSTEM  Fuel Pump Control Circuit  


DESCRIPTION

When the engine is cranked, current flows from terminal ST1 of the ignition switch to the starter relay coil and current also flows to terminal STA of the ECM (STA signal).

When the STA signal and NE signal are input to the ECM, Tr is turned on, current flows to the coil of the circuit opening relay, the relay switches on, power is supplied to the fuel pump and the fuel pump operates.

While the NE signal is generated (engine running), the ECM keeps Tr on (circuit opening relay on) and the fuel pump continues operating.

WIRING DIAGRAM
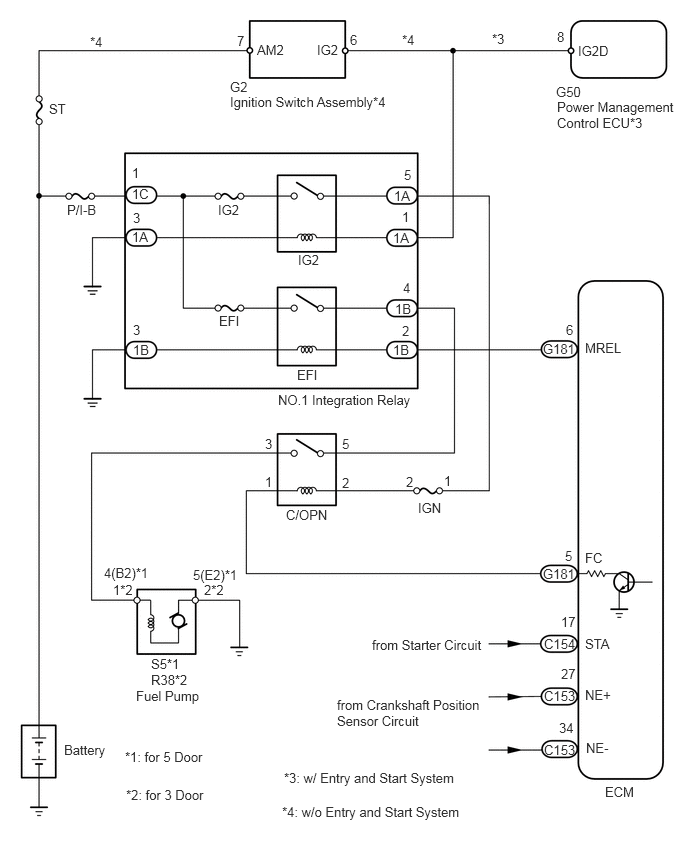
A357166E02
0.667,7.729 1.219,7.906 0.552,0.177 10 false Battery 1.573,6.833 2.115,6.99 0.542,0.156 10 false S5*1 1.573,7 2.094,7.146 0.521,0.146 10 false R38*2 1.417,7.167 2.448,7.406 1.031,0.24 10 false Fuel Pump 1.302,7.802 2.458,8.01 1.156,0.208 10 false *1: for 5 Door 1.313,8.198 2.469,8.438 1.156,0.24 10 false *2: for 3 Door 2.958,8.021 5.365,8.219 2.406,0.198 10 false *3: w/ Entry and Start System 2.938,8.375 5.333,8.708 2.396,0.333 10 false *4: w/o Entry and Start System 3.875,6.635 5.573,6.906 1.698,0.271 10 false from Starter Circuit 3.51,7.26 5.156,7.76 1.646,0.5 10 false from Crankshaft Position Sensor Circuit 5.667,7.729 6.052,7.938 0.385,0.208 10 false C153 5.667,7.167 6.052,7.375 0.385,0.208 10 false C153 5.667,6.625 6.042,6.813 0.375,0.188 10 false C154 5.823,7.5 6.052,7.667 0.229,0.167 10 false 34 5.844,6.938 6.083,7.125 0.24,0.188 10 false 27 5.844,6.396 6.042,6.583 0.198,0.188 10 false 17 5.656,5.896 6.052,6.073 0.396,0.177 10 false G181 5.885,5.708 6.052,5.875 0.167,0.167 10 false 5 6.094,5.729 6.354,5.885 0.26,0.156 10 false FC 2.125,6.063 2.438,6.24 0.313,0.177 10 false 2*2 1.177,6.063 1.469,6.24 0.292,0.177 10 false 1*2 2.01,5.906 2.625,6.135 0.615,0.229 10 false 5(E2)*1 1.083,5.885 1.74,6.104 0.656,0.219 10 false 4(B2)*1 2.979,5.281 3.542,5.469 0.563,0.188 10 false C/OPN 2.76,4.938 2.896,5.146 0.135,0.208 10 false 1 3.563,4.948 3.76,5.177 0.198,0.229 10 false 2 2.76,4.542 2.917,4.719 0.156,0.177 10 false 3 3.563,4.542 3.729,4.74 0.167,0.198 10 false 5 4.354,5.208 4.688,5.365 0.333,0.156 10 false IGN 4.229,4.938 4.365,5.125 0.135,0.188 10 false 2 4.625,4.927 4.76,5.104 0.135,0.177 10 false 1 6.094,3.542 6.635,3.708 0.542,0.167 10 false MREL 5.656,3.552 6.042,3.719 0.385,0.167 10 false G181 5.896,3.354 6.073,3.563 0.177,0.208 10 false 6 4.094,3.563 4.344,3.729 0.25,0.167 10 false 1B 4.188,3.365 4.323,3.531 0.135,0.167 10 false 2 4.115,3.135 4.354,3.302 0.24,0.167 10 false 1B 4.198,2.917 4.344,3.104 0.146,0.188 10 false 4 3.094,3.823 3.375,4.021 0.281,0.198 10 false EFI 1.385,3.563 1.646,3.719 0.26,0.156 10 false 1B 1.385,3.354 1.542,3.51 0.156,0.156 10 false 3 2.281,3.26 2.542,3.406 0.26,0.146 10 false EFI 3.104,2.625 3.385,2.802 0.281,0.177 10 false IG2 4.094,2.396 4.385,2.573 0.292,0.177 10 false 1A 4.188,2.177 4.333,2.344 0.146,0.167 10 false 1 4.104,1.958 4.344,2.104 0.24,0.146 10 false 1A 4.208,1.74 4.385,1.917 0.177,0.177 10 false 5 2.271,2.104 2.594,2.271 0.323,0.167 10 false IG2 1.375,2.385 1.615,2.563 0.24,0.177 10 false 1A 1.385,2.188 1.531,2.354 0.146,0.167 10 false 3 1.375,1.938 1.667,2.115 0.292,0.177 10 false 1C 1.375,1.719 1.542,1.927 0.167,0.208 10 false 1 2.896,4.083 4.625,4.292 1.729,0.208 10 false NO.1 Integration Relay 0.698,2.104 1.094,2.25 0.396,0.146 10 false P/I-B 0.51,1.052 0.76,1.198 0.25,0.146 10 false ST 2.469,0.344 2.677,0.573 0.208,0.229 10 false 7 2.677,0.438 3.083,0.594 0.406,0.156 10 false AM2 3.302,0.438 3.594,0.604 0.292,0.167 10 false IG2 3.646,0.333 3.802,0.521 0.156,0.188 10 false 6 2.396,0.823 2.677,1.01 0.281,0.188 10 false G2 2.396,0.979 4.313,1.167 1.917,0.188 10 false Ignition Switch Assembly*4 6.021,0.448 6.406,0.635 0.385,0.188 10 false IG2D 5.802,0.302 5.948,0.469 0.146,0.167 10 false 8 5.792,0.875 6.135,1.052 0.344,0.177 10 false G50 5.802,1.031 7.156,1.385 1.354,0.354 10 false Power Management Control ECU*3 6.302,8.167 6.708,8.323 0.406,0.156 10 false ECM 6.094,6.625 6.458,6.792 0.365,0.167 10 false STA 6.094,7.156 6.458,7.354 0.365,0.198 10 false NE+ 6.104,7.708 6.469,7.896 0.365,0.188 10 false NE- 0.938,0.354 1.208,0.521 0.271,0.167 10 false *4 4.188,0.333 4.438,0.521 0.25,0.188 10 false *4 5.125,0.323 5.427,0.521 0.302,0.198 10 false *3

CAUTION / NOTICE / HINT

NOTICE:

Inspect the fuses for circuits related to this system before performing the following inspection procedure.


PROCEDURE

1.PERFORM ACTIVE TEST USING GTS (OPERATE C/OPN RELAY)
a.

Connect the GTS to the DLC3.


b.

Turn the ignition switch to ON.


c.

Turn the tester on.


d.

Enter the following menus: Powertrain / Engine and ECT / Active Test / Control the Fuel Pump / Speed.


e.

Check whether the fuel pump operation sound occurs when performing the Active Test on the tester.

OK:

Fuel pump operating sound occurs.


OK

PROCEED TO NEXT SUSPECTED AREA SHOWN IN PROBLEM SYMPTOMS TABLE

NG

2.INSPECT CIRCUIT OPENING RELAY (C/OPN)
a.

Inspect the circuit opening relay (C/OPN) (See page Engine / Hybrid System>2TR-FE (ENGINE CONTROL)>RELAY>ON-VEHICLE INSPECTION).


OK

3.CHECK HARNESS AND CONNECTOR (C/OPN RELAY - ECM)

NG

REPLACE CIRCUIT OPENING RELAY (C/OPN)

3.CHECK HARNESS AND CONNECTOR (C/OPN RELAY - ECM)
a.

Disconnect the ECM connector.


b.

Remove the C/OPN relay from the engine room relay block.


c.

Measure the resistance according to the value(s) in the table below.

Standard Resistance:
Tester Connection Condition Specified Condition
C/OPN relay terminal 1 - G181-5 (FC) Always Below 1 Ω
C/OPN relay terminal 1 or G181-5 (FC) - Body ground Always 10 kΩ or higher


OK

4.CHECK HARNESS AND CONNECTOR (C/OPN RELAY - NO. 1 INTEGRATION RELAY (EFI RELAY, IG2 RELAY))

NG

REPAIR OR REPLACE HARNESS OR CONNECTOR (C/OPN RELAY - ECM)

4.CHECK HARNESS AND CONNECTOR (C/OPN RELAY - NO. 1 INTEGRATION RELAY (EFI RELAY, IG2 RELAY))
a.

Remove the NO. 1 integration relay from the engine room relay block.


b.

Remove the C/OPN relay from the engine room relay block.


c.

Measure the resistance according to the value(s) in the table below.

Standard Resistance:
Tester Connection Condition Specified Condition
C/OPN relay terminal 5 - 1B-4 Always Below 1 Ω
C/OPN relay terminal 2 - 1A-5 Always Below 1 Ω
C/OPN relay terminal 5 or 1B-4 - Body ground Always 10 kΩ or higher
C/OPN relay terminal 2 or 1A-5 - Body ground Always 10 kΩ or higher


OK

5.CHECK HARNESS AND CONNECTOR (C/OPN RELAY - FUEL PUMP)

NG

REPAIR OR REPLACE HARNESS OR CONNECTOR (C/OPN RELAY - NO. 1 INTEGRATION RELAY (EFI MAIN RELAY, IG2 RELAY))

5.CHECK HARNESS AND CONNECTOR (C/OPN RELAY - FUEL PUMP)
a.

Disconnect the fuel pump connector.


b.

Remove the C/OPN relay from the engine room relay block.


c.

Measure the resistance according to the value(s) in the table below.

Standard Resistance:
for 5 Door
Tester Connection Condition Specified Condition
C/OPN relay terminal 3 - S5-4 (B2) Always Below 1 Ω
C/OPN relay terminal 3 or S5-4 (B2) - Body ground Always 10 kΩ or higher

for 3 Door
Tester Connection Condition Specified Condition
C/OPN relay terminal 3 - R38-1 Always Below 1 Ω
C/OPN relay terminal 3 or R38-1 - Body ground Always 10 kΩ or higher


OK

6.CHECK HARNESS AND CONNECTOR (FUEL PUMP - BODY GROUND)

NG

REPAIR OR REPLACE HARNESS OR CONNECTOR (C/OPN RELAY - FUEL PUMP)

6.CHECK HARNESS AND CONNECTOR (FUEL PUMP - BODY GROUND)
a.

Disconnect the fuel pump connector.


b.

Measure the resistance according to the value(s) in the table below.

Standard Resistance:
for 5 Door
Tester Connection Condition Specified Condition
S5-5 (E2) - Body ground Always Below 1 Ω

for 3 Door
Tester Connection Condition Specified Condition
R38-2 - Body ground Always Below 1 Ω


OK

7.INSPECT FUEL PUMP

NG

REPAIR OR REPLACE HARNESS OR CONNECTOR (FUEL PUMP - BODY GROUND)

7.INSPECT FUEL PUMP
a.

Inspect the fuel pump.


Result:
Result Proceed to
OK A
NG (for 5 Door) B
NG (for 3 Door) C


A

8.CHECK ECM POWER SOURCE CIRCUIT

B

C

8.CHECK ECM POWER SOURCE CIRCUIT

OK

NG

REPAIR OR REPLACE ECM POWER SOURCE CIRCUIT