Home › Engine / Hybrid System › 5L-E (ENGINE CONTROL) › ECD SYSTEM
RM27T0E _51 Engine / Hybrid System _053658 5L-E ENGINE CONTROL _0260445 ECD SYSTEM J

5L-E ENGINE CONTROL  ECD SYSTEM  Pre-heating Control Circuit  


DESCRIPTION

When the ignition switch is turned to ON, the ECM calculates the glow indicator lighting time/heating corresponding to the coolant temperature at that time and turns on the glow indicator light/glow plug relay (GLOW).

As ceramic is used for glow plug assembly material, current control is not performed.
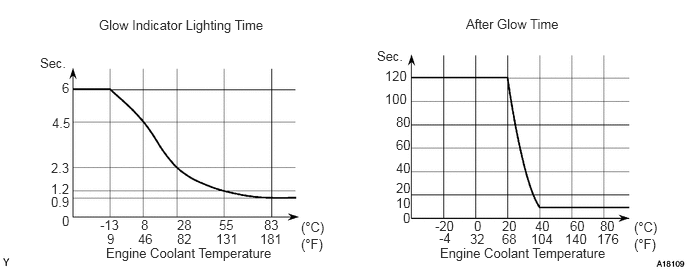
A018109E03
1.031,0.177 2.927,0.385 1.896,0.208 10 false Glow Indicator Lighting Time 4.854,0.167 6.167,0.375 1.313,0.208 10 false After Glow Time 0.417,0.573 0.792,0.771 0.375,0.198 10 false Sec. 3.927,0.5 4.302,0.698 0.375,0.198 10 false Sec. 0.646,0.833 0.771,1.031 0.125,0.198 10 false 6 0.646,2.219 0.771,2.417 0.125,0.198 10 false 0 0.542,1.198 0.802,1.396 0.26,0.198 10 false 4.5 0.531,1.667 0.792,1.865 0.26,0.198 10 false 2.3 0.531,1.885 0.792,2.083 0.26,0.198 10 false 1.2 0.531,2.021 0.792,2.219 0.26,0.198 10 false 0.9 1.042,2.26 1.313,2.458 0.271,0.198 10 false -13 1.115,2.406 1.229,2.604 0.115,0.198 10 false 9 1.469,2.26 1.583,2.458 0.115,0.198 10 false 8 1.438,2.406 1.646,2.604 0.208,0.198 10 false 46 1.844,2.26 2.052,2.458 0.208,0.198 10 false 28 1.844,2.406 2.052,2.604 0.208,0.198 10 false 82 2.281,2.26 2.49,2.458 0.208,0.198 10 false 55 2.75,2.26 2.958,2.458 0.208,0.198 10 false 83 2.25,2.406 2.563,2.604 0.313,0.198 10 false 131 2.708,2.406 3.021,2.604 0.313,0.198 10 false 181 1.104,2.552 3.271,2.75 2.167,0.198 10 false Engine Coolant Temperature 4.583,2.552 6.75,2.75 2.167,0.198 10 false Engine Coolant Temperature 4.01,0.708 4.354,0.906 0.344,0.198 10 false 120 4.01,0.948 4.354,1.146 0.344,0.198 10 false 100 4.125,1.188 4.344,1.385 0.219,0.198 10 false 80 4.125,1.427 4.344,1.625 0.219,0.198 10 false 60 4.125,1.667 4.344,1.865 0.219,0.198 10 false 40 4.125,1.875 4.344,2.073 0.219,0.198 10 false 20 4.125,2.031 4.344,2.229 0.219,0.198 10 false 10 4.198,2.188 4.323,2.385 0.125,0.198 10 false 0 4.531,2.271 4.802,2.469 0.271,0.198 10 false -20 4.573,2.396 4.75,2.594 0.177,0.198 10 false -4 4.938,2.271 5.063,2.469 0.125,0.198 10 false 0 4.896,2.406 5.115,2.604 0.219,0.198 10 false 32 5.229,2.271 5.448,2.469 0.219,0.198 10 false 20 5.229,2.406 5.448,2.604 0.219,0.198 10 false 68 5.573,2.271 5.792,2.469 0.219,0.198 10 false 40 5.938,2.271 6.156,2.469 0.219,0.198 10 false 60 6.25,2.271 6.469,2.469 0.219,0.198 10 false 80 5.531,2.406 5.844,2.604 0.313,0.198 10 false 104 5.885,2.406 6.198,2.604 0.313,0.198 10 false 140 6.219,2.406 6.531,2.604 0.313,0.198 10 false 176 3.135,2.458 3.51,2.635 0.375,0.177 10 false (°F) 3.135,2.281 3.521,2.458 0.385,0.177 10 false (°C) 6.604,2.458 6.979,2.635 0.375,0.177 10 false (°F) 6.604,2.281 6.99,2.458 0.385,0.177 10 false (°C)

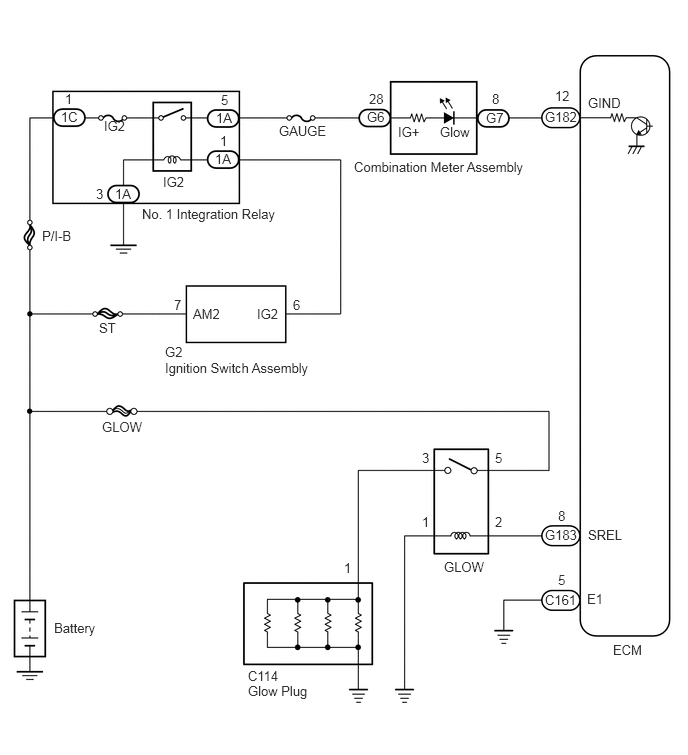
WIRING DIAGRAM

A269539E03
1.031,3.333 1.354,3.521 0.323,0.188 10 false ST 6.125,0.99 6.667,1.177 0.542,0.188 10 false GIND 2.01,3.188 2.479,3.385 0.469,0.198 10 false AM2 0.438,2.375 0.865,2.563 0.427,0.188 10 false P/I-B 6.385,6.688 6.802,6.917 0.417,0.229 10 false ECM 1.813,3.094 1.958,3.271 0.146,0.177 10 false 7 3.052,3.094 3.219,3.24 0.167,0.146 10 false 6 0.563,6.458 1.229,6.635 0.667,0.177 10 false Battery 0.677,0.948 0.854,1.094 0.177,0.146 10 false 1 1.083,1.229 1.406,1.417 0.323,0.188 10 false IG2 0.635,1.135 0.875,1.281 0.24,0.146 10 false 1C 1.479,2.146 3.021,2.375 1.542,0.229 10 false No. 1 Integration Relay 3.688,1.656 5.667,1.865 1.979,0.208 10 false Combination Meter Assembly 2.906,1.281 3.51,1.521 0.604,0.24 10 false GAUGE 2.677,3.188 3.01,3.375 0.333,0.188 10 false IG2 2.302,0.958 2.479,1.104 0.177,0.146 10 false 5 2.25,1.146 2.49,1.292 0.24,0.146 10 false 1A 2.292,1.385 2.469,1.531 0.177,0.146 10 false 1 2.24,1.573 2.479,1.719 0.24,0.146 10 false 1A 5.125,0.948 5.302,1.125 0.177,0.177 10 false 8 5.063,1.146 5.302,1.292 0.24,0.146 10 false G7 3.844,0.948 4.021,1.094 0.177,0.146 10 false 28 3.823,1.135 4.063,1.281 0.24,0.146 10 false G6 1,1.938 1.177,2.115 0.177,0.177 10 false 3 1.198,1.938 1.438,2.083 0.24,0.146 10 false 1A 5.781,0.917 6.073,1.104 0.292,0.188 10 false 12 5.677,5.49 6.052,5.667 0.375,0.177 10 false G183 5.677,6.167 6.052,6.344 0.375,0.177 10 false C161 1.698,1.813 2.021,1.99 0.323,0.177 10 false IG2 4.146,1.292 4.479,1.469 0.333,0.177 10 false IG+ 4.583,1.292 5,1.469 0.417,0.177 10 false Glow 1.719,3.75 3.438,3.99 1.719,0.24 10 false Ignition Switch Assembly 1.719,3.583 2.188,3.781 0.469,0.198 10 false G2 1.063,4.365 1.667,4.552 0.604,0.188 10 false GLOW 4.625,5.823 5.229,6.01 0.604,0.188 10 false GLOW 2.583,7.115 3.438,7.302 0.854,0.188 10 false Glow Plug 2.583,6.958 3.188,7.146 0.604,0.188 10 false C114 6.125,5.49 6.594,5.667 0.469,0.177 10 false SREL 5.813,5.292 6.104,5.479 0.292,0.188 10 false 8 5.813,5.958 6.01,6.146 0.198,0.188 10 false 5 5.677,1.135 6.083,1.313 0.406,0.177 10 false G182 5.156,4.688 5.333,4.875 0.177,0.188 10 false 5 5.156,5.354 5.333,5.542 0.177,0.188 10 false 2 4.396,5.354 4.573,5.542 0.177,0.188 10 false 1 4.396,4.688 4.573,4.875 0.177,0.188 10 false 3 3.583,5.833 3.76,6.021 0.177,0.188 10 false 1 6.115,6.156 6.354,6.344 0.24,0.188 10 false E1

CAUTION / NOTICE / HINT

NOTICE:

Inspect the fuses for circuits related to this system before performing the following inspection procedure.


PROCEDURE

1.CHECK GLOW INDICATOR LIGHT
a.

Turn the ignition switch to ON.


b.

Check that the glow indicator light comes on.

OK:

The glow indicator light remains on for 0.5 seconds or more, and then goes off.


OK

2.CHECK GLOW PLUG ASSEMBLY (INSTALLATION)

NG

10.CHECK ECM (GIND VOLTAGE)
2.CHECK GLOW PLUG ASSEMBLY (INSTALLATION)
a.

Check that the glow plug assembly and glow plug wire are securely installed.

OK:

The glow plug assembly and glow plug wire are securely installed.


OK

3.INSPECT GLOW PLUG ASSEMBLY (RESISTANCE)

NG

TIGHTEN GLOW PLUG ASSEMBLY

3.INSPECT GLOW PLUG ASSEMBLY (RESISTANCE)
a.


OK

4.CHECK INDICATOR LIGHTING TIME AND AFTER GLOW TIME

NG

REPLACE GLOW PLUG ASSEMBLY

4.CHECK INDICATOR LIGHTING TIME AND AFTER GLOW TIME

OK

5.READ OUTPUT DTC

NG

5.READ OUTPUT DTC
a.

Connect the GTS to the DLC3.


b.

Turn the ignition switch to ON and turn the GTS on.


c.

Enter the following menus: Powertrain / Engine and ECT / DTC.


d.

Read the DTCs (See page Engine / Hybrid System>5L-E (ENGINE CONTROL)>ECD SYSTEM>DTC CHECK / CLEAR).

Result
Result Proceed to
DTC is not output A
DTC is output B


A

6.INSPECT GLOW RELAY ASSEMBLY

B

6.INSPECT GLOW RELAY ASSEMBLY
a.

Inspect the glow plug relay (GLOW) (See page Engine / Hybrid System>5L-E (STARTING)>RELAY>ON-VEHICLE INSPECTION).


OK

7.CHECK ECM (SREL VOLTAGE)

NG

REPLACE GLOW PLUG RELAY (GLOW)

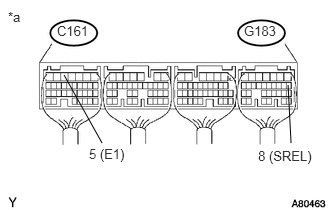
7.CHECK ECM (SREL VOLTAGE)
a.
U169072E02
0.667,0.781 1.063,1.49 false 3,0.885 3.031,1.49 false 0.594,0.24 0.979,0.438 0.385,0.198 10 false C161 0.927,1.521 1.375,1.719 0.448,0.198 10 false 5 (E1) 2.688,1.542 3.333,1.74 0.646,0.198 10 false 8 (SREL) 0.083,0.094 0.271,0.292 0.188,0.198 10 false *a 2.542,0.24 2.927,0.438 0.385,0.198 10 false G183

Turn the ignition switch to the start position.


b.

Measure the voltage according to the value(s) in the table below.

Standard Voltage:
Tester Connection Condition Specified Condition
G183-8 (SREL) - C161-5 (E1) Cranking 11 to 14 V


Text in Illustration
*a Component with harness connected
(ECM)


OK

8.CHECK HARNESS AND CONNECTOR (GLOW RELAY - ECM AND BODY GROUND)

NG

8.CHECK HARNESS AND CONNECTOR (GLOW RELAY - ECM AND BODY GROUND)
a.

Disconnect the ECM connector.


b.

Remove the glow relay from the engine room relay block.


c.

Measure the resistance according to the value(s) in the table below.

Standard Resistance:
Tester Connection Condition Specified Condition
G183-8 (SREL) - Relay block glow relay terminal 2 Always Below 1 Ω
Relay block glow relay terminal 1 - Body ground Always Below 1 Ω
G183-8 (SREL) or relay block glow relay terminal 2 - Body ground Always 10 kΩ or higher


d.

Reconnect the ECM connector.


e.

Reinstall the glow relay.


OK

9.CHECK HARNESS AND CONNECTOR (GLOW PLUG RELAY (GLOW) - GLOW PLUG ASSEMBLY AND BATTERY)

NG

REPAIR OR REPLACE HARNESS OR CONNECTOR

9.CHECK HARNESS AND CONNECTOR (GLOW PLUG RELAY (GLOW) - GLOW PLUG ASSEMBLY AND BATTERY)
a.

Disconnect the cable from the negative (-) battery terminal.


b.

Disconnect the cable from the positive (+) battery terminal.


c.

Remove the glow relay from the engine room relay block.


d.

Disconnect the glow plug wire.


e.

Measure the resistance according to the value(s) in the table below.

Standard Resistance:
Tester Connection Condition Specified Condition
Relay block glow relay terminal 3 - C114-1 Always Below 1 Ω
Relay block glow relay terminal 5 - Positive (+) battery terminal Always Below 1 Ω


NOTICE:

After reconnecting the battery cable, the radio and clock need to be adjusted as they were previously.


f.

Reinstall the glow relay.


g.

Reconnect the glow plug wire.


h.

Reconnect the cable to the positive (+) battery terminal.


i.

Reconnect the cable to the negative (-) battery terminal.


OK

PROCEED TO NEXT SUSPECTED AREA SHOWN IN PROBLEM SYMPTOMS TABLE

NG

REPAIR OR REPLACE HARNESS OR CONNECTOR

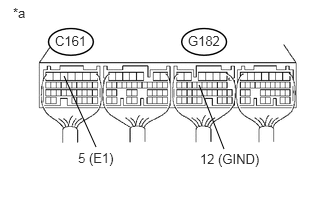
10.CHECK ECM (GIND VOLTAGE)
a.
U169092E02
0.667,0.792 1,1.531 false 2.073,0.885 2.333,1.552 false 1.958,0.344 2.396,0.51 0.438,0.167 10 false G182 0.135,0.052 0.365,0.219 0.229,0.167 10 false *a 2.083,1.573 2.781,1.76 0.698,0.188 10 false 12 (GIND) 0.813,1.563 1.438,1.75 0.625,0.188 10 false 5 (E1) 0.573,0.344 1.01,0.51 0.438,0.167 10 false C161

Disconnect the ECM connector.


b.

Turn the ignition switch to ON.


c.

Measure the voltage according to the value(s) in the table below.

Standard Voltage:
Tester Connection Switch Condition Specified Condition
G182-12 (GIND) - C161-5 (E1) Ignition switch ON 11 to 14 V


Text in Illustration
*a Rear view of wire harness connector
(to ECM)


d.

Reconnect the ECM connector.


OK

NG

11.CHECK HARNESS AND CONNECTOR (ECM - COMBINATION METER ASSEMBLY)
a.

Disconnect the combination meter assembly connector.


b.

Disconnect the ECM connector.


c.

Measure the resistance according to the value(s) in the table below.

Standard Resistance:
Tester Connection Condition Specified Condition
G7-8 - G182-12 (GIND) Always Below 1 Ω


d.

Reconnect the combination meter assembly connector.


e.

Reconnect the ECM connector.


OK

12.CHECK HARNESS AND CONNECTOR (COMBINATION METER ASSEMBLY - BATTERY)

NG

REPAIR OR REPLACE HARNESS OR CONNECTOR

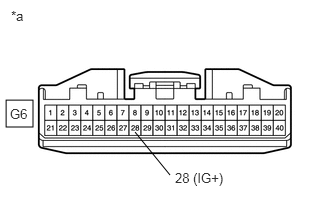
12.CHECK HARNESS AND CONNECTOR (COMBINATION METER ASSEMBLY - BATTERY)
a.
A241244E01
0.063,1.042 0.344,1.323 0.281,0.281 1.406,1.375 1.771,1.823 false 1.823,1.771 2.49,2.021 0.667,0.25 10 false 28 (IG+) 0.115,0.083 0.375,0.292 0.26,0.208 10 false *a 0.104,1.104 0.365,1.313 0.26,0.208 10 false G6

Disconnect the combination meter assembly connector.


b.

Turn the ignition switch to ON.


c.

Measure the voltage according to the value(s) in the table below.

Standard Voltage:
Tester Connection Switch Condition Specified Condition
G6-28 - Body ground Ignition switch ON 11 to 14 V


Text in Illustration
*a Front view of wire harness connector
(to Combination Meter Assembly)


d.

Reconnect the combination meter assembly connector.


OK

REPLACE COMBINATION METER ASSEMBLY

NG

REPAIR OR REPLACE HARNESS OR CONNECTOR