1KD-FTV ENGINE CONTROL ECD SYSTEM P0724 Brake Switch "B" Circuit High
DESCRIPTION
This DTC indicates that the stop light switch remains on. When the stop light switch remains on during GO and STOP driving, the ECM interprets this as a fault in the stop light switch. Then the MIL illuminates and the ECM stores the DTC.
| DTC Detection Drive Pattern | DTC Detection Condition | Trouble Area |
|---|---|---|
| Accelerate the vehicle to 30 km/h (19 mph) or more, depress the brake pedal and decelerate the vehicle to 3 km/h (1.8 mph) or less 5 times. | Stop light switch remains on even when vehicle is driven in GO (30 km/h (19 mph) or more) and STOP (less than 3 km/h (1.8 mph)) pattern 5 times (2 trip detection logic). | ·
Short in stop light switch signal circuit ·
Stop light switch assembly ·
ECM |
| DTC No. | Data List |
|---|---|
| P0724 | Stop Light Switch |
WIRING DIAGRAM
Refer to DTC P0504 (See page Engine / Hybrid System>1KD-FTV (ENGINE CONTROL)>ECD SYSTEM>P0504).
CAUTION / NOTICE / HINT
- NOTICE:
-
After replacing the ECM, the new ECM needs registration (See page Engine / Hybrid System>1KD-FTV (ENGINE CONTROL)>ECD SYSTEM>REGISTRATION) and initialization (See page Engine / Hybrid System>1KD-FTV (ENGINE CONTROL)>ECD SYSTEM>INITIALIZATION).
- HINT:
-
Read freeze frame data using the intelligent tester. Freeze frame data records the engine condition when malfunctions are detected. When troubleshooting, freeze frame data can help determine if the vehicle was moving or stationary, if the engine was warmed up or not, and other data from the time the malfunction occurred.
PROCEDURE
Connect the intelligent tester to the DLC3.
Turn the ignition switch to ON.
Enter the following menus: Powertrain / Engine and ECT / Data List / Stop Light Switch.
Read the value displayed on the tester when the brake pedal is depressed and released.
- OK:
Brake Pedal Display Released OFF Depressed ON
OK
NG
Check the stop light switch assembly installation (See page Vehicle Exterior>LIGHTING (EXT)>STOP LIGHT SWITCH>INSTALLATION).
OK
NG
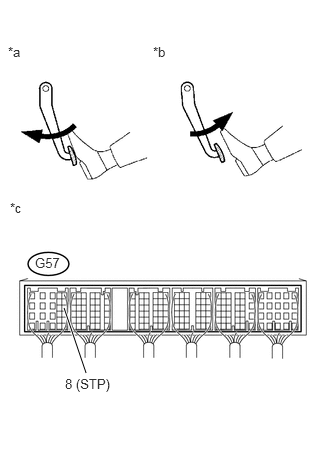
Disconnect the ECM connector.
Turn the ignition switch to ON.
Measure the voltage according to the value(s) in the table below.
- Standard Voltage:
Tester Connection Brake Pedal Condition Specified Condition G57-8 (STP) - Body ground Released 0 to 3 V Depressed 11 to 14 V
| *a | Brake pedal depressed |
| *b | Brake pedal released |
| *c | Component with harness connected
(ECM) |
Reconnect the ECM connector.
OK
NG
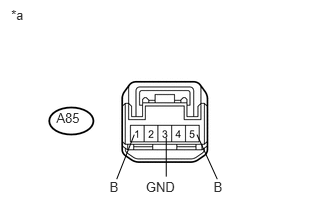
Disconnect the stop light switch connector.
Measure the voltage according to the value(s) in the table below.
- Standard Voltage:
Tester Connection Condition Specified Condition A85-1 (B) - Body ground Always 11 to 14 V A85-5 (B) - Body ground Ignition switch ON 11 to 14 V
Measure the resistance according to the value(s) in the table below.
- Standard Resistance:
Tester Connection Condition Specified Condition A85-3 (GND) - Body ground Always Below 1 Ω
| *a | Front view of wire harness connector
(to Stop Light Switch) |
Reconnect the stop light switch assembly connector.
OK
NG
Disconnect the stop light switch assembly connector.
Disconnect the ECM connector.
Measure the resistance according to the value(s) in the table below.
- Standard Resistance (Check for Open):
Tester Connection Condition Specified Condition A85-2 (L) - G57-8 (STP) Always Below 1 Ω A85-4 (L) - G57-9 (ST1-) Always Below 1 Ω
- Standard Resistance (Check for Short):
Tester Connection Condition Specified Condition A85-2 (L) or G57-8 (STP) - Body ground Always 10 kΩ or higher A85-4 (L) or G57-9 (ST1-) - Body ground Always 10 kΩ or higher
Reconnect the stop light switch assembly connector.
Reconnect the ECM connector.
OK
NG
Replace the stop light switch assembly (See page Vehicle Exterior>LIGHTING (EXT)>STOP LIGHT SWITCH>REMOVAL).
NEXT
Replace the ECM (See page Engine / Hybrid System>1KD-FTV (ENGINE CONTROL)>ECM>REMOVAL).
NEXT
Securely reinstall the stop light switch assembly (See page Vehicle Exterior>LIGHTING (EXT)>STOP LIGHT SWITCH>INSTALLATION).
NEXT
Repair or replace the harness or connector.
NEXT
Connect the intelligent tester to the DLC3.
Clear the DTCs (See page Engine / Hybrid System>1KD-FTV (ENGINE CONTROL)>ECD SYSTEM>DTC CHECK / CLEAR).
Turn the ignition switch off for 30 seconds or more.
Turn the ignition switch to ON and turn the tester on.
Start the engine.
Accelerate the vehicle to 30 km/h (19 mph) or more, depress the brake pedal and decelerate the vehicle to 3 km/h (1.8 mph) or less 5 times or more.
Confirm that the DTC is not output again.
- HINT:
-
Perform the following procedure using the tester to determine whether or not the DTC judgment has been carried out.
Enter the following menus: Powertrain / Engine and ECT / Utility / All Readiness.
Input DTC P0724.
Check that STATUS is NORMAL.
- HINT:
- ·
If STATUS is NORMAL, DTC judgment is complete and it can be determined that the system is normal.
·If STATUS is INCOMPLETE or N/A, DTC judgment is incomplete. Perform the following procedure again 5 times: accelerate the vehicle to 30 km/h (19 mph) or more, depress the brake pedal and decelerate the vehicle to 3 km/h (1.8 mph) or less.
NEXT