1GD-FTV ENGINE CONTROL ECD SYSTEM(w/ Urea SCR System) Active Control Engine Mount System
DESCRIPTION
The active control engine mount system decreases engine vibration at low engine speed using the vacuum switching valve sub-assembly (for engine mounting). The vacuum switching valve sub-assembly (for engine mounting) is controlled by a pulse signal transmitted to the vacuum switching valve sub-assembly (for engine mounting) from the ECM. The frequency of this pulse signal is matched to the engine speed to decrease engine vibration.
WIRING DIAGRAM
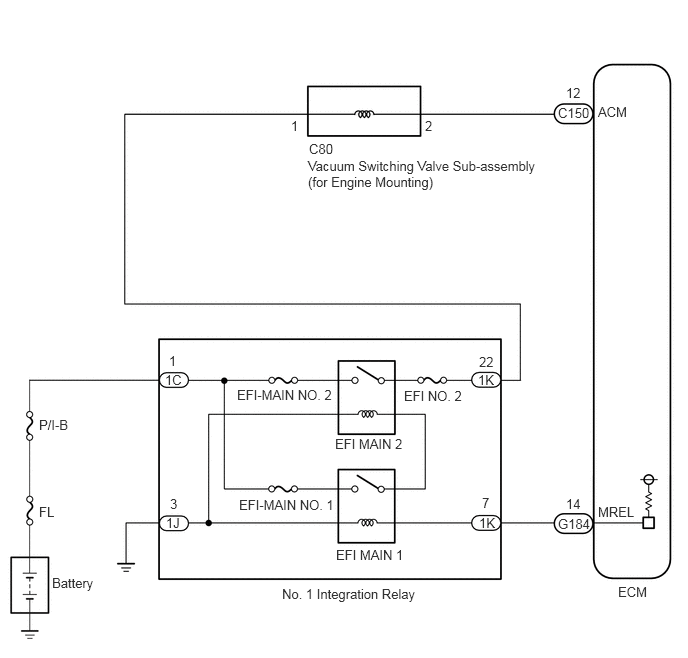
CAUTION / NOTICE / HINT
- NOTICE:
- ·
Inspect the fuses for circuits related to this system before performing the following inspection procedure.
·After replacing the ECM, the new ECM needs registration (See page Engine / Hybrid System>1GD-FTV (ENGINE CONTROL)>ECD SYSTEM (w/ Urea SCR System)>REGISTRATION) and initialization (See page Engine / Hybrid System>1GD-FTV (ENGINE CONTROL)>ECD SYSTEM (w/ Urea SCR System)>INITIALIZATION).
PROCEDURE
Inspect intake system (See page Engine / Hybrid System>1GD-FTV (INTAKE / EXHAUST)>INTAKE SYSTEM>ON-VEHICLE INSPECTION).
- Result:
Repair any trouble areas.
OK
NG
Inspect the vacuum switching valve sub-assembly (for engine mounting) (See page Engine / Hybrid System>1GD-FTV (ENGINE CONTROL)>VACUUM SWITCHING VALVE (for Engine Mounting)>INSPECTION).
OK
NG
(See pageEngine / Hybrid System>1GD-FTV (ENGINE CONTROL)>VACUUM SWITCHING VALVE (for Engine Mounting)>REMOVAL)
Disconnect the vacuum hose from the front engine mount insulator assembly.
Using a vacuum pump, apply vacuum of 80 kPa (600 mmHg, 23.622 in.Hg) and wait for 1 minute.
Check that there is no change in the needle movement of the vacuum pump gauge.
Check that there is no fluid leakage caused by a break in the diaphragm.
- OK:
Vacuum does not leak.
Reconnect the vacuum hose.
OK
NG
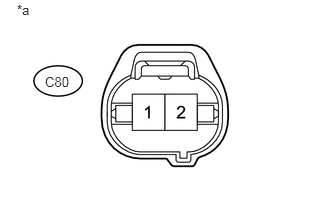
Disconnect the vacuum switching valve sub-assembly (for engine mounting) connector.
Turn the engine switch on (IG).
Measure the voltage according to the value(s) in the table below.
- Standard Voltage:
Tester Connection Condition Specified Condition C80-1 - Body ground Engine switch on (IG) 11 to 14 V
| *1 | Front view of wire harness connector
(to Vacuum Switching Valve Sub-assembly (for Engine Mounting)) |
Reconnect the vacuum switching valve sub-assembly (for engine mounting) connector.
OK
NG
Disconnect the vacuum switching valve sub-assembly (for engine mounting) connector.
Disconnect the ECM connector.
Measure the resistance according to the value(s) in the table below.
- Standard Resistance:
Tester Connection Condition Specified Condition C80-2 - C150-12 (ACM) Always Below 1 Ω C80-2 or C150-12 (ACM) - Body ground and other terminals Always 10 kΩ or higher
Reconnect the ECM connector.
Reconnect the vacuum switching valve sub-assembly (for engine mounting) connector.
OK
NG
Remove the No. 1 integration relay from the engine room relay block.
Disconnect the vacuum switching valve sub-assembly (for engine mounting) connector.
Measure the resistance of the wire harness side connectors.
- Standard Resistance:
Tester Connection Condition Specified Condition 1K-22 - C80-1 Always Below 1 Ω K-22 or C80-1 - Body ground and other terminals Always 10 kΩ or higher
OK
NG
Inspect the No. 1 Integration relay (EFI MAIN2) (See page Engine / Hybrid System>1GD-FTV (ENGINE CONTROL)>RELAY (w/ Urea SCR System)>ON-VEHICLE INSPECTION).
OK
NG