THEFT DETERRENT / KEYLESS ENTRY ENTRY AND START SYSTEM(for Start Function) B2284 Brake Signal Malfunction
DESCRIPTION
This DTC is stored when the brake signal information from the cable and the brake signal information from the CAN communication line are inconsistent
- HINT:
-
When the power management control ECU is replaced with a new one and the cable is connected to the negative (-) battery terminal, the power source mode is reset to on (IG). When the battery is removed and reinstalled, the power source mode that was selected when the battery was removed is restored.
| DTC Code | DTC Detection Condition | Trouble Area |
|---|---|---|
| B2284 | The brake signal information from the cable and the brake signal information from the CAN communication line are inconsistent. | ·
STOP fuse ·
AM2 fuse ·
Stop light switch assembly ·
Engine control system ·
Power management control ECU ·
Harness or connector |
WIRING DIAGRAM
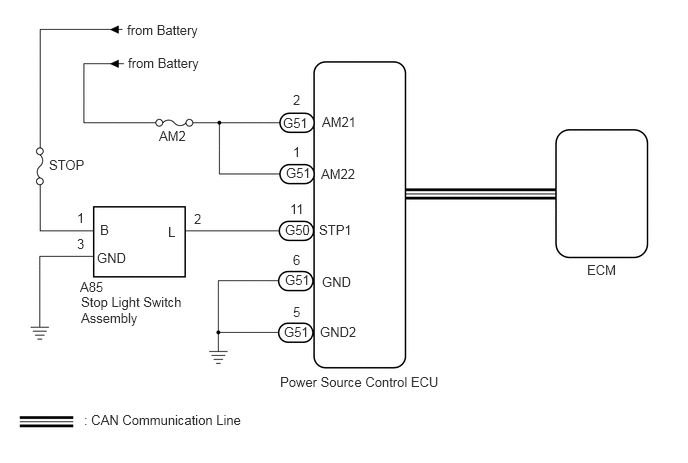
CAUTION / NOTICE / HINT
- NOTICE:
- ·
When using the intelligent tester with the engine switch off to troubleshoot: Connect the intelligent tester to the vehicle and turn a courtesy light switch on and off at 1.5 second intervals until communication between the intelligent tester and vehicle begins.
·Before performing the inspection, check that there are no problems related to the CAN communication system and LIN communication system.
·Inspect the fuses for circuits related to this system before performing the following inspection procedure.
- HINT:
-
Check the connector connections and terminals to make sure that there are no abnormalities such as loose connections, deformation, etc.
PROCEDURE
OK
NG
OK
NG
Inspect the stop light switch assembly (See page Vehicle Exterior>LIGHTING (EXT)>STOP LIGHT SWITCH>ON-VEHICLE INSPECTION).
OK
NG
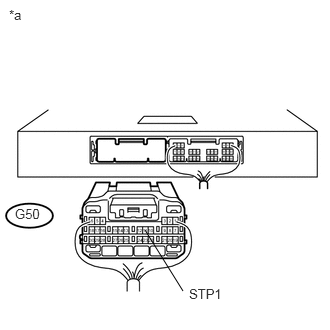
Disconnect the G50 power management control ECU connector.
Disconnect the A85 stop light switch assembly connector.
Measure the resistance according to the value(s) in the table below.
- Standard Resistance:
Tester Connection Condition Specified Condition G50-11 (STP1) - A85-2 (L) Always Below 1 Ω G50-11 (STP1) or A85-2 (L) - Body ground Always 10 kΩ or higher A85-3 (GND) - Body ground Always Below 1 Ω
Reconnect the A85 stop light switch assembly connector.
Measure the voltage according to the value(s) in the table below.
- Standard Voltage:
Tester Connection Condition Specified Condition G50-11 (STP1) - Body ground Brake pedal not depressed Below 1 V Brake pedal depressed ([Voltage at terminal AM21 or AM22] minus 2.0 V) or higher
| *a | Rear view of wire harness connector
(to Power Management Control ECU) |
OK
NG
Connect the intelligent tester to the DLC3.
Turn the engine switch on (IG).
Turn the intelligent tester on.
Enter the following menus: Body / Power Source Control / Data List.
According to the display on the intelligent tester, read the Data List.
| Tester Display | Measurement Item/Range | Normal Condition | Diagnostic Note |
|---|---|---|---|
| Stop Light Switch1 | Stop light switch 1 / ON or OFF | ON: Brake pedal depressed
OFF: Brake pedal released |
- |
- OK:
ON (brake pedal depressed) or OFF (brake pedal released) appears on the screen according to the stop light switch condition.
OK
NG
Check the SFI system*1 or ECD system*2.
*1: for 1GR-FE and 2TR-FE
*2: for 1KD-FTV and 1GD-FTV
| Result | Proceed to |
|---|---|
| OK (for 1GR-FE and 2TR-FE) | A |
| OK (for 1KD-FTV and 1GD-FTV) | B |
| NG | C |
- HINT:
- ·
for 1GR-FE:
If it is necessary to refer to the SFI system, refer to the following procedure (See page Engine / Hybrid System>1GR-FE (ENGINE CONTROL)>SFI SYSTEM>HOW TO PROCEED WITH TROUBLESHOOTING).
·for 2TR-FE:
If it is necessary to refer to the SFI system, refer to the following procedure (See page Engine / Hybrid System>2TR-FE (ENGINE CONTROL)>SFI SYSTEM>HOW TO PROCEED WITH TROUBLESHOOTING).
·for 1KD-FTV:
If it is necessary to refer to the ECD system, refer to the following procedure (See page Engine / Hybrid System>1KD-FTV (ENGINE CONTROL)>ECD SYSTEM>HOW TO PROCEED WITH TROUBLESHOOTING).
·for 1GD-FTV:
If it is necessary to refer to the ECD system, refer to the following procedure (See page Engine / Hybrid System>1GD-FTV (ENGINE CONTROL)>ECD SYSTEM>HOW TO PROCEED WITH TROUBLESHOOTING).
·for 1GD-FTV (w/ Urea SCR System):
If it is necessary to refer to the ECD system, refer to the following procedure (See page Engine / Hybrid System>1GD-FTV (ENGINE CONTROL)>ECD SYSTEM (w/ Urea SCR System)>HOW TO PROCEED WITH TROUBLESHOOTING).
A
B