HEATING / AIR CONDITIONING COMPRESSOR(for 1KD-FTV) INSTALLATION
PROCEDURE

 88320
1.INSTALL COOLER COMPRESSOR ASSEMBLY
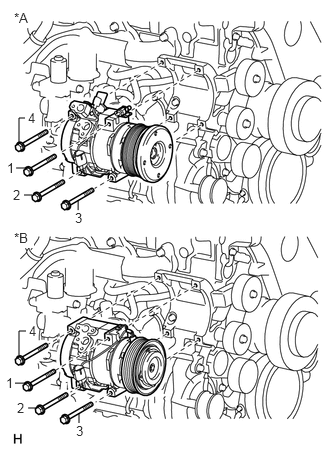
Temporarily install the cooler compressor with the 4 bolts.
| *A | except Cold Area Specification Vehicles |
| *B | for Cold Area Specification Vehicles |
- HINT:
-
Tighten the bolts in the order shown in the illustration.
Tighten the 4 bolts.
- Torque:
- 25 N*m (255 kgf*cm, 18 ft.*lbf)
- NOTICE:
-
Tighten the bolts in the order shown in the illustration to install the cooler compressor.
88712
2.INSTALL NO. 1 COOLER REFRIGERANT SUCTION HOSE
Remove the attached vinyl tape from the hose.
Sufficiently apply compressor oil to a new O-ring and the fitting surface of the cooler compressor.
- Compressor oil:
ND-OIL 8 or equivalent
Install the O-ring to the suction hose.
Connect the suction hose to the cooler compressor with the bolt.
- Torque:
- 9.8 N*m (100 kgf*cm, 87 in.*lbf)
88711
3.INSTALL NO. 1 COOLER REFRIGERANT DISCHARGE HOSE
Remove the attached vinyl tape from the hose.
Sufficiently apply compressor oil to a new O-ring and the fitting surface of the cooler compressor.
- Compressor oil:
ND-OIL 8 or equivalent
Install the O-ring to the discharge hose.
Connect the discharge hose to the cooler compressor with the bolt.
- Torque:
- 9.8 N*m (100 kgf*cm, 87 in.*lbf)
87101
4.INSTALL NO. 1 VISCOUS HEATER BRACKET SUB-ASSEMBLY (w/ Viscous Heater)
87120G
5.INSTALL VISCOUS WITH MAGNET CLUTCH HEATER ASSEMBLY (w/ Viscous Heater)
16361A
6.INSTALL FAN AND GENERATOR V BELT
17275A
7.INSTALL COMPRESSOR OUTLET ELBOW
8.INSTALL AIR CLEANER CASE SUB-ASSEMBLY
17801
9.INSTALL AIR CLEANER FILTER ELEMENT SUB-ASSEMBLY
17705
10.INSTALL AIR CLEANER CAP SUB-ASSEMBLY
17881
11.INSTALL NO. 1 AIR CLEANER HOSE
74431
12.INSTALL BATTERY TRAY
28800
13.INSTALL BATTERY
74481
14.INSTALL BATTERY HOLD DOWN CLAMP
16470
15.INSTALL RADIATOR RESERVOIR
Connect the No. 2 water by-pass hose to the radiator reservoir.
Connect the No. 1 water by-pass hose to the fan shroud and attach the 2 clamps.
Install the radiator reservoir assembly with the 3 bolts.
- Torque:
- 5.0 N*m (51 kgf*cm, 44 in.*lbf)
16.CONNECT CABLE TO NEGATIVE BATTERY TERMINAL
- NOTICE:
-
When disconnecting the cable, some systems need to be initialized after the cable is reconnected (See page General>INTRODUCTION>REPAIR INSTRUCTION>INITIALIZATION).
17.ADD ENGINE COOLANT
51405A
18.INSTALL NO. 1 ENGINE UNDER COVER SUB-ASSEMBLY
19. CHARGE REFRIGERANT
20. WARM UP ENGINE
21.CHECK FOR REFRIGERANT GAS LEAK
53292A
22.INSTALL UPPER RADIATOR SUPPORT SEAL