CRUISE CONTROL DRIVING SUPPORT ECU INSTALLATION
CAUTION / NOTICE / HINT
- NOTICE:
- ·
Do not twist the connectors of the driving support ECU when connecting them.
·Do not apply more force than necessary to the connectors. If more than 98 N (10 kgf, 22 lbf) of force is applied to a connector, the connector or connector holder may be damaged.
- HINT:
- ·
A bolt without a torque specification is shown in the standard bolt chart (See page General>SPECIFICATIONS>STANDARD BOLT>SPECIFIED TORQUE FOR STANDARD BOLTS).
·Use the same procedure for RHD and LHD vehicles.
·The procedure listed below is for LHD vehicles.
PROCEDURE

 88150A
1.INSTALL DRIVING SUPPORT ECU ASSEMBLY
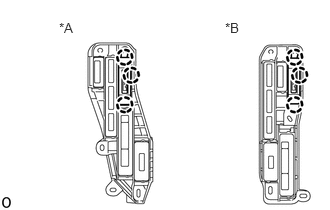
| *A | for LHD |
| *B | for RHD |
Attach the 3 claws to install the driving support ECU assembly.
82878
2.INSTALL ECU INTEGRATION BOX LH (for RHD)
82877
3.INSTALL ECU INTEGRATION BOX RH (for LHD)
87201B
4.INSTALL NO. 2 AIR DUCT SUB-ASSEMBLY
55550
5.INSTALL GLOVE COMPARTMENT DOOR ASSEMBLY
55461A
6.INSTALL INSTRUMENT PANEL ORNAMENT
55317A
7.INSTALL INSTRUMENT SIDE PANEL RH
62311B
8.INSTALL FRONT DOOR OPENING TRIM WEATHERSTRIP RH
55607
9.INSTALL NO. 2 INSTRUMENT PANEL UNDER COVER SUB-ASSEMBLY
62111C
10.INSTALL COWL SIDE TRIM BOARD RH
- HINT:
-
Use the same procedure for the RH side and LH side.
-
Click hereVehicle Interior>INTERIOR PANELS / TRIM>ROOF HEADLINING (for 5 Door)>INSTALLATION
67910
11.INSTALL DOOR SCUFF PLATE ASSEMBLY RH
- HINT:
-
Use the same procedure for the RH side and LH side.
-
Click hereVehicle Interior>INTERIOR PANELS / TRIM>ROOF HEADLINING (for 5 Door)>INSTALLATION
12.CONNECT CABLE TO NEGATIVE BATTERY TERMINAL
- NOTICE:
-
When disconnecting the cable, some systems need to be initialized after the cable is reconnected.
-
Click hereGeneral>INTRODUCTION>REPAIR INSTRUCTION>INITIALIZATION