CRUISE CONTROL DYNAMIC RADAR CRUISE CONTROL SYSTEM P0571 Brake Switch "A" Circuit
DESCRIPTION
When the brake pedal is depressed, the stop light switch assembly sends a signal to the ECM. When the ECM receives this signal, it cancels the dynamic radar cruise control. The fail-safe function operates to enable normal driving even if there is a malfunction in the stop light signal circuit. The cancellation condition occurs when voltage is applied to terminal STP. When the brake is applied, voltage is normally applied to terminal STP of the ECM through the STOP fuse and the stop light switch assembly, and the ECM turns the dynamic radar cruise control system off.
The ECM receives the brake demand signal from the driving support ECU assembly and transmits it to the skid control ECU. The skid control ECU receives a signal from the ECM and operates the skid control ECU. The skid control ECU operates the brake actuator assembly and at the same time illuminates the stop light by operating the stop light switch assembly.
| DTC No. | Detection Item | DTC Detection Condition | Trouble Area |
|---|---|---|---|
| P0571 | Brake Switch "A" Circuit | Condition 1:
·
While the vehicle speed is 36 km/h (22 mph) or more and the dynamic radar cruise control system is operating, voltage of STP terminal and that of ST1- terminal of ECM are less than 1 V for approximately 0.5 seconds or more. Condition 2:
·
While the vehicle speed is 36 km/h (22 mph) or more and the dynamic radar cruise control system is operating, the ECM detects the stop light switch assembly error signal from the skid control ECU for approximately 0.2 seconds or more. |
Detection condition 1:
·
Stop light switch assembly ·
ECM ·
Harness or connector Detection condition 2:
·
Stop light switch assembly ·
Skid control ECU (brake actuator assembly)*1 ·
Rear combination light assembly LH ·
Skid control ECU (master cylinder solenoid)*2 ·
Rear combination light assembly RH ·
Center stop light assembly ·
Center stop light cord assembly ·
Harness or connector |
*1: for Vacuum Brake Booster
*2: for Hydraulic Brake Booster
WIRING DIAGRAM
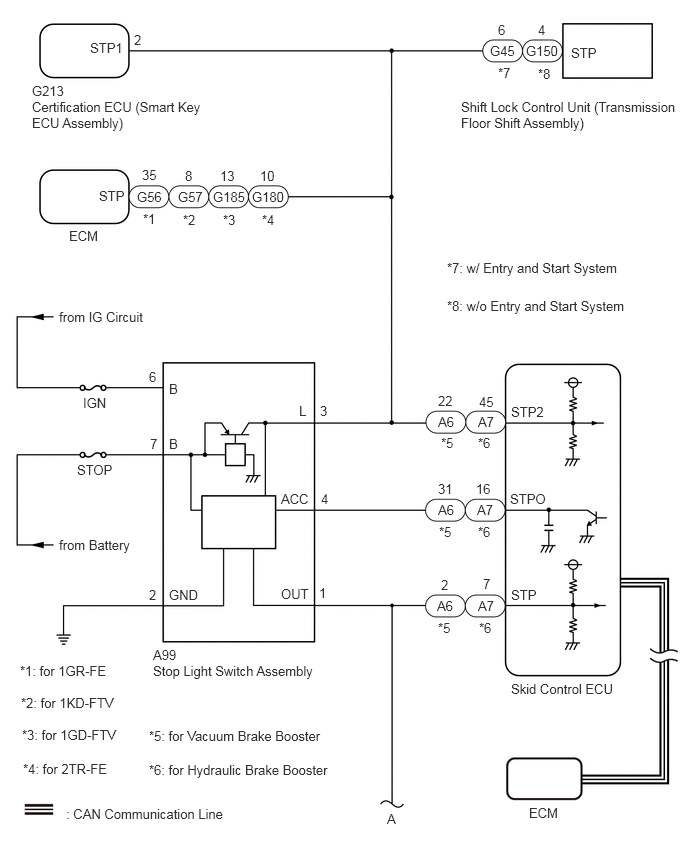
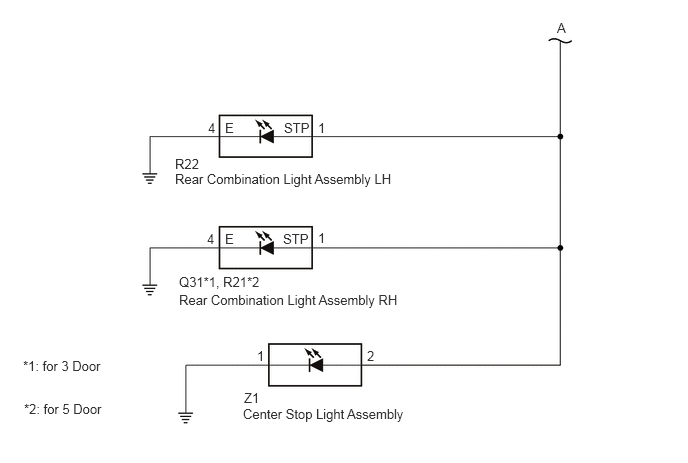
CAUTION / NOTICE / HINT
- NOTICE:
- ·
Before replacing the certification ECU (smart key ECU assembly), refer to smart entry and start system (for Entry Function) Precaution.
·Before replacing the ECM, refer to Service Bulletin.
·First perform the communication function inspections in How to Proceed with Troubleshooting to confirm that there are no CAN communication malfunctions before troubleshooting. Inspect the fuses for circuits related to this system before performing the following procedure.
·Inspect the fuses for circuits related to this system before performing the following procedure.
·When replacing the skid control ECU, perform zero point calibration.
for Vacuum Brake Booster: Click hereBrake>BRAKE CONTROL / DYNAMIC CONTROL SYSTEMS>VEHICLE STABILITY CONTROL SYSTEM(for Vacuum Brake Booster)>CALIBRATION
for Hydraulic Brake Booster: Click hereBrake>BRAKE CONTROL / DYNAMIC CONTROL SYSTEMS>VEHICLE STABILITY CONTROL SYSTEM (for Hydraulic Brake Booster)>CALIBRATION
PROCEDURE
- HINT:
-
Dynamic radar cruise control system DTC P0571 may be stored due to a malfunction in the engine control system. Therefore it is necessary to check for and troubleshoot engine control system DTCs first.
Connect the GTS to the DLC3.
Turn the ignition switch to ON.
Check for DTCs.
for 1GR-FE: Click hereEngine / Hybrid System>1GR-FE (ENGINE CONTROL)>SFI SYSTEM>DTC CHECK / CLEAR
for 1KD-FTV: Click hereEngine / Hybrid System>1KD-FTV (ENGINE CONTROL)>ECD SYSTEM>DTC CHECK / CLEAR
for 1GD-FTV: Click hereEngine / Hybrid System>1GD-FTV (ENGINE CONTROL)>ECD SYSTEM>DTC CHECK / CLEAR
for 1GD-FTV (w/ Urea SCR System): Click hereEngine / Hybrid System>1GD-FTV (ENGINE CONTROL)>ECD SYSTEM (w/ Urea SCR System)>DTC CHECK / CLEAR
for 2TR-FE: Click hereEngine / Hybrid System>2TR-FE (ENGINE CONTROL)>SFI SYSTEM>DTC CHECK / CLEAR
- Result:
Result Proceed to Engine control system DTCs are not output. A Engine control system DTCs are output. B
A
B
for 1GR-FE: Click hereEngine / Hybrid System>1GR-FE (ENGINE CONTROL)>SFI SYSTEM>DIAGNOSTIC TROUBLE CODE CHART
for 1KD-FTV: Click hereEngine / Hybrid System>1KD-FTV (ENGINE CONTROL)>ECD SYSTEM>DIAGNOSTIC TROUBLE CODE CHART
for 1GD-FTV: Click hereEngine / Hybrid System>1GD-FTV (ENGINE CONTROL)>ECD SYSTEM>DIAGNOSTIC TROUBLE CODE CHART
for 1GD-FTV (w/ Urea SCR System): Click hereEngine / Hybrid System>1GD-FTV (ENGINE CONTROL)>ECD SYSTEM (w/ Urea SCR System)>DIAGNOSTIC TROUBLE CODE CHART
for 2TR-FE: Click hereEngine / Hybrid System>2TR-FE (ENGINE CONTROL)>SFI SYSTEM>DIAGNOSTIC TROUBLE CODE CHART
for Vacuum brake booster
Turn the ignition switch off.
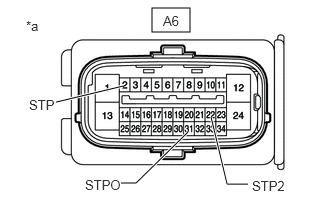
| *a | Front view of wire harness connector
(to Skid Control ECU (Brake Actuator Assembly)) |
Disconnect the skid control ECU (brake actuator assembly) connector.
Measure the voltage according to the value(s) in the table below.
- Standard Voltage:
Tester Connection Condition Specified Condition A6-22 (STP2) - Body ground Brake pedal depressed 11 to 14 V Brake pedal released Below 1.5 V A6-31 (STPO) - Body ground Ignition switch ON 11 to 14 V A6-2 (STP) - Body ground Brake pedal depressed 11 to 14 V Brake pedal released Below 1.5 V
for Hydraulic brake booster
Turn the ignition switch off.
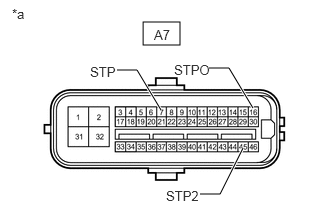
| *a | Front view of wire harness connector
(to Skid Control ECU (Master Cylinder Solenoid)) |
Disconnect the skid control ECU (master cylinder solenoid) connector.
Measure the voltage according to the value(s) in the table below.
- Standard Voltage:
Tester Connection Condition Specified Condition A7-45 (STP2) - Body ground Brake pedal depressed 11 to 14 V Brake pedal released Below 1.5 V A7-16 (STPO) - Body ground Ignition switch ON 11 to 14 V A7-7 (STP) - Body ground Brake pedal depressed 11 to 14 V Brake pedal released Below 1.5 V
- Result:
Result Proceed to All terminal voltage is normal A Only STP2 terminal voltage abnormal B Only STPO terminal voltage abnormal C Only STP terminal voltage abnormal D STPO terminal and STP terminal voltage abnormal E
A
B
C
D
E
Enter the following menus: Chassis / ABS/VSC/TRC / Active Test.
Perform "Active Test" according to the display on the GTS.
Chassis > ABS/VSC/TRC > Active Test
| Tester Display | Measurement Item | Control Range | Diagnostic Note |
|---|---|---|---|
| Stop Light Relay | Stop light control relay (stop light switch assembly) | Relay ON/OFF | Stop lights come on
Vehicle condition: Vehicle stopped |
- OK:
Stop light turns ON/OFF in response to the GTS operation
- Result:
Proceed to OK NG
OK
NG
Connect the GTS to the DLC3.
Turn the ignition switch to ON.
Clear the DTCs.
Click hereEngine / Hybrid System>CRUISE CONTROL>DYNAMIC RADAR CRUISE CONTROL SYSTEM>DTC CHECK / CLEAR
Enter the following menus: Chassis / ABS/VSC/TRC / Active Test.
Perform "Active Test" according to the display on the GTS.
Chassis > ABS/VSC/TRC > Active Test
| Tester Display | Measurement Item | Control Range | Diagnostic Note |
|---|---|---|---|
| Stop Light Relay | Stop light control relay (stop light switch assembly) | Relay ON/OFF | Stop lights come on
Vehicle condition: Vehicle stopped |
Check for DTCs.
Click hereEngine / Hybrid System>CRUISE CONTROL>DYNAMIC RADAR CRUISE CONTROL SYSTEM>DTC CHECK / CLEAR
- Result:
Result Proceed to DTC P0571 is output A DTC P0571 is not output B
A
for Vacuum Brake Booster: Click hereBrake>BRAKE CONTROL / DYNAMIC CONTROL SYSTEMS>BRAKE ACTUATOR>REMOVAL
for Hydraulic Brake Booster (for LHD): Click hereBrake>BRAKE SYSTEM (OTHER)>HYDRAULIC BRAKE BOOSTER(for LHD)>REMOVAL
for Hydraulic Brake Booster (for RHD): Click hereBrake>BRAKE SYSTEM (OTHER)>HYDRAULIC BRAKE BOOSTER(for RHD)>REMOVAL
B
Click hereGeneral>INTRODUCTION>HOW TO TROUBLESHOOT ECU CONTROLLED SYSTEMS>HOW TO PROCEED WITH TROUBLESHOOTING
Enter the following menus: Chassis / ABS/VSC/TRC / Active Test.
Perform "Active Test" according to the display on the GTS.
Chassis > ABS/VSC/TRC > Active Test
| Tester Display | Measurement Item | Control Range | Diagnostic Note |
|---|---|---|---|
| Stop Light Relay | Stop light control relay (stop light switch assembly) | Relay ON/OFF | Stop lights come on
Vehicle condition: Vehicle stopped |
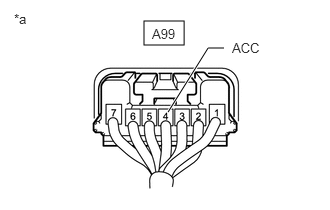
| *a | Component with harness connected
(Stop Light Switch Assembly) |
Measure the voltage according to the value(s) in the table below.
- Standard Voltage:
Tester Connection Condition Specified Condition A99-4 (ACC) - Body ground Active test is ON Below 1.5 V
- Result:
Proceed to OK NG
OK
NG
for Vacuum Brake Booster: Click hereBrake>BRAKE CONTROL / DYNAMIC CONTROL SYSTEMS>BRAKE ACTUATOR>REMOVAL
for Hydraulic Brake Booster (for LHD): Click hereBrake>BRAKE SYSTEM (OTHER)>HYDRAULIC BRAKE BOOSTER(for LHD)>REMOVAL
for Hydraulic Brake Booster (for RHD): Click hereBrake>BRAKE SYSTEM (OTHER)>HYDRAULIC BRAKE BOOSTER(for RHD)>REMOVAL
for Vacuum brake booster
Turn the ignition switch off.
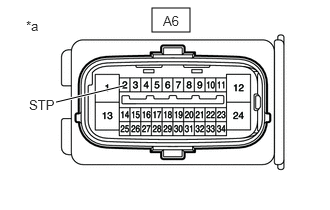
| *a | Front view of wire harness connector
(to Skid Control ECU (Brake Actuator Assembly)) |
Disconnect the skid control ECU (brake actuator assembly) connector.
Measure the voltage according to the value(s) in the table below.
- Standard Voltage:
Tester Connection Condition Specified Condition A6-2 (STP) - Body ground Brake pedal released Below 1.5 V
for Hydraulic brake booster
Turn the ignition switch off.
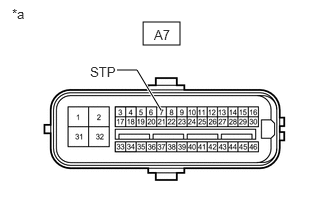
| *a | Front view of wire harness connector
(to Skid Control ECU (Master Cylinder Solenoid)) |
Disconnect the skid control ECU (master cylinder solenoid) connector.
Measure the voltage according to the value(s) in the table below.
- Standard Voltage:
Tester Connection Condition Specified Condition A7-7 (STP) - Body ground Brake pedal released Below 1.5 V
- Result:
Proceed to OK NG
OK
NG
for Vacuum Brake Booster
Turn the ignition switch off.
Disconnect the A6 skid control ECU (brake actuator assembly) connector.
Disconnect the G180 ECM connector.
Measure the voltage according to the value(s) in the table below.
- Standard Voltage:
Tester Connection Condition Specified Condition A6-22 (STP2) or G180-10 (STP) - Body ground Brake pedal depressed 11 to 14 V
for Hydraulic Brake Booster
Turn the ignition switch off.
Disconnect the A7 skid control ECU (master cylinder solenoid) connector.
Disconnect the G56*1, G57*2 or G185*3 ECM connector.
*1: for 1GR-FE
*2: for 1KD-FTV
*3: for 1GD-FTV
Measure the voltage according to the value(s) in the table below.
- Standard Voltage:
Tester Connection Condition Specified Condition A7-45 (STP2) or G56-35 (STP)*1 - Body ground Brake pedal depressed 11 to 14 V A7-45 (STP2) or G57-8 (STP)*2 - Body ground Brake pedal depressed 11 to 14 V A7-45 (STP2) or G185-13 (STP)*3 - Body ground Brake pedal depressed 11 to 14 V
*1: for 1GR-FE
*2: for 1KD-FTV
*3: for 1GD-FTV
- Result:
Proceed to OK NG
OK
for 1GR-FE: Click hereEngine / Hybrid System>1GR-FE (ENGINE CONTROL)>ECM>REMOVAL
for 1KD-FTV: Click hereEngine / Hybrid System>1KD-FTV (ENGINE CONTROL)>ECM>REMOVAL
for 1GD-FTV: Click hereEngine / Hybrid System>1GD-FTV (ENGINE CONTROL)>ECM>REMOVAL
for 2TR-FE: Click hereEngine / Hybrid System>2TR-FE (ENGINE CONTROL)>ECM>REMOVAL
NG
for Vacuum Brake Booster
Turn the ignition switch off.
Disconnect the A6 skid control ECU (brake actuator assembly) connector.
Disconnect the G180 ECM connector.
Disconnect the G45*1 or G150*2 shift lock control unit (transmission floor shift assembly) connector.
*1: w/ Entry and Start System
*2: w/o Entry and Start System
Measure the voltage according to the value(s) in the table below.
- Standard Voltage:
Tester Connection Condition Specified Condition A6-22 (STP2) or G45-6 (STP)*1 - Body ground Brake pedal depressed 11 to 14 V A6-22 (STP2) or G150-4 (STP)*2 - Body ground Brake pedal depressed 11 to 14 V
*1: w/ Entry and Start System
*2: w/o Entry and Start System
for Hydraulic Brake Booster
Turn the ignition switch off.
Disconnect the A7 skid control ECU (master cylinder solenoid) connector.
Disconnect the G56*1, G57*2 or G185*3 ECM connector.
*1: for 1GR-FE
*2: for 1KD-FTV
*3: for 1GD-FTV
Disconnect the G45*1 or G150*2 shift lock control unit (transmission floor shift assembly) connector.
*1: w/ Entry and Start System
*2: w/o Entry and Start System
Measure the voltage according to the value(s) in the table below.
- Standard Voltage:
Tester Connection Condition Specified Condition A7-45 (STP2) or G45-6 (STP)*1 - Body ground Brake pedal depressed 11 to 14 V A7-45 (STP2) or G150-4 (STP)*2 - Body ground Brake pedal depressed 11 to 14 V
*1: w/ Entry and Start System
*2: w/o Entry and Start System
- Result:
Proceed to OK NG
OK
for A750F: Click hereDrivetrain>A750F (AUTOMATIC TRANSMISSION / TRANSAXLE)>SHIFT LEVER>DISASSEMBLY
for AC60F: Click hereDrivetrain>AC60F (AUTOMATIC TRANSMISSION / TRANSAXLE)>SHIFT LEVER>DISASSEMBLY
NG
for Vacuum Brake Booster
Turn the ignition switch off.
Disconnect the A6 skid control ECU (brake actuator assembly) connector.
Disconnect the G180 ECM connector.
Disconnect the G45*1 or G150*2 shift lock control unit (transmission floor shift assembly) connector.
*1: w/ Entry and Start System
*2: w/o Entry and Start System
Disconnect the G213 certification ECU (smart key ECU assembly) connector.
Measure the voltage according to the value(s) in the table below.
- Standard Voltage:
Tester Connection Condition Specified Condition A6-22 (STP2) or G213-2 (STP1) - Body ground Brake pedal depressed 11 to 14 V
for Hydraulic Brake Booster
Turn the ignition switch off.
Disconnect the A7 skid control ECU (master cylinder solenoid) connector.
Disconnect the G56*1, G57*2 or G185*3 ECM connector.
*1: for 1GR-FE
*2: for 1KD-FTV
*3: for 1GD-FTV
Disconnect the G45*1 or G150*2 shift lock control unit (transmission floor shift assembly) connector.
*1: w/ Entry and Start System
*2: w/o Entry and Start System
Disconnect the G213 certification ECU (smart key ECU assembly) connector.
Measure the voltage according to the value(s) in the table below.
- Standard Voltage:
Tester Connection Condition Specified Condition A7-45 (STP2) or G213-2 (STP1) - Body ground Brake pedal depressed 11 to 14 V
- Result:
Proceed to OK NG
OK
NG
for Vacuum Brake Booster
Turn the ignition switch off.
Disconnect the A6 skid control ECU (brake actuator assembly) connector.
Disconnect the G180 ECM connector.
Disconnect the G45*1 or G150*2 shift lock control unit (transmission floor shift assembly) connector.
*1: w/ Entry and Start System
*2: w/o Entry and Start System
Disconnect the G213 certification ECU (smart key ECU assembly) connector.
Disconnect the A99 stop light switch assembly connector.
Measure the voltage according to the value(s) in the table below.
- Standard Voltage:
Tester Connection Condition Specified Condition A6-22 (STP2) or A99-3 (L) - Body ground Brake pedal depressed 11 to 14 V
for Hydraulic Brake Booster
Turn the ignition switch off.
Disconnect the A7 skid control ECU (master cylinder solenoid) connector.
Disconnect the G56*1, G57*2 or G185*3 ECM connector.
*1: for 1GR-FE
*2: for 1KD-FTV
*3: for 1GD-FTV
Disconnect the G45*1 or G150*2 shift lock control unit (transmission floor shift assembly) connector.
*1: w/ Entry and Start System
*2: w/o Entry and Start System
Disconnect the G213 certification ECU (smart key ECU assembly) connector.
Disconnect the A99 stop light switch assembly connector.
Measure the voltage according to the value(s) in the table below.
- Standard Voltage:
Tester Connection Condition Specified Condition A7-45 (STP2) or A99-3 (L) - Body ground Brake pedal depressed 11 to 14 V
- Result:
Proceed to OK NG
OK
NG
Remove the stop light switch assembly.
Click hereVehicle Exterior>LIGHTING (EXT)>STOP LIGHT SWITCH>REMOVAL
Inspect the stop light switch assembly.
Click hereVehicle Exterior>LIGHTING (EXT)>STOP LIGHT SWITCH>ON-VEHICLE INSPECTION
- Result:
Proceed to OK NG
OK
NG
Remove the stop light switch assembly.
Click hereVehicle Exterior>LIGHTING (EXT)>STOP LIGHT SWITCH>REMOVAL
Inspect the stop light switch assembly.
Click hereVehicle Exterior>LIGHTING (EXT)>STOP LIGHT SWITCH>ON-VEHICLE INSPECTION
- Result:
Proceed to OK NG
OK
NG
for Vacuum Brake Booster
Turn the ignition switch off.
Disconnect the A6 skid control ECU (brake actuator assembly) connector.
Disconnect the A99 stop light switch assembly connector.
Measure the resistance according to the value(s) in the table below.
- Standard Resistance:
Tester Connection Condition Specified Condition A6-31 (STPO) - A99-4 (ACC) Always Below 1 Ω
for Hydraulic Brake Booster
Turn the ignition switch off.
Disconnect the A7 skid control ECU (master cylinder solenoid) connector.
Disconnect the A99 stop light switch assembly connector.
Measure the resistance according to the value(s) in the table below.
- Standard Resistance:
Tester Connection Condition Specified Condition A7-16 (STPO) - A99-4 (ACC) Always Below 1 Ω
- Result:
Proceed to OK NG
OK
NG
Turn the ignition switch off.
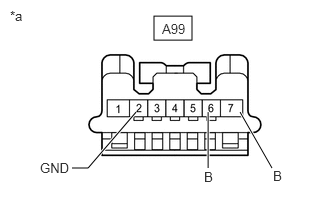
| *a | Front view of wire harness connector
(to Stop Light Switch Assembly) |
Disconnect the stop light switch assembly connector.
Measure the voltage according to the value(s) in the table below.
- Standard Voltage:
Tester Connection Condition Specified Condition A99-6 (B) - Body ground Ignition switch ON 11 to 14 V A99-7 (B) - Body ground Always 11 to 14 V
Measure the resistance according to the value(s) in the table below.
- Standard Resistance:
Tester Connection Condition Specified Condition A99-2 (GND) -Body ground Always Below 1 Ω
- Result:
Proceed to OK NG
OK
NG
for Vacuum brake booster
Turn the ignition switch off.
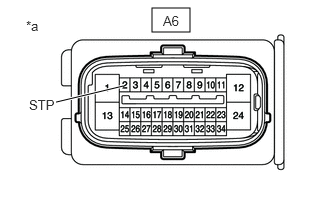
| *a | Front view of wire harness connector
(to Skid Control ECU (Brake Actuator Assembly)) |
Disconnect the skid control ECU (brake actuator assembly) connector.
Measure the voltage according to the value(s) in the table below.
- Standard Voltage:
Tester Connection Condition Specified Condition A6-2 (STP) - Body ground Brake pedal released Below 1.5 V
for Hydraulic brake booster
Turn the ignition switch off.
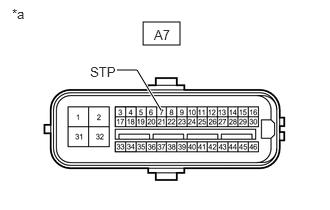
| *a | Front view of wire harness connector
(to Skid Control ECU (Master Cylinder Solenoid)) |
Disconnect the skid control ECU (master cylinder solenoid) connector.
Measure the voltage according to the value(s) in the table below.
- Standard Voltage:
Tester Connection Condition Specified Condition A7-7 (STP) - Body ground Brake pedal released Below 1.5 V
- Result:
Proceed to OK NG
OK
NG
for Vacuum Brake Booster
Turn the ignition switch off.
Disconnect the A6 skid control ECU (brake actuator assembly) connector.
Disconnect the R22 rear combination light assembly LH connector.
Measure the voltage according to the value(s) in the table below.
- Standard Voltage:
Tester Connection Condition Specified Condition A6-2 (STP) - Body ground Brake pedal depressed 11 to 14 V
for Hydraulic Brake Booster
Turn the ignition switch off.
Disconnect the A7 skid control ECU (master cylinder solenoid) connector.
Disconnect the R22 rear combination light assembly LH connector.
Measure the voltage according to the value(s) in the table below.
- Standard Voltage:
Tester Connection Condition Specified Condition A7-7 (STP) - Body ground Brake pedal depressed 11 to 14 V
- Result:
Proceed to OK NG
OK
NG
for Vacuum Brake Booster
Turn the ignition switch off.
Disconnect the A6 skid control ECU (brake actuator assembly) connector.
Disconnect the R22 rear combination light assembly LH connector.
Disconnect the Q31*1 or R21*2 rear combination light assembly RH connector.
*1: for 3 Door
*2: for 5 Door
Measure the voltage according to the value(s) in the table below.
- Standard Voltage:
Tester Connection Condition Specified Condition A6-2 (STP) - Body ground Brake pedal depressed 11 to 14 V
for Hydraulic Brake Booster
Turn the ignition switch off.
Disconnect the A7 skid control ECU (master cylinder solenoid) connector.
Disconnect the R22 rear combination light assembly LH connector.
Disconnect the Q31*1 or R21*2 rear combination light assembly RH connector.
*1: for 3 Door
*2: for 5 Door
Measure the voltage according to the value(s) in the table below.
- Standard Voltage:
Tester Connection Condition Specified Condition A7-7 (STP) - Body ground Brake pedal depressed 11 to 14 V
- Result:
Proceed to OK NG
OK
NG
for Vacuum Brake Booster
Turn the ignition switch off.
Disconnect the A6 skid control ECU (brake actuator assembly) connector.
Disconnect the R22 rear combination light assembly LH connector.
Disconnect the Q31*1 or R21*2 rear combination light assembly RH connector.
*1: for 3 Door
*2: for 5 Door
Disconnect the Z1 center stop light assembly connector.
Measure the voltage according to the value(s) in the table below.
- Standard Voltage:
Tester Connection Condition Specified Condition A6-2 (STP) - Body ground Brake pedal depressed 11 to 14 V
for Hydraulic Brake Booster
Turn the ignition switch off.
Disconnect the A7 skid control ECU (master cylinder solenoid) connector.
Disconnect the R22 rear combination light assembly LH connector.
Disconnect the Q31*1 or R21*2 rear combination light assembly RH connector.
*1: for 3 Door
*2: for 5 Door
Disconnect the Z1 center stop light assembly connector.
Measure the voltage according to the value(s) in the table below.
- Standard Voltage:
Tester Connection Condition Specified Condition A7-7 (STP) - Body ground Brake pedal depressed 11 to 14 V
- Result:
Proceed to OK NG
OK
NG
for Vacuum Brake Booster
Turn the ignition switch off.
Disconnect the A6 skid control ECU (brake actuator assembly) connector.
Disconnect the R22 rear combination light assembly LH connector.
Disconnect the Q31*1 or R21*2 rear combination light assembly RH connector.
*1: for 3 Door
*2: for 5 Door
Disconnect the Z1 center stop light assembly connector.
Disconnect the A99 stop light switch assembly connector.
Measure the resistance according to the value(s) in the table below.
- Standard Resistance:
Tester Connection Condition Specified Condition A99-1 (OUT) - A6-2 (STP) Always Below 1 Ω A99-1 (OUT) or A6-2 (STP) - Body ground Always 10 kΩ or higher
for Hydraulic Brake Booster
Turn the ignition switch off.
Disconnect the A7 skid control ECU (master cylinder solenoid) connector.
Disconnect the R22 rear combination light assembly LH connector.
Disconnect the Q31*1 or R21*2 rear combination light assembly RH connector.
*1: for 3 Door
*2: for 5 Door
Disconnect the Z1 center stop light assembly connector.
Disconnect the A99 stop light switch assembly connector.
Measure the resistance according to the value(s) in the table below.
- Standard Resistance:
Tester Connection Condition Specified Condition A99-1 (OUT) - A7-7 (STP) Always Below 1 Ω A99-1 (OUT) or A7-7 (STP) - Body ground Always 10 kΩ or higher
- Result:
Proceed to OK NG
OK
NG
for Vacuum Brake Booster
Turn the ignition switch off.
Disconnect the A6 skid control ECU (brake actuator assembly) connector.
Disconnect the A99 stop light switch assembly connector.
Measure the voltage according to the value(s) in the table below.
- Standard Voltage:
Tester Connection Condition Specified Condition A6-2 (STP) - Body ground Brake pedal released Below 1.5 V
for Hydraulic Brake Booster
Turn the ignition switch off.
Disconnect the A7 skid control ECU (master cylinder solenoid) connector.
Disconnect the A99 stop light switch assembly connector.
Measure the voltage according to the value(s) in the table below.
- Standard Voltage:
Tester Connection Condition Specified Condition A7-7 (STP) - Body ground Brake pedal released Below 1.5 V
- Result:
Proceed to OK NG
OK
NG
for Vacuum Brake Booster
Turn the ignition switch off.
Disconnect the A6 skid control ECU (brake actuator assembly) connector.
Disconnect the A99 stop light switch assembly connector.
Disconnect the R22 rear combination light assembly LH connector.
Measure the voltage according to the value(s) in the table below.
- Standard Voltage:
Tester Connection Condition Specified Condition A6-2 (STP) - Body ground Brake pedal released Below 1.5 V
for Hydraulic Brake Booster
Turn the ignition switch off.
Disconnect the A7 skid control ECU (master cylinder solenoid) connector.
Disconnect the A99 stop light switch assembly connector.
Disconnect the R22 rear combination light assembly LH connector.
Measure the voltage according to the value(s) in the table below.
- Standard Voltage:
Tester Connection Condition Specified Condition A7-7 (STP) - Body ground Brake pedal released Below 1.5 V
- Result:
Proceed to OK NG
OK
NG
for Vacuum Brake Booster
Turn the ignition switch off.
Disconnect the A6 skid control ECU (brake actuator assembly) connector.
Disconnect the A99 stop light switch assembly connector.
Disconnect the R22 rear combination light assembly LH connector.
Disconnect the Q31*1 or R21*2 rear combination light assembly RH connector.
*1: for 3 Door
*2: for 5 Door
Measure the voltage according to the value(s) in the table below.
- Standard Voltage:
Tester Connection Condition Specified Condition A6-2 (STP) - Body ground Brake pedal released Below 1.5 V
for Hydraulic Brake Booster
Turn the ignition switch off.
Disconnect the A7 skid control ECU (master cylinder solenoid) connector.
Disconnect the A99 stop light switch assembly connector.
Disconnect the R22 rear combination light assembly LH connector.
Disconnect the Q31*1 or R21*2 rear combination light assembly RH connector.
*1: for 3 Door
*2: for 5 Door
Measure the voltage according to the value(s) in the table below.
- Standard Voltage:
Tester Connection Condition Specified Condition A7-7 (STP) - Body ground Brake pedal released Below 1.5 V
- Result:
Proceed to OK NG
OK
NG
for Vacuum Brake Booster
Turn the ignition switch off.
Disconnect the A6 skid control ECU (brake actuator assembly) connector.
Disconnect the A99 stop light switch assembly connector.
Disconnect the R22 rear combination light assembly LH connector.
Disconnect the Q31*1 or R21*2 rear combination light assembly RH connector.
*1: for 3 Door
*2: for 5 Door
Disconnect the Z1 center stop light assembly connector.
Measure the voltage according to the value(s) in the table below.
- Standard Voltage:
Tester Connection Condition Specified Condition A6-2 (STP) - Body ground Brake pedal released Below 1.5 V
for Hydraulic Brake Booster
Turn the ignition switch off.
Disconnect the A7 skid control ECU (master cylinder solenoid) connector.
Disconnect the A99 stop light switch assembly connector.
Disconnect the R22 rear combination light assembly LH connector.
Disconnect the Q31*1 or R21*2 rear combination light assembly RH connector.
*1: for 3 Door
*2: for 5 Door
Disconnect the Z1 center stop light assembly connector.
Measure the voltage according to the value(s) in the table below.
- Standard Voltage:
Tester Connection Condition Specified Condition A7-7 (STP) - Body ground Brake pedal released Below 1.5 V
- Result:
Proceed to OK NG
OK
NG
for Vacuum Brake Booster
Turn the ignition switch off.
Disconnect the A6 skid control ECU (brake actuator assembly) connector.
Disconnect the A99 stop light switch assembly connector.
Measure the resistance according to the value(s) in the table below.
- Standard Resistance:
Tester Connection Condition Specified Condition A6-31 (STPO) or A99-4 (ACC) - Body ground Always 10 kΩ or higher
for Hydraulic Brake Booster
Turn the ignition switch off.
Disconnect the A7 skid control ECU (master cylinder solenoid) connector.
Disconnect the A99 stop light switch assembly connector.
Measure the resistance according to the value(s) in the table below.
- Standard Resistance:
Tester Connection Condition Specified Condition A7-16 (STPO) or A99-4 (ACC) - Body ground Always 10 kΩ or higher
- Result:
Proceed to OK NG
OK
NG