1GD-FTV FUEL FUEL SUPPLY PUMP INSTALLATION
PROCEDURE

 1. PRECAUTION
- NOTICE:
- ·
When replacing the parts in the following chart (A), replace the No. 1 injection pipe subassembly, No. 2 injection pipe sub-assembly and/or fuel inlet pipe sub-assembly with new ones.
Replaced Parts (A) Pipes Requiring New Replacement Injector assembly (including shuffling the injector assemblies between the cylinders) ·No. 1 injection pipe sub-assembly
·No. 2 injection pipe sub-assembly
Supply pump assembly Fuel inlet pipe sub-assembly ·Common rail assembly
·Cylinder block sub-assembly
·Cylinder head sub-assembly
·Cylinder head gasket
·Timing chain case assembly
·No. 1 injection pipe sub-assembly
·No. 2 injection pipe sub-assembly
·Fuel inlet pipe sub-assembly
·After removing the No. 1 injection pipe sub-assembly, No. 2 injection pipe sub-assembly and/or fuel inlet pipe sub-assembly, clean them with a brush and compressed air.
·The supply pump assembly is a precision instrument. Do not use the supply pump assembly if it is struck or dropped.
·Hold the supply pump assembly itself during removal and installation. Do not hold the pre-stroke control valve or fuel pipe, etc.
·Make sure foreign matter does not enter the fuel path.
22100
2.INSTALL SUPPLY PUMP ASSEMBLY
- NOTICE:
-
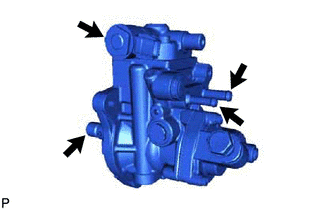
- ·
Do not hold the supply pump assembly by the parts indicated by the arrows in the illustration.
·With SST set, do not turn the crankshaft more than a half rotation.
Apply a light coat of engine oil to a new O-ring.
Install the O-ring to the supply pump assembly.
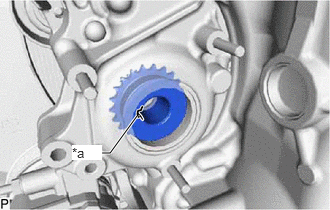
| *a | Groove |
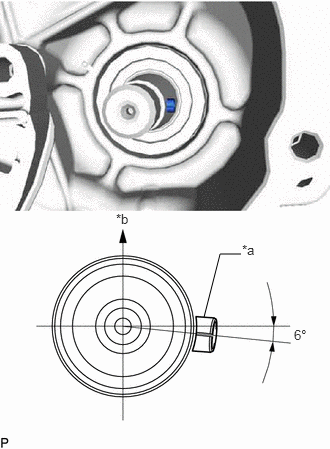
| *a | Supply Pump Shaft Key |
| *b | Upper Side |
To insert the supply pump assembly shaft in the supply pump shaft sprocket, it may be necessary to turn the supply pump assembly several degrees and the groove in the supply pump assembly shaft are aligned.
- HINT:
-
When installing a new supply pump assembly, adjust the supply pump assembly injection pump drive shaft key assignment by turning the supply pump assembly shown in the illustration.
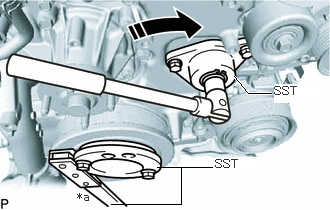
| *a | Hold |

|
Turn |
Using SST, tighten clockwise direction the supply pump assembly, and then temporarily install the 3 fuel supply pump fixing nuts.
- SST
- 09213-58014 (91551-80840)
09330-00021
09241-11010
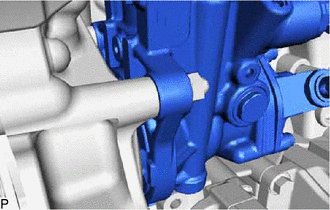
Using SST, tighten and insert the supply pump assembly up to the position shown in the illustration and tighten the 3 fuel supply pump fixing nuts.
- Torque:
- 21 N*m (214 kgf*cm, 15 ft.*lbf)
- HINT:
-
After tightening the part with SST, a gap of 2 to 3 mm in area A shown in the illustration is normal.
Install the No. 1 fuel pump bracket with the 2 bolts to the supply pump assembly and cylinder block sub-assembly.
- Torque:
- 21 N*m (214 kgf*cm, 15 ft.*lbf)
Remove SST and the 3 set bolts.
| *a | Hold |
|
|
Turn |
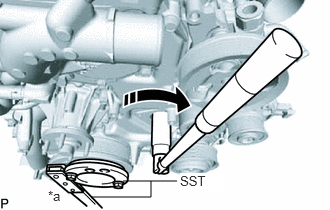
Using SST, hold the crankshaft pulley subassembly and tighten the set nut.
- SST
- 09213-58014 (91551-80840)
09330-00021
- Torque:
- 137 N*m (1397 kgf*cm, 101 ft.*lbf)
11324
3.INSTALL TIMING CHAIN COVER PLATE
Install the timing chain cover plate and new gasket with the 3 bolts.
- Torque:
- 10 N*m (102 kgf*cm, 7 ft.*lbf)
4.INSTALL FUEL PUMP MOTOR WIRE
Attach the clamp and install the fuel pump motor wire.
Connect the fuel pump motor wire connector.
22803
5.INSTALL FUEL INJECTION PUMP COVER SUB-ASSEMBLY
Install the fuel injection pump cover sub-assembly to the supply pump assembly.
23271H
6.INSTALL NO. 1 FUEL HOSE
Install the No. 1 fuel hose to the supply pump assembly and No. 2 fuel pipe, and slide the 2 clamps to secure it.
23273C
7.INSTALL NO. 2 FUEL HOSE
Install the No. 2 fuel hose to the supply pump assembly and No. 3 nozzle leakage pipe assembly, and slide the 2 clamps to secure it.
16620
8.INSTALL V-RIBBED BELT TENSIONER ASSEMBLY
16711
9.INSTALL FAN SHROUD
82123
10.CONNECT NO. 3 ENGINE WIRE (for Cold Area Specification Vehicles)
88359
11.INSTALL VISCOUS HEATER V BELT (w/ Viscous Heater)
12.CONNECT OIL COOLER HOSE (for Automatic Transmission)
16470
13.INSTALL RADIATOR RESERVOIR ASSEMBLY
16640
14.INSTALL INTERCOOLER RESERVOIR ASSEMBLY (w/ Urea SCR System)
16554B
15.INSTALL NO. 4 SUB-RADIATOR HOSE (w/ Urea SCR System)
16553B
16.INSTALL NO. 3 SUB-RADIATOR HOSE (w/ Urea SCR System)
161B0
17.INSTALL ELECTRIC WATER PUMP ASSEMBLY (w/ Urea SCR System)
16551B
18.INSTALL NO. 1 SUB-RADIATOR HOSE (w/ Urea SCR System)
16552B
19.INSTALL NO. 2 SUB-RADIATOR HOSE (w/ Urea SCR System)
16571C
20.INSTALL NO. 1 RADIATOR HOSE
17342F
21.INSTALL NO. 2 INTERCOOLER AIR HOSE (w/o Urea SCR System)
17341K
22.INSTALL INTERCOOLER AIR HOSE (w/o Urea SCR System)
17111
23.INSTALL INTAKE MANIFOLD
24.CONNECT CABLE TO NEGATIVE BATTERY TERMINAL
- NOTICE:
-
When disconnecting the cable, some systems need to be initialized after the cable is reconnected.
-
(Click hereGeneral>INTRODUCTION>REPAIR INSTRUCTION>INITIALIZATION)
25.BLEED AIR FROM FUEL SYSTEM
26.INSPECT FOR FUEL LEAK
51405A
27.INSTALL NO. 1 ENGINE UNDER COVER SUB-ASSEMBLY