1GD-FTV ENGINE CONTROL ECD SYSTEM(w/ Urea SCR System) P1251 Step Motor for Turbocharger Control Circuit (Intermittent)
DESCRIPTION
Refer to DTC P0046 (See page Engine / Hybrid System>1GD-FTV (ENGINE CONTROL)>ECD SYSTEM (w/ Urea SCR System)>P0046).
| DTC Detection Drive Pattern | DTC Detection Condition | Trouble Area |
|---|---|---|
| Vehicle being driven | Boost pressure is higher than the threshold* for 5 seconds (1 trip detection logic). | ·
Turbocharger nozzle vane control actuator ·
VN turbo link stuck malfunction ·
Extremely low battery voltage (P0560 stored simultaneously) ·
Intake system ·
Exhaust system ·
Electric EGR control valve assembly ·
EGR cooler assembly ·
Injector assembly ·
Diesel throttle body assembly ·
ECM |
- HINT:
-
*: This value changes based on engine speed, atmospheric pressure and the engine coolant temperature (the value is generally between 90 and 276 kPa).
| DTC No. | Data List |
|---|---|
| P1251 | ·
MAP ·
Target Booster Pressure ·
MAF ·
Target EGR Valve Pos ·
Actual EGR Valve Pos ·
Actual VN Turbo Position ·
Atmosphere Pressure |
- HINT:
-
If DTC P1251 is stored due to the VN turbo vane being stuck closed, the following symptoms may appear:
- ·
Vehicle surge when driving with full load
·Sudden lack of power due to power being limited
WIRING DIAGRAM
Refer to DTC P0046 (See page Engine / Hybrid System>1GD-FTV (ENGINE CONTROL)>ECD SYSTEM (w/ Urea SCR System)>P0046).
Refer to DTC P2564 (See page Engine / Hybrid System>1GD-FTV (ENGINE CONTROL)>ECD SYSTEM (w/ Urea SCR System)>P2564).
CAUTION / NOTICE / HINT
- NOTICE:
-
After replacing an injector assembly, the ECM needs registration (Click here Engine / Hybrid System>1GD-FTV (ENGINE CONTROL)>ECD SYSTEM (w/ Urea SCR System)>REGISTRATION).
- HINT:
-
Read freeze frame data using the GTS. Freeze frame data records the engine condition when malfunctions are detected. When troubleshooting, freeze frame data can help determine if the vehicle was moving or stationary, if the engine was warmed up or not, and other data from the time the malfunction occurred.
PROCEDURE
Connect the GTS to the DLC3.
Turn the engine switch on (IG) and turn the GTS on.
Enter the following menus: Powertrain / Engine and ECT / Trouble Codes.
Read the DTCs.
- HINT:
- ·
Record the stored DTCs and freeze frame data.
·Be sure to carefully examine "MAP" and "Target Booster Pressure" in the freeze frame data.
| Result | Proceed to |
|---|---|
| DTC P1251 is output | A |
| DTC P1251 and other DTCs are output | B |
- HINT:
-
DC motor related DTCs: P0046, P0047 and P0048.
-
Click hereEngine / Hybrid System>1GD-FTV (ENGINE CONTROL)>ECD SYSTEM (w/ Urea SCR System)>P0046
-
Nozzle vane position sensor related DTCs: P2564 and P2565.
-
Click hereEngine / Hybrid System>1GD-FTV (ENGINE CONTROL)>ECD SYSTEM (w/ Urea SCR System)>P2564
A
B
Check if the hoses between the air cleaner filter element sub-assembly and turbocharger subassembly, and turbocharger sub-assembly and intake manifold are damaged or disconnected.
| Result | Proceed to |
|---|---|
| Hoses or pipes are damaged or disconnected | A |
| No hoses or pipes are damaged or disconnected | B |
- HINT:
- ·
Be sure to check if the hoses and pipes between the air cleaner and compressor are disconnected as disconnection of a hose or pipe can cause overboost. Also, check the high pressure hoses for disconnection due to overboost.
·Check for disconnection of the exhaust pipes.
·Using your hand, check whether the pipes and hoses in the intake system are securely connected.
·Check for any modifications in the intake system made by the user.
A
B
Repair or replace the malfunctioning part in the air intake system.
NEXT
Connect the GTS to the DLC3.
Turn the engine switch on (IG) and turn the GTS on.
Enter the following menus: Powertrain / Engine and ECT / Active Test / Test the Turbo Charger Step Motor / Data List / Target VN Turbo Position and Actual VN Turbo Position.
While changing the Active Test value to 10, 20, 30, 40, 30, 20 and 10%, check that Actual VN Turbo Position smoothly changes to the set opening amount.
- NOTICE:
-
When moving the vanes toward the fully closed position, make sure that Actual VN Turbo Position does not become 5% or less.
- OK:
The Actual VN Turbo Position value follows the Target VN Turbo Position.
OK
NG
Connect the GTS to the DLC3.
Start the engine and warm it up, and make sure the A/C switch and all accessory switches are off.
Turn the engine switch off. Wait for 30 seconds, and then restart the engine.
Turn the GTS on.
Enter the following menus: Powertrain / Engine and ECT / Data List / MAF.
Read the MAF value displayed on the GTS while the engine is idling.
Enter the following menus: Powertrain / Engine and ECT / Active Test / Activate the EGR Valve Close / Data List / MAF.
Read the MAF value when the EGR valve is closed using the Active Test function.
- HINT:
- ·
If idling continues for 20 minutes or more, the EGR valve target opening angle becomes 0% (EGR valve fully closed). As this makes diagnosis impossible, it becomes necessary to drive the vehicle or to restart the engine.
·Before performing the diagnosis, confirm that the EGR valve target opening angle is not 0%.
·When idling the engine, the No. 1 EGR cooler is bypassed.
| Active Test | Result | Proceed to |
|---|---|---|
| Activate the EGR Valve Close:
Off (Open) to On (Closed) |
MAF value does not change | A |
| MAF value changes | B |
- NOTICE:
-
As the measured values may differ from those shown below due to factors such as differences in measuring environments and changes in vehicle condition due to aging, do not use these values to determine whether the vehicle is malfunctioning or not.
- HINT:
-
The problem may be a temporary one, due to the entry of deposits or foreign matter. Check that there are no deposits or foreign matter in the electric EGR control valve assembly or mass air flow meter sub-assembly.
- Reference:
EGR Valve Condition (Opening) Measuring Condition MAF (Reference) Open (41%) ·Atmosphere pressure: 101 kPa
·Engine coolant temperature: 75°C (167°F)
3 to 7 gm/sec Closed (0%) 11 to 16 gm/sec
A
B
Check the change in the values of "Target EGR Valve Pos" and "Actual EGR Valve Pos" in the Data List from the time when the "Control the EGR Step Position" Active Test was performed in the previous step.
| Result | Proceed to |
|---|---|
| Even though "Target EGR Valve Pos" indicated that the system was commanding the valve to open, "Actual EGR Valve Pos" remained near 0% and did not change | A |
| Other than above ("Actual EGR Valve Pos" changed according to the EGR valve open/close commands of the Active Test) | B |
A
B
Remove the electric EGR control valve assembly.
Click hereEngine / Hybrid System>1GD-FTV (EMISSION CONTROL)>EGR VALVE>REMOVAL
Visually check the electric EGR control valve assembly for deposits. If there are deposits, clean the electric EGR control valve assembly.
- NOTICE:
- ·
When cleaning the electric EGR control valve assembly, make sure the valve is completely closed.
·Do not forcibly open the valve, as it may be damaged or deformed.
·When cleaning the electric EGR control valve assembly, use a piece of cloth soaked with cleaning solvent. Spraying the solvent directly onto these parts or soaking the parts in the solvent may damage the parts.
·When cleaning the electric EGR control valve, care should be taken to prevent the ingress of cleaning solvent into the bearings of the valve shaft, and when wiping off deposits on the EGR valve, care should be taken not to push the deposits into the bearings of the valve shaft. These contaminants may adversely affect the function of the EGR valve.
·When cleaning the electric EGR control valve assembly, perform initialization procedure.
Click hereEngine / Hybrid System>1GD-FTV (ENGINE CONTROL)>ECD SYSTEM (w/ Urea SCR System)>INITIALIZATION
- HINT:
- ·
If the EGR valve is stuck closed, the intake air amount increases and engine vibration may worsen.
·If the EGR valve does not close properly or is stuck open, EGR becomes excessive and combustion becomes unstable. Also, there may be a lack of power.
Reinstall the electric EGR control valve assembly.
Click hereEngine / Hybrid System>1GD-FTV (ENGINE CONTROL)>ECD SYSTEM (w/ Urea SCR System)>INITIALIZATION
NEXT
Replace the No. 1 EGR cooler.
Click hereEngine / Hybrid System>1GD-FTV (EMISSION CONTROL)>EGR COOLER>REMOVAL
NEXT
Connect the GTS to the DLC3.
Start the engine and warm it up until the engine coolant temperature reaches 75°C (167°F) or higher.
Allow the engine to idle for 1 minute or more.
- HINT:
-
The A/C switch and all accessory switches should be off with a fully warm engine.
Turn the GTS on.
Enter the following menus: Powertrain / Engine and ECT / Data List / Injection Volume.
Read the value of Injection Volume at 4000 rpm without load.
| Result | Proceed to |
|---|---|
| Injection Volume is less than 10 mm3/st | A |
| Except above | B |
- HINT:
- ·
If the injector assembly is malfunctioning, the compensatory injection volume remains at 5.0 mm3/st.
·If there is a disconnection, the feedback value will increase and +5.0 mm3/st will be indicated, because it will become impossible for the injector to inject.
A
B
Replace the injector assemblies of all cylinders.
Click hereEngine / Hybrid System>1GD-FTV (FUEL)>FUEL INJECTOR>REMOVAL
- NOTICE:
- ·
When replacing the injector assembly for a cylinder, always be sure to use a new No. 1 injection pipe sub-assembly and a new No. 2 injection pipe sub-assembly.
·Follow the procedure in the repair manual and temporarily install the No. 1 injection pipe sub-assembly, No. 2 injection pipe sub-assembly and No. 1 nozzle leakage pipe assembly, and then correctly position the injector assemblies. After that, tighten parts according to the torque specifications.
·If the installation procedure is not performed correctly, injector assemblies may become out of position, which may cause the injector assemblies to deteriorate, resulting in malfunctions.
·If an injector assembly deteriorates and malfunctions, other problems such as knocking, rough idle, etc. may occur.
·If an injector assembly becomes out of position, it is possible that the seal between the injector assembly and injection pipe sub-assembly may become incomplete, resulting in a fuel leak.
NEXT
Bleed the air from the fuel system.
Click hereEngine / Hybrid System>1GD-FTV (FUEL)>FUEL SYSTEM>ON-VEHICLE INSPECTION
NEXT
Register the injector compensation code.
Click hereEngine / Hybrid System>1GD-FTV (ENGINE CONTROL)>ECD SYSTEM (w/ Urea SCR System)>REGISTRATION
Perform the injector pilot quantity learning.
Click hereEngine / Hybrid System>1GD-FTV (ENGINE CONTROL)>ECD SYSTEM (w/ Urea SCR System)>REGISTRATION
NEXT
Connect the GTS to the DLC3.
Clear the DTCs.
Click hereEngine / Hybrid System>1GD-FTV (ENGINE CONTROL)>ECD SYSTEM (w/ Urea SCR System)>DTC CHECK / CLEAR
Turn the engine switch off.
Start the engine and warm it up.
Confirm the value of Engine Speed from the Freeze Frame Data recorded previously, and then drive the vehicle according to the Engine Speed value.
- HINT:
-
Take a snapshot of "MAP" and "Target Boost Pressure" in the Data List with the GTS while driving the vehicle.
Enter the following menus: Powertrain / Engine and ECT / Trouble Codes.
Read the DTCs.
| Result | Proceed to |
|---|---|
| DTC P1251 is not output and the amount by which MAP exceeds Target Boost Pressure is 20 kPa or less | A |
| Except above | B* |
- HINT:
-
*: Return to "Check Air Intake System" and inspect areas that have not been inspected yet.
A
B
Disconnect the DC motor connector.
Disconnect the nozzle vane position sensor connector.
Disconnect the ECM connector.
Measure the resistance according to the value(s) in the table below.
- Standard Resistance:
Tester Connection Condition Specified Condition C175-1 (M-) - C151-2 (VNM-) Always Below 1 Ω C175-2 (M+) - C151-1 (VNM+) Always Below 1 Ω C144-3 (VTA1) - C151-23 (VNA) Always Below 1 Ω C144-2 (VNE2) - C151-22 (VNE2) Always Below 1 Ω C144-1 (VNVC) - C151-30 (VNVC) Always Below 1 Ω C175-1 (M-) or C151-2 (VNM-) - Body ground and other terminals Always 10 kΩ or higher C175-2 (M+) or C151-1 (VNM+) - Body ground and other terminals Always 10 kΩ or higher C144-3 (VTA1) or C151-23 (VNA) - Body ground and other terminals Always 10 kΩ or higher C144-1 (VNVC) or C151-30 (VNVC) - Body ground and other terminals Always 10 kΩ or higher
Reconnect the DC motor connector.
Reconnect the nozzle vane position sensor connector.
Reconnect the ECM connector.
OK
NG
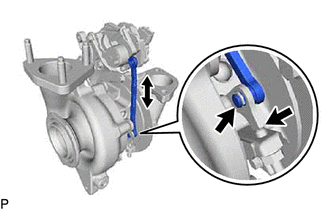
Remove the turbocharger sub-assembly.
Click hereEngine / Hybrid System>1GD-FTV (INTAKE / EXHAUST)>EXHAUST MANIFOLD W/ TURBOCHARGER>REMOVAL
Inspect the turbocharger nozzle vane plate.
Remove the e-washer from the turbocharger nozzle vane control actuator.
Move the turbocharger vane control rod subassembly and check that the turbocharger nozzle vane plate moves.
- Result:
Result Proceed to Catches, but operates* OK Gets stuck and does not operate NG
- NOTICE:
-
*: Check several times.
OK
Click hereEngine / Hybrid System>1GD-FTV (INTAKE / EXHAUST)>EXHAUST MANIFOLD W/ TURBOCHARGER>DISASSEMBLY
NG
Click hereEngine / Hybrid System>1GD-FTV (INTAKE / EXHAUST)>EXHAUST MANIFOLD W/ TURBOCHARGER>REMOVAL