SLIDING ROOF / CONVERTIBLE SLIDING ROOF HOUSING REMOVAL
PROCEDURE

 1. PRECAUTION
- NOTICE:
-
After the ignition switch is turned off, there may be a waiting time before disconnecting the negative (-) battery terminal.
-
Click hereGeneral>INTRODUCTION>REPAIR INSTRUCTION>PRECAUTION
2.DISCONNECT CABLE FROM NEGATIVE BATTERY TERMINAL
- CAUTION:
-
Wait at least 90 seconds after disconnecting the cable from the negative (-) battery terminal to disable the SRS system.
63310
3.REMOVE ROOF HEADLINING ASSEMBLY (for 5 Door)
63310
4.REMOVE ROOF HEADLINING ASSEMBLY (for 3 Door)
62180A
5.REMOVE CURTAIN SHIELD AIRBAG ASSEMBLY LH
62170A
6.REMOVE CURTAIN SHIELD AIRBAG ASSEMBLY RH
- HINT:
-
Use the same procedure described for the LH side.
88566T
7.REMOVE REAR NO. 3 ROOF AIR DUCT (for Dual Air Conditioning System)
88566V
8.REMOVE REAR NO. 5 ROOF AIR DUCT (for Dual Air Conditioning System)
86680A
9.REMOVE TELEVISION DISPLAY ASSEMBLY (w/ Rear Seat Entertainment System)
86117A
10.REMOVE TELEVISION DISPLAY BRACKET A (w/ Rear Seat Entertainment System)
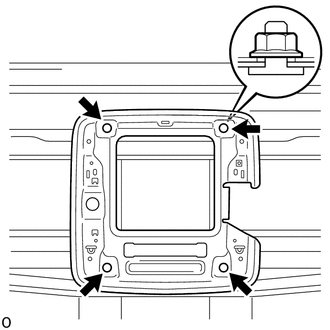
Remove the 4 nuts and television display bracket A.
63218M
11.REMOVE SLIDING ROOF SIDE GARNISH LH
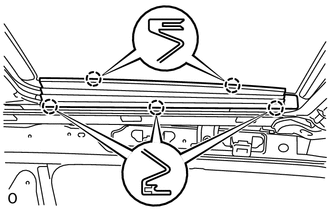
Detach the 5 claws and remove the sliding roof side garnish LH.
63217K
12.REMOVE SLIDING ROOF SIDE GARNISH RH
- HINT:
-
Use the same procedure described for the LH side.
63201G
13.REMOVE SLIDING ROOF GLASS SUB-ASSEMBLY
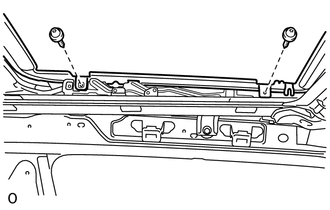
Using a T25 "TORX" driver, remove the 4 screws and sliding roof glass sub-assembly.
63203F
14.REMOVE SLIDING ROOF HOUSING SUB-ASSEMBLY
Disconnect the 4 drain hoses.
Remove the 4 bolts and 4 nuts.
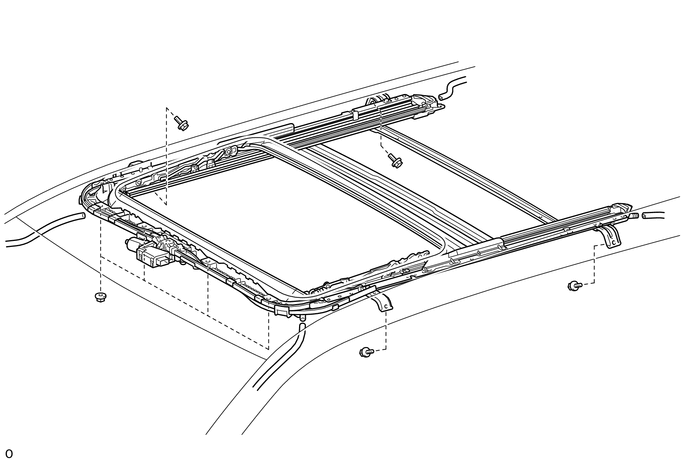
Loosen the 4 nuts as shown in the illustration.
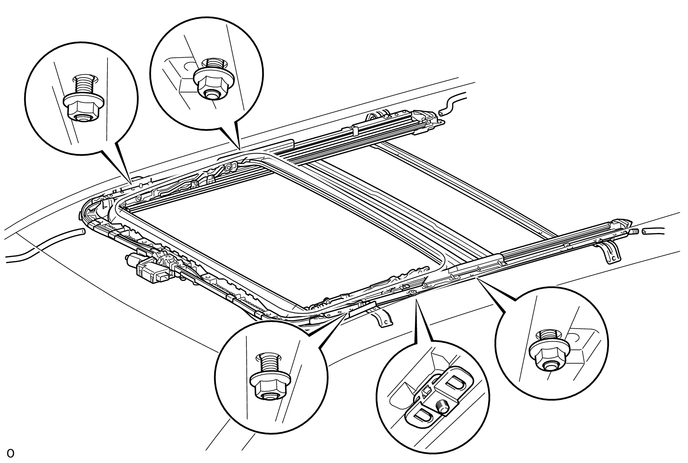
- NOTICE:
-
Be sure that the nuts are fully threaded onto the bolts.
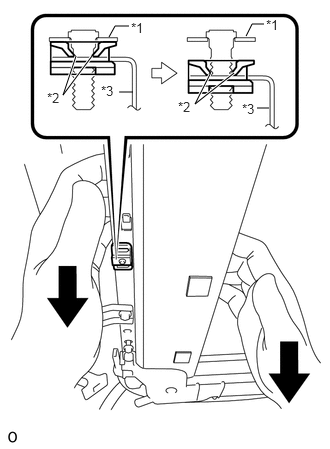
Pull the sliding roof housing sub-assembly downward and detach the 2 claws of the sliding roof lock catch plate LH form the stud bolt as shown in the illustration.
| *1 | Bracket (Roof Panel) |
| *2 | Sliding Roof Lock Catch Plate LH Claw |
| *3 | Sliding Roof Housing Sub-assembly |
- NOTICE:
-
Performing this procedure breaks the claws of the sliding roof lock catch plate LH so that the sliding roof housing sub-assembly can be removed. However, do not use excessive force.
Remove the 4 nuts and sliding roof housing sub-assembly.
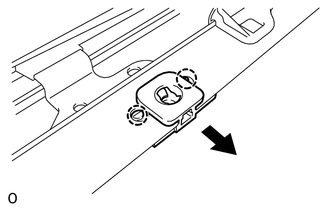
Detach the 2 claws and remove the sliding roof lock catch plate LH from the sliding roof housing sub-assembly.
- HINT:
-
The sliding roof lock catch plate LH is used when the vehicle is assembled at the factory and is not needed for reinstallation.