SUSPENSION CONTROL STABILIZER CONTROL VALVE(w/ KDSS) INSTALLATION
PROCEDURE

 48860D
1.INSTALL STABILIZER CONTROL WITH ACCUMULATOR HOUSING ASSEMBLY
Install the stabilizer control with accumulator housing with the 3 bolts.
- Torque:
- 29 N*m (296 kgf*cm, 21 ft.*lbf)
Connect the connector, and then attach the clamp to the hole of the bracket.
48890
2.CONNECT FRONT NO. 1 STABILIZER CONTROL TUBE ASSEMBLY
Temporarily install the 2 flare nuts on the front No. 1 stabilizer control tube assembly.
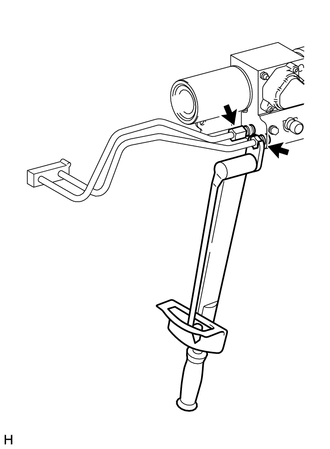
Using a union nut wrench, tighten the 2 flare nuts on the front No. 1 stabilizer control tube assembly.
- Torque:
- 44 N*m (450 kgf*cm, 33 ft.*lbf)
- NOTICE:
-
Use the formula to calculate special torque values for situations where a union nut wrench is combined with a torque wrench (See page General>INTRODUCTION>REPAIR INSTRUCTION>PRECAUTION).
44327N
3.CONNECT REAR NO. 1 STABILIZER CONTROL TUBE ASSEMBLY
Temporarily install the 2 flare nuts on the rear No. 1 stabilizer control tube assembly.
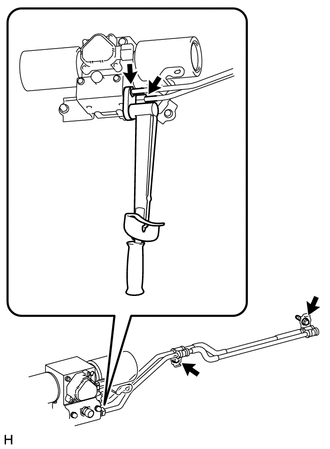
Connect the rear No. 1 stabilizer control tube assembly with the 2 bolts.
- Torque:
- 29 N*m (296 kgf*cm, 21 ft.*lbf)
Using a union nut wrench, tighten the 2 flare nuts on the rear stabilizer control tubes.
- Torque:
- 44 N*m (450 kgf*cm, 33 ft.*lbf)
- NOTICE:
-
Use the formula to calculate special torque values for situations where a union nut wrench is combined with a torque wrench (See page General>INTRODUCTION>REPAIR INSTRUCTION>PRECAUTION).
4.BLEED AIR FROM SUSPENSION FLUID
5.APPLY PRESSURE ACCORDING TO TEMPERATURE MANAGEMENT CHART WHEN FILLING FLUID
6.INSPECT FOR SUSPENSION FLUID LEAK
7.MEASURE VEHICLE HEIGHT
48826D
8.INSTALL STABILIZER CONTROL VALVE PROTECTOR
Install the stabilizer control valve protector with the 2 bolts.
- Torque:
- 29 N*m (296 kgf*cm, 21 ft.*lbf)
9.INSTALL SIDE STEP ASSEMBLY LH
10.CONNECT CABLE TO NEGATIVE BATTERY TERMINAL
11. INITIALIZATION AFTER RECONNECTING BATTERY TERMINAL
Click hereGeneral>SETUP>WHEN DISCONNECTING OR RECONNECTING BATTERY TERMINAL>WORK PROCEDURE
- HINT:
-
When disconnecting and reconnecting the battery, there is an automatic learning function that completes learning when the respective system is used.
-
Click hereGeneral>SETUP>WHEN DISCONNECTING OR RECONNECTING BATTERY TERMINAL>AUTOMATIC LEARNING CHART