1GD-FTV EMISSION CONTROL EGR VALVE INSTALLATION
PROCEDURE

 25630
1.INSTALL NO. 2 EGR VALVE ASSEMBLY (w/ EGR Cooler)
Using an E8 "TORX" socket wrench, install the 2 stud bolts to the No. 2 EGR valve assembly.
- Torque:
- 5.0 N*m (51 kgf*cm, 44 in.*lbf)
Install a new gasket and the No. 2 EGR valve assembly to the No. 1 EGR cooler with the 4 bolts.
- Torque:
- 25 N*m (255 kgf*cm, 18 ft.*lbf)
25624
2.INSTALL EGR VALVE ADAPTER (w/ EGR Cooler)
Install a new gasket and the EGR valve adapter to the No. 2 EGR valve assembly with the 2 bolts.
- Torque:
- 25 N*m (255 kgf*cm, 18 ft.*lbf)
3.INSTALL NO. 1 EGR COOLER WITH NO. 2 EGR VALVE ASSEMBLY (w/ EGR Cooler)
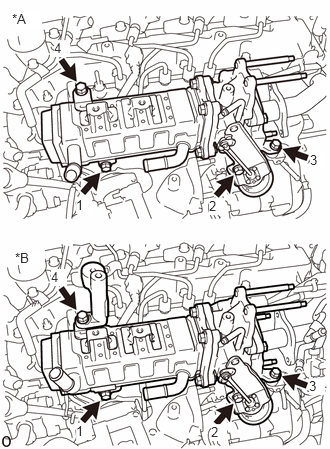
| *A | w/o Urea SCR System |
| *B | w/ Urea SCR System |
w/ Urea SCR System:
Temporarily install a new gasket and the No. 2 intercooler support bracket and No. 1 EGR cooler with No. 2 EGR valve assembly to the intake manifold with the 4 bolts.
w/o Urea SCR System:
Temporarily install a new gasket and the No. 1 EGR cooler with No. 2 EGR valve assembly to the intake manifold with the 4 bolts.
Using an E8 "TORX" socket wrench, install the 2 stud bolts to the No. 2 EGR valve assembly.
- Torque:
- 5.0 N*m (51 kgf*cm, 44 in.*lbf)
Tighten the 4 bolts in the order shown in the illustration.
- Torque:
- 21 N*m (214 kgf*cm, 15 ft.*lbf)
- NOTICE:
-
Make sure to tighten the bolts in the order.
25804
4.INSTALL VACUUM CONTROL VALVE SET (w/ EGR Cooler)
25601
5.CONNECT NO. 1 EGR PIPE SUB-ASSEMBLY (w/ EGR Cooler)
Install 2 new gaskets and connect the No. 1 EGR pipe sub-assembly to the EGR valve adapter with 2 new nuts.
- Torque:
- 29 N*m (296 kgf*cm, 21 ft.*lbf)
16209
6.CONNECT NO. 4 WATER BY-PASS PIPE SUB-ASSEMBLY (w/ EGR Cooler)
Connect the No. 4 water by-pass pipe sub-assembly to the intake manifold with the 2 bolts.
- Torque:
- 10 N*m (102 kgf*cm, 7 ft.*lbf)
Connect the water hose to the No. 2 EGR valve assembly, and slide the clamp to secure the hose.
Connect the No. 7 water by-pass hose to the No. 1 EGR cooler, and slide the clamp to secure the hose.
Install the No.17 water by-pass hose to the No. 1 EGR pipe sub-assembly and No. 4 water by-pass pipe sub-assembly.
16206B
7.INSTALL NO. 3 WATER BY-PASS PIPE SUB-ASSEMBLY (w/ EGR Cooler)
Install the No. 3 water by-pass pipe sub-assembly to the No. 1 EGR cooler with the 2 bolts.
- Torque:
- 10 N*m (102 kgf*cm, 7 ft.*lbf)
Connect the No. 8 water by-pass hose to the No. 3 water by-pass pipe sub-assembly, and slide the clamp to secure the hose.
Connect the No. 4 fuel hose to the No. 3 water by-pass pipe sub-assembly.
25800
8.INSTALL ELECTRIC EGR CONTROL VALVE ASSEMBLY
Install a new gasket and the electric EGR control valve assembly to the No. 2 EGR valve assembly with the 2 bolts.
- Torque:
- 25 N*m (255 kgf*cm, 18 ft.*lbf)
Connect the No. 9 water by-pass hose to the electric EGR control valve assembly, and slide the clamp to secure the hose.
25612
9.INSTALL NO. 2 EGR PIPE
Install 2 new gaskets and No. 2 EGR pipe to the electric EGR control valve assembly and the intake manifold with the 4 nuts.
- Torque:
- 29 N*m (296 kgf*cm, 21 ft.*lbf)
Attach the 6 clamps and connect the engine room main wire.
25625
10.INSTALL EGR VALVE BRACKET
Install the EGR valve bracket to the electric EGR control valve assembly and intake manifold with the bolt and nut.
- Torque:
- 21 N*m (214 kgf*cm, 15 ft.*lbf)
82121
11.CONNECT ENGINE WIRE
w/ Urea SCR System:
Attach the clamp and connect the engine wire with the bolt.
- Torque:
- 13 N*m (133 kgf*cm, 9 ft.*lbf)
Attach the clamp and connect the connector to the vacuum control valve set.
Attach the clamp and install the bolt.
- Torque:
- 8.0 N*m (82 kgf*cm, 6 ft.*lbf)
Connect the connector to the engine water temperature sensor.
Connect the 2 connectors to the vane pump assembly.
Attach the clamp and install the 3 bolts.
- Torque:
- 8.0 N*m (82 kgf*cm, 71 in.*lbf)
Connect the connector to the electric EGR control valve assembly.
Connect the connector to the glow plug connector.
Connect the connector to the sensor wire of the common rail assembly.
Connect the 4 connectors to the 4 injector assemblies.
Connect the connector to the No. 1 nitrogen oxides sensor.
Attach the clamp and install the bolt.
- Torque:
- 8.0 N*m (82 kgf*cm, 71 in.*lbf)
Connect the 3 connectors to the 3 exhaust gas temperature sensors.
Connect the connector to the differential pressure sensor.
Connect the engine wire to the engine cover bracket with the bolt.
- Torque:
- 8.0 N*m (82 kgf*cm, 71 in.*lbf)
Connect the connector to the exhaust fuel addition injector assembly.
Connect the connector to the camshaft position sensor.
Attach the 3 clamps and connect the 2 connectors to the turbocharger sub-assembly.
w/o Urea SCR System:
Connect the connector to the vacuum control valve set.
Attach the clamp and install the bolt.
- Torque:
- 13 N*m (133 kgf*cm, 9 ft.*lbf)
Attach the clamp and connect the 2 connectors to the vane pump assembly.
Attach the clamp and install the bolt.
- Torque:
- 13 N*m (133 kgf*cm, 10 ft.*lbf)
Connect the connector to the sensor wire of the common rail assembly.
Connect the connector to the glow plug connector.
Connect the connector to the electric EGR control valve assembly.
Connect the 4 connectors to the 4 injector assemblies.
Connect the connector to the camshaft position sensor.
w/ DPF:
Connect the connector to the exhaust fuel addition injector assembly.
w/ DPF:
Connect the 3 connectors to the 3 exhaust gas temperature sensors.
w/ DPF:
Connect the connector to the differential pressure sensor.
Attach the 2 clamps and connect the 2 connectors to the turbocharger sub-assembly.
44306
12.CONNECT VANE PUMP OIL RESERVOIR SUB-ASSEMBLY
Connect the vane pump oil reservoir sub-assembly to the body with the 2 bolts.
- Torque:
- 13.5 N*m (138 kgf*cm, 10 ft.*lbf)
77820
13.CONNECT UREA TANK FILLER PIPE ASSEMBLY (w/ Urea SCR System)
Connect the urea tank filler pipe assembly to the No. 1 oil reservoir bracket assembly with the 3 bolts.
- Torque:
- 5.5 N*m (56 kgf*cm, 49 in.*lbf)
12632
14.INSTALL NO. 2 ENGINE COVER BRACKET (w/o Urea SCR System)
Install the No. 2 engine cover bracket to the No. 3 water by-pass pipe sub-assembly and No. 2 EGR valve assembly with the 2 bolts.
- Torque:
- 10 N*m (102 kgf*cm, 7 ft.*lbf)
12633
15.INSTALL NO. 3 ENGINE COVER BRACKET (w/o Urea SCR System)
Install the No. 3 engine cover bracket to the engine cover bracket and No. 2 engine cover bracket with the 2 bolts.
- Torque:
- 21 N*m (214 kgf*cm, 15 ft.*lbf)
89421C
16.INSTALL DIESEL TURBO PRESSURE SENSOR
Install the diesel turbo pressure sensor to the No. 3 water by-pass pipe sub-assembly with the bolt.
- Torque:
- 10 N*m (102 kgf*cm, 7 ft.*lbf)
Connect the connector to the diesel turbo pressure sensor.
23265C
17.INSTALL GAS FILTER
Install the gas filter to the gas filter bracket.
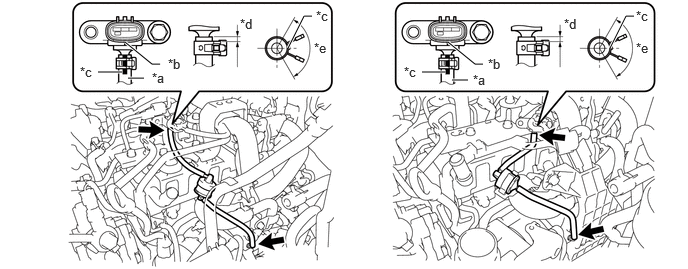
| *a | Vacuum Hose | *b | Protrusion |
| *c | Paint Mark | *d | 0 to 4 mm (0 to 0.157 in.) |
| *e | 120° | - | - |
Connect the vacuum hose to the turbo pressure sensor, and slide the clip to secure the hose.
Connect the vacuum hose to the intake manifold.
16278
18.INSTALL NO. 2 WATER BY-PASS PIPE
Install the No. 2 water by-pass pipe to the cylinder head cover sub-assembly, No. 3 water by-pass pipe sub-assembly and No. 2 engine cover bracket with the 3 bolts.
- Torque:
- 10 N*m (102 kgf*cm, 7 ft.*lbf)
w/ EGR Cooler:
Connect the No. 16 water by-pass hose to the No. 1 EGR cooler, and slide the clamp to secure the hose.
w/o EGR Cooler:
Connect the No. 16 water by-pass hose to the No. 1 EGR pipe stay, and slide the clamp to secure the hose.
Connect the No. 15 water by-pass hose to the water by-pass pipe, and slide the clamp to secure the hose.
w/o Viscous Heater:
Connect the No. 13 water by-pass hose to the No. 2 water by-pass pipe, and slide the clamp to secure the hose.
w/ Viscous Heater:
Connect the water by-pass hose sub-assembly to the No. 2 water by-pass pipe, and slide the clamp to secure the hose.
w/o Urea SCR System:
w/ EGR Pre-cooler:
Attach the clamp and connect the No. 18 water by-pass hose to the No. 2 engine cover bracket.
w/ EGR Pre-cooler:
Connect the No. 18 water by-pass hose to the No. 1 EGR pipe sub-assembly, and slide the clamp to secure the hose.
87209
19.INSTALL WATER HOSE SUB-ASSEMBLY
Install the 2 water hose sub-assemblies to the air conditioning unit assembly, and slide the clamp to secure the hoses.
w/ Rear Air Conditioning System:
Connect the 2 water hose sub-assemblies to the water pipe, and slide the clamp to secure the hoses.
26100G
20.INSTALL DIESEL THROTTLE BODY ASSEMBLY
55781E
21.INSTALL COWL TOP VENTILATOR LOUVER SUB-ASSEMBLY
17940D
22.INSTALL INTERCOOLER ASSEMBLY (w/ Urea SCR System)
23.ADD ENGINE COOLANT (w/ Urea SCR System)
24.ADD ENGINE COOLANT
25.INSPECT FOR COOLANT LEAK (w/ Urea SCR System)
26.INSPECT FOR COOLANT LEAK