SUSPENSION CONTROL STABILIZER CONTROL TUBE(w/ KDSS) REMOVAL
PROCEDURE

 1. PRECAUTION
- CAUTION:
-
Be sure to read Precaution thoroughly before servicing.
-
Click hereVehicle Interior>SUPPLEMENTAL RESTRAINT SYSTEMS>AIRBAG SYSTEM>PRECAUTION
- NOTICE:
-
After the ignition switch is turned off, there may be a waiting time before disconnecting the negative (-) battery terminal.
-
Click hereGeneral>INTRODUCTION>REPAIR INSTRUCTION>PRECAUTION
2.DISCONNECT CABLE FROM NEGATIVE BATTERY TERMINAL
- CAUTION:
-
Wait at least 90 seconds after disconnecting the cable from the negative (-) battery terminal to disable the SRS system.
3.REMOVE FRONT WHEEL LH
4.REMOVE REAR WHEEL LH
5.REMOVE SPARE TIRE
6.REMOVE SIDE STEP ASSEMBLY LH
52129B
7.REMOVE FRONT BUMPER COVER LOWER
51405A
8.REMOVE NO. 1 ENGINE UNDER COVER SUB-ASSEMBLY
51495
9.REMOVE TRANSMISSION UNDER COVER
48826D
10.REMOVE STABILIZER CONTROL VALVE PROTECTOR
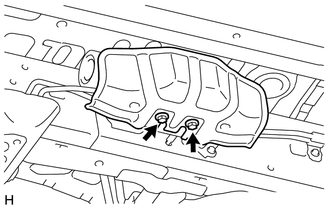
Remove the 2 bolts and stabilizer control valve protector.
11.DRAIN SUSPENSION FLUID
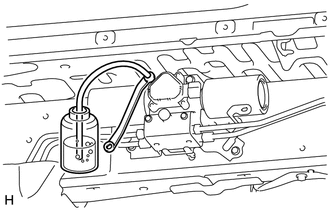
Loosen the bleeder plug on the stabilizer control with accumulator housing assembly and drain suspension fluid.
- HINT:
- ·
Drain suspension fluid when performing operations related to the hydraulic circuits.
·Draining suspension fluid decreases suspension fluid pressure.
Tighten the bleeder plug.
- Torque:
- 8.3 N*m (85 kgf*cm, 73 in.*lbf)
48827D
12.REMOVE FRONT STABILIZER TUBE PROTECTOR (for 1GR-FE)
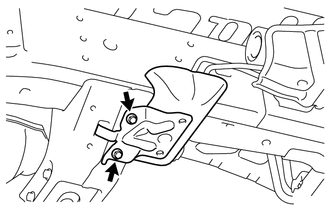
Remove the 2 bolts and front stabilizer tube protector.
89678A
13.REMOVE NO. 2 UREA PUMP CONTROL BRACKET (for 1GD-FTV)
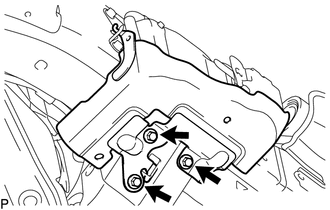
Remove the 3 bolts and No. 2 urea pump control bracket from the frame LH.
48890
14.REMOVE FRONT STABILIZER CONTROL TUBE INSULATOR (for 1GR-FE)
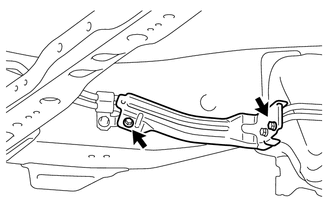
Remove the 2 bolts and front stabilizer control tube insulator.
- NOTICE:
-
When replacing the front No. 1 stabilizer control tube assembly, do not install the front stabilizer control tube insulator as it becomes unnecessary.
48890
15.DISCONNECT FRONT NO. 1 STABILIZER CONTROL TUBE ASSEMBLY
When disconnecting the front No. 1 stabilizer control tube assembly before replacement:
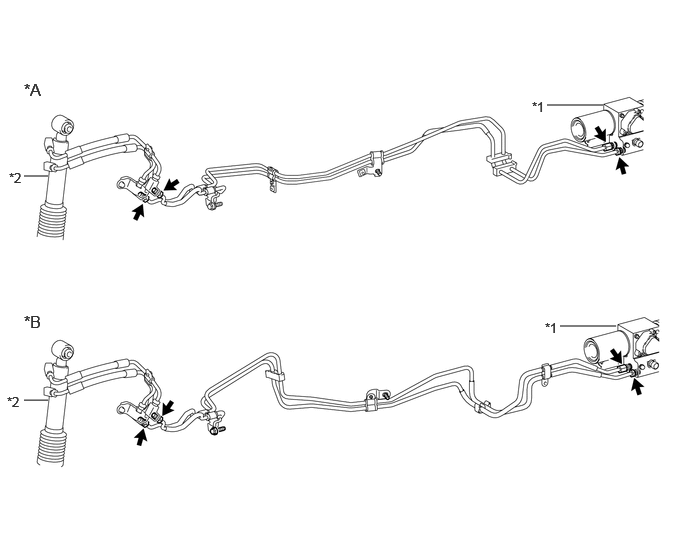
| *A | for 1GR-FE | *B | for 1GD-FTV |
| *1 | Stabilizer Control with Accumulator Housing Assembly | *2 | Front Stabilizer with Tube Cylinder Assembly |
Using a union nut wrench, disconnect the 2 flare nuts from the stabilizer control with accumulator housing.
Using a union nut wrench, disconnect the 2 flare nuts from the front stabilizer with tube cylinder assembly.
When disconnecting the front No. 1 stabilizer control tube assembly after replacement:
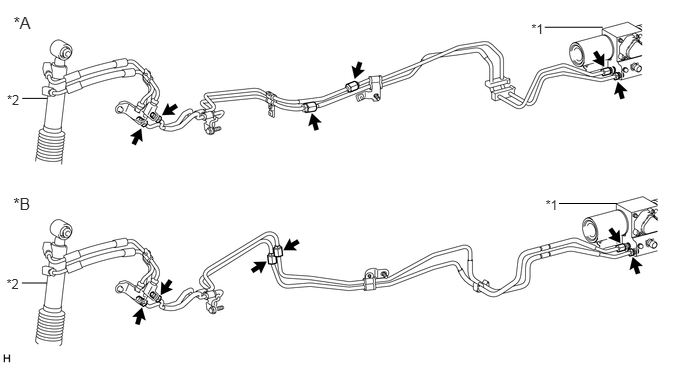
| *A | for 1GR-FE | *B | for 1GD-FTV |
| *1 | Stabilizer Control with Accumulator Housing Assembly | *2 | Front Stabilizer with Tube Cylinder Assembly |
Using a union nut wrench, disconnect the 2 flare nuts from the stabilizer control with accumulator housing.
Using a union nut wrench, disconnect the 2 flare nuts from the front stabilizer with tube cylinder assembly.
Using a union nut wrench, disconnect the 2 flare nuts.
48890
16.REMOVE FRONT NO. 1 STABILIZER CONTROL TUBE ASSEMBLY
When removing the front No. 1 stabilizer control tube assembly before replacement:
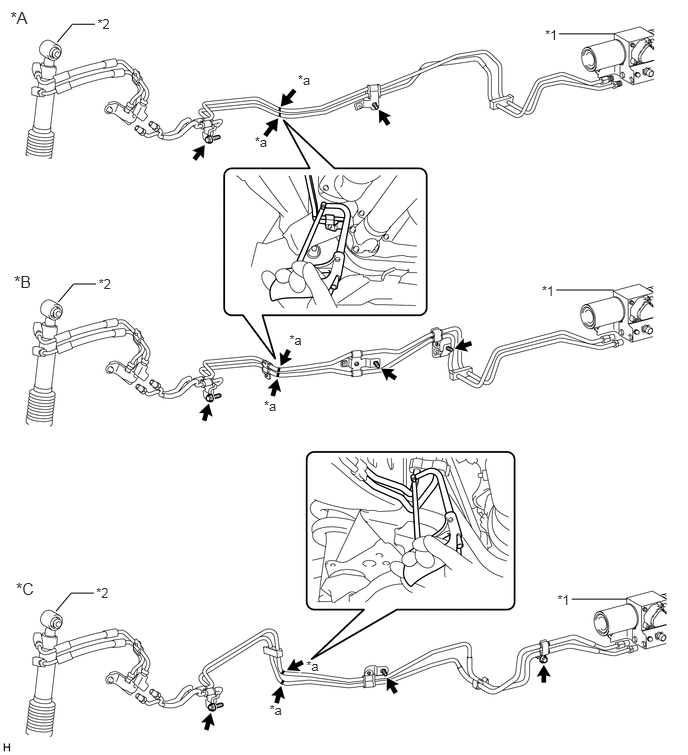
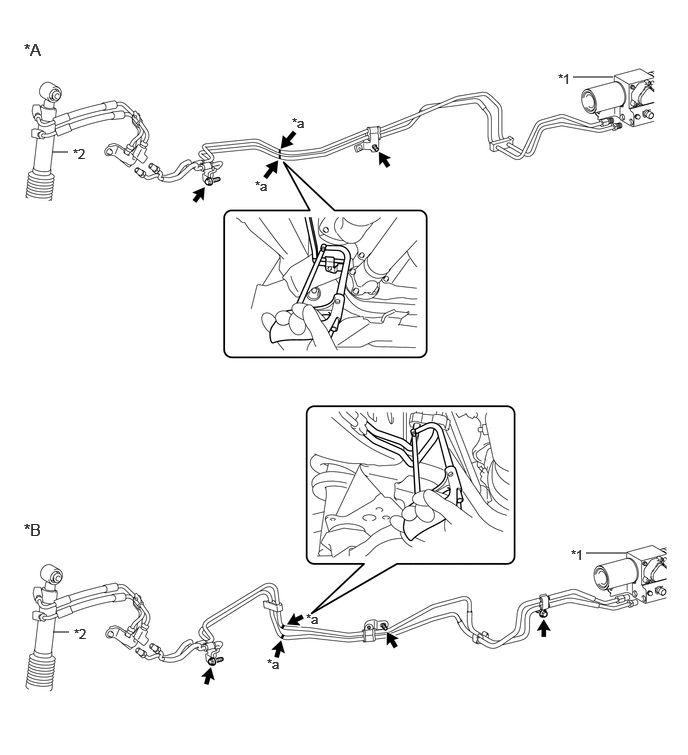
| *A | for 1GR-FE | *B | for 1GD-FTV |
| *1 | Stabilizer Control with Accumulator Housing Assembly | *2 | Front Stabilizer with Tube Cylinder Assembly |
| *a | Cut Position | - | - |
Using a hacksaw, cut the front No. 1 stabilizer control tube assembly at the position shown in the illustration.
- CAUTION:
- ·
Do not cut your fingers, etc.
·Wear protective goggles.
- NOTICE:
- ·
Wrap protective tape around the cut ends of the front No. 1 stabilizer control tube assembly.
·Use a piece of cloth to protect the body from becoming damaged.
for 1GR-FE:
Remove the bolt and front No. 1 stabilizer control tube assembly (stabilizer control with accumulator housing assembly side).
Remove the bolt and front No. 1 stabilizer control tube assembly (front stabilizer with tube cylinder assembly side).
- NOTICE:
-
Make sure that the drive shaft boot is not damaged during removal.
for 1GD-FTV:
Remove the 2 bolts and front No. 1 stabilizer control tube assembly (stabilizer control with accumulator housing assembly side).
Remove the bolt and front No. 1 stabilizer control tube assembly (front stabilizer with tube cylinder assembly side).
- NOTICE:
-
Make sure that the drive shaft boot is not damaged during removal.
When removing the front No. 1 stabilizer control tube assembly after replacement:
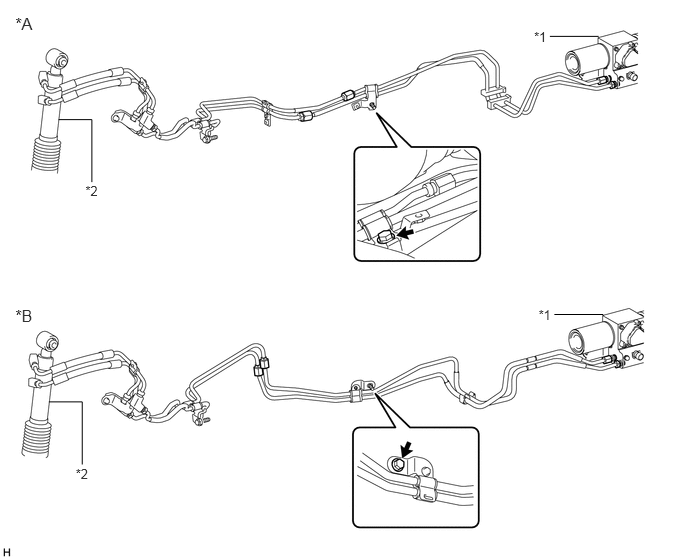
| *A | for 1GR-FE | *B | for 1GD-FTV |
| *1 | Stabilizer Control with Accumulator Housing Assembly | *2 | Front Stabilizer with Tube Cylinder Assembly |
Remove the bolt and front No. 1 stabilizer control tube assembly (stabilizer control with accumulator housing assembly side).
Remove the bolt (labeled A) and clamp from the front No. 1 stabilizer control tube assembly.
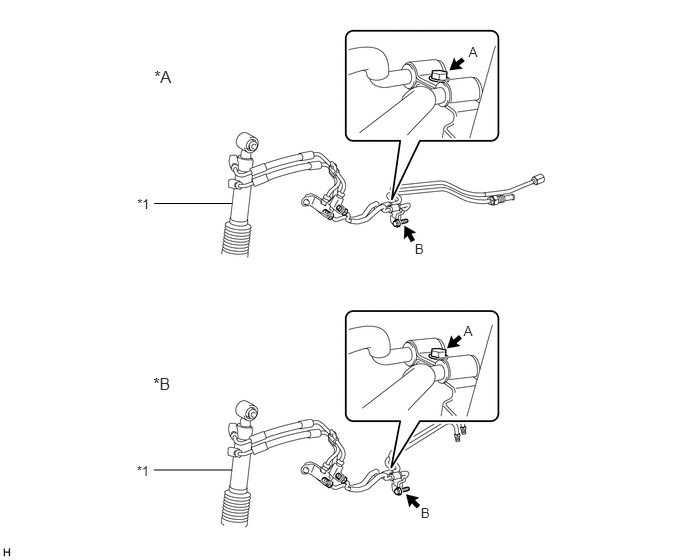
| *A | for 1GR-FE | *B | for 1GD-FTV |
| *1 | Front Stabilizer with Tube Cylinder Assembly | - | - |
Remove the bolt (labeled B), and then disconnect the front No. 1 stabilizer control tube assembly (front stabilizer with tube cylinder assembly side).
Remove the front No. 1 stabilizer control tube assembly (lower part) and front No. 1 stabilizer control tube assembly (upper part).
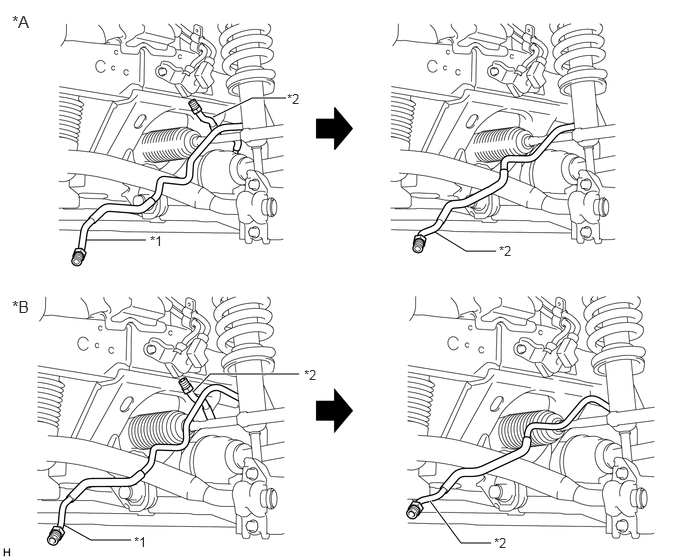
| *A | for 1GR-FE | *B | for 1GD-FTV |
| *1 | Front No. 1 Stabilizer Control Tube Assembly (Upper Part) | *2 | Front No. 1 Stabilizer Control Tube Assembly (Lower Part) |
89570A
17.REMOVE FUEL PUMP CONTROL ECU ASSEMBLY
48540
18.REMOVE REAR SHOCK ABSORBER ASSEMBLY LH
48880
19.DISCONNECT REAR NO. 1 STABILIZER CONTROL TUBE ASSEMBLY
When disconnecting the rear No. 1 stabilizer control tube assembly before replacement:
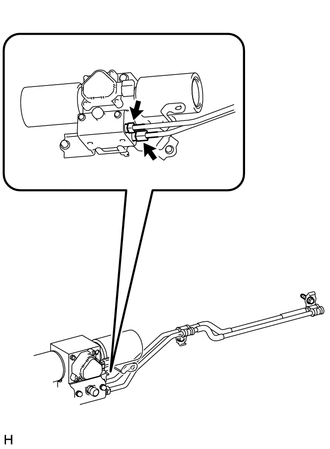
Using a union nut wrench, disconnect the 2 flare nuts from the stabilizer control with accumulator housing.
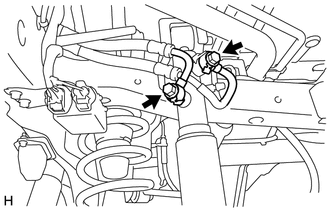
Remove the 2 union bolts of the rear stabilizer control cylinder and the 2 pressure port gaskets.
When disconnecting the rear No. 1 stabilizer control tube assembly after replacement:
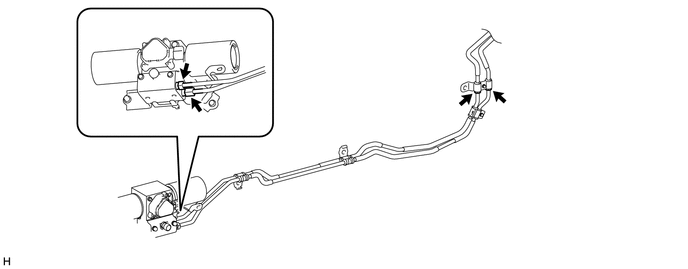
Using a union nut wrench, disconnect the 2 flare nuts from the stabilizer control with accumulator housing.
Using a union nut wrench, disconnect the 2 flare nuts.
Remove the 2 union bolts of the rear stabilizer control cylinder and the 2 pressure port gaskets.
48880
20.REMOVE REAR NO. 1 STABILIZER CONTROL TUBE ASSEMBLY
When removing the rear No. 1 stabilizer control tube assembly before replacement:
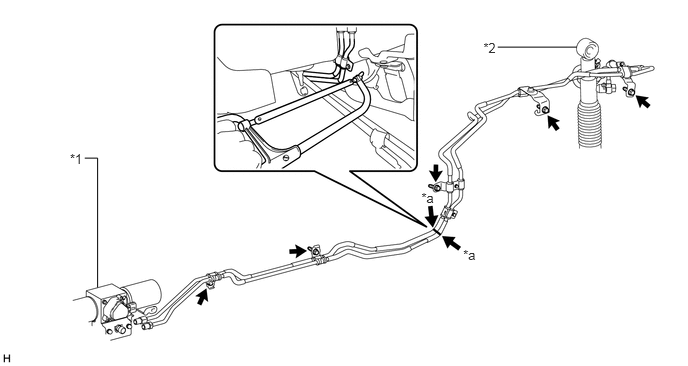
| *1 | Stabilizer Control with Accumulator Housing Assembly | *2 | Rear Stabilizer Control Cylinder |
| *a | Cut Position | - | - |
Remove the 5 bolts and disconnect the rear No. 1 stabilizer control tube assembly.
Using a hacksaw, cut the rear No. 1 stabilizer control tube assembly at the position shown in the illustration.
- CAUTION:
- ·
Do not cut your fingers, etc.
·Wear protective goggles.
- NOTICE:
- ·
Cut the rear No. 1 stabilizer control tube assembly while securely holding down the cut position.
·Use a piece of cloth to protect the body from becoming damaged.
·Wrap protective tape around the cut ends of the rear No. 1 stabilizer control tube assembly.
Remove the cut rear No. 1 stabilizer control tube assembly (stabilizer control with accumulator housing assembly side).
Using a plastic-faced hammer, lightly tap the cut rear No. 1 stabilizer control tube assembly (rear stabilizer control cylinder side) while sliding it to the right to remove it.
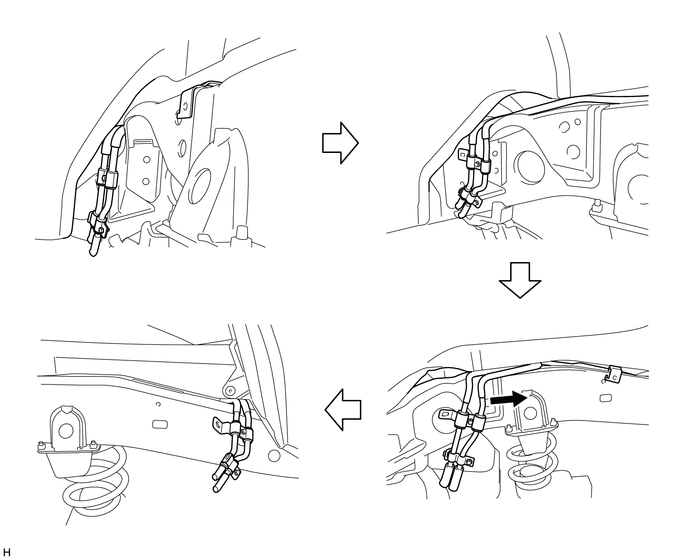
- HINT:
-
Performing this procedure with 2 persons may make the removal easier.
When removing the rear No. 1 stabilizer control tube assembly after replacement:
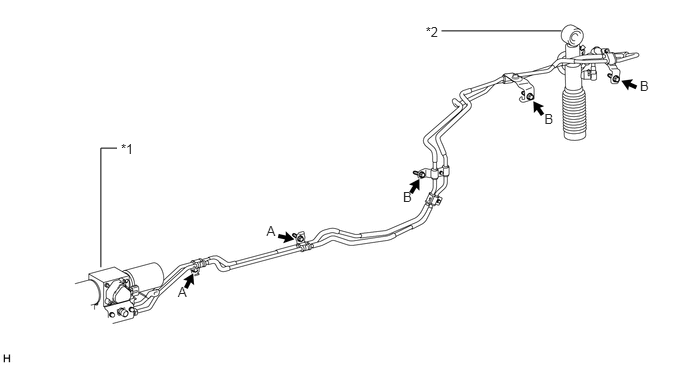
| *1 | Stabilizer Control with Accumulator Housing Assembly | *2 | Rear Stabilizer Control Cylinder |
Remove the 2 bolts (labeled A) and disconnect the rear No. 1 stabilizer control tube assembly (stabilizer control with accumulator housing assembly side).
Remove the 3 bolts (labeled B) and disconnect the rear No. 1 stabilizer control tube assembly (rear stabilizer control cylinder side).
Using a plastic-faced hammer, lightly tap the rear No. 1 stabilizer control tube assembly (rear stabilizer control cylinder side) while sliding it to the right to remove it.
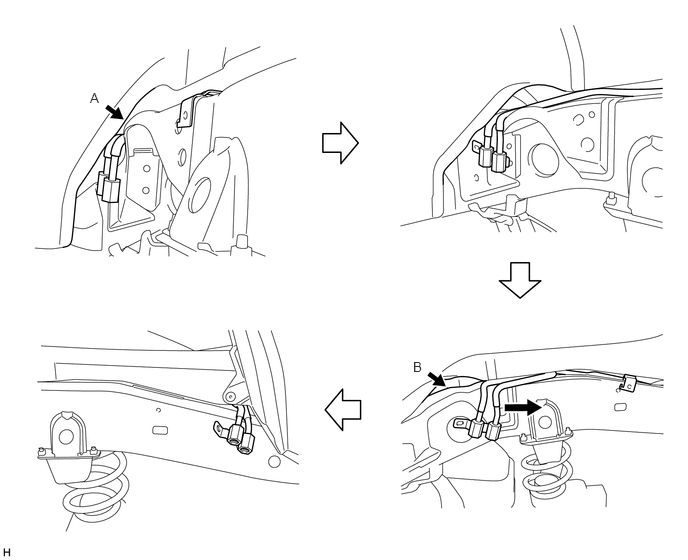
- NOTICE:
-
Make sure that the rear No. 1 stabilizer control tube assembly is not deformed, as the gaps shown by arrows A and B in the illustration are small.
- HINT:
-
Performing this procedure with 2 persons may make the removal easier.