1GR-FE ENGINE MECHANICAL ENGINE ASSEMBLY REMOVAL
CAUTION / NOTICE / HINT
The necessary procedures (adjustment, calibration, initialization, or registration) that must be performed after parts are removed, installed, or replaced during the engine assembly removal/installation are shown below.
| Replaced Part or Performed Procedure | Necessary Procedure | Effect/Inoperative Function when Necessary Procedure not Performed | Link |
|---|---|---|---|
| Battery terminal is disconnected/reconnected | Correction of steering angle neutral point | Multi-terrain monitor system | ( ) |
- HINT:
-
When the cable is disconnected/reconnected to the auxiliary battery terminal, systems temporarily stop operating. However, each system has a function that completes learning the first time the system is used.
- ·
Learning completes when vehicle is driven
Effect/Inoperative Function When Necessary Procedures are not Performed Necessary Procedures Link Lane departure alert system Drive the vehicle straight ahead at 40 km/h (25 mph) or more for 10 seconds or more. ( )
Pre-collision system Lighting system (EXT) (for LED Headlight) Stop and start system Drive the vehicle until stop and start control is permitted (approximately 5 to 60 minutes) ( )
Vehicle stability control system (for Hydraulic brake booster) Drive the vehicle straight ahead at 40 km/h (25 mph) or more for at least 10 seconds. ( )
PROCEDURE

 1.RECOVER REFRIGERANT FROM REFRIGERATION SYSTEM
2. PRECAUTION
- NOTICE:
-
After turning the ignition switch off, waiting time may be required before disconnecting the cable from the battery terminal (See page General>INTRODUCTION>REPAIR INSTRUCTION>PRECAUTION).
3.DISCHARGE FUEL SYSTEM PRESSURE
4.DISCONNECT CABLE FROM NEGATIVE BATTERY TERMINAL
53301
5.REMOVE HOOD SUB-ASSEMBLY
Disconnect the washer nozzle hose.
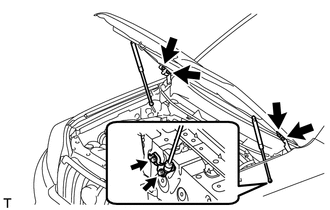
Remove the 8 bolts and hood.
- NOTICE:
-
If the hood support is detached from the ball joint, it become non-reusable. Therefore, do not detach the hood support from the ball joint unless replacing it.
55781E
6.REMOVE COWL TOP VENTILATOR LOUVER SUB-ASSEMBLY
Remove the cowl top ventilator louver (See page Vehicle Exterior>WIPER / WASHER>FRONT WIPER MOTOR>REMOVAL).
52129B
7.REMOVE FRONT BUMPER COVER LOWER
Remove the clip, 5 bolts and front bumper cover lower.
51405A
8.REMOVE NO. 1 ENGINE UNDER COVER SUB-ASSEMBLY
Remove the 4 bolts.
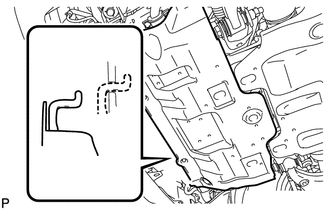
Unhook the engine under cover from the vehicle body as shown in the illustration.
51495
9.REMOVE TRANSMISSION UNDER COVER
Remove the 2 bolts and transmission under cover.
51450
10.REMOVE REAR ENGINE UNDER COVER ASSEMBLY
Remove the 4 bolts and rear engine under cover.
53737B
11.REMOVE FRONT FENDER APRON SEAL LH
Remove the 5 clips and front fender apron seal.
53736
12.REMOVE FRONT FENDER APRON SEAL RH
Remove the 5 clips and front fender apron seal.
53737A
13.REMOVE FRONT NO. 1 FENDER APRON TO FRAME SEAL LH
Remove the 5 clips and front No. 1 fender apron to frame seal.
53736B
14.REMOVE FRONT NO. 1 FENDER APRON TO FRAME SEAL RH
Remove the 5 clips and front No. 1 fender apron to frame seal.
53292A
15.REMOVE UPPER RADIATOR SUPPORT SEAL
Remove the 13 clips and upper radiator support seal.
16.DRAIN ENGINE OIL
17.DRAIN ENGINE COOLANT
28800A
18.DISCONNECT CABLE FROM POSITIVE BATTERY TERMINAL
74481
19.REMOVE BATTERY HOLD DOWN CLAMP
28800
20.REMOVE BATTERY
74431
21.REMOVE BATTERY TRAY
11259
22.REMOVE V-BANK COVER
52119A
23.REMOVE FRONT BUMPER COVER
Remove the front bumper cover (See page Vehicle Exterior>EXTERIOR PANELS / TRIM>FRONT BUMPER>REMOVAL).
24.REMOVE AIR CLEANER CAP AND HOSE
25.REMOVE AIR CLEANER CASE SUB-ASSEMBLY
52521
26.REMOVE FRONT BUMPER CENTER UPPER RETAINER
53293C
27.REMOVE RADIATOR SIDE DEFLECTOR RH
53294C
28.REMOVE RADIATOR SIDE DEFLECTOR LH
16571C
29.REMOVE NO. 1 RADIATOR HOSE
16572D
30.REMOVE NO. 2 RADIATOR HOSE
16470
31.REMOVE RADIATOR RESERVOIR
32907C
32.DISCONNECT OIL COOLER TUBE (w/ Warmer)
32907C
33.DISCONNECT OIL COOLER TUBE (w/ Air Cooled Transmission Oil Cooler)
16711
34.REMOVE FAN SHROUD
16400
35.REMOVE RADIATOR ASSEMBLY
17360
36.REMOVE AIR TUBE ASSEMBLY (w/ Secondary Air Injection System)
17129
37.REMOVE INTAKE AIR SURGE TANK
38.REMOVE FAN AND GENERATOR V BELT
44320
39.DISCONNECT VANE PUMP ASSEMBLY
88711
40.DISCONNECT DISCHARGE HOSE SUB-ASSEMBLY
88704
41.DISCONNECT SUCTION HOSE SUB-ASSEMBLY
88320
42.REMOVE COOLER COMPRESSOR ASSEMBLY
17410
43.REMOVE FRONT EXHAUST PIPE ASSEMBLY
Remove the front exhaust pipe (See page Engine / Hybrid System>1GR-FE (INTAKE / EXHAUST)>EXHAUST PIPE>REMOVAL).
17118
44.REMOVE MANIFOLD STAY
17361
45.REMOVE AIR TUBE (w/ Secondary Air Injection System)
45203
46.DISCONNECT NO. 2 STEERING INTERMEDIATE SHAFT SUB-ASSEMBLY (for RHD)
for Manual tilt and manual telescopic steering column:
Disconnect the No. 2 steering intermediate shaft (See page Steering>STEERING COLUMN>STEERING COLUMN ASSEMBLY (for Manual Tilt and Manual Telescopic Steering Column)>REMOVAL).
for Power tilt and power telescopic steering column:
Disconnect the No. 2 steering intermediate shaft (See page Steering>STEERING COLUMN>STEERING COLUMN ASSEMBLY (for Power Tilt and Power Telescopic Steering Column)>REMOVAL).
17167
47.REMOVE NO. 1 EXHAUST MANIFOLD HEAT INSULATOR
17104
48.REMOVE EXHAUST MANIFOLD SUB-ASSEMBLY RH
17119
49.REMOVE NO. 2 MANIFOLD STAY
17362
50.REMOVE NO. 2 AIR TUBE (w/ Secondary Air Injection System)
17168
51.REMOVE NO. 2 EXHAUST MANIFOLD HEAT INSULATOR
17105
52.REMOVE EXHAUST MANIFOLD SUB-ASSEMBLY LH
82715
53.REMOVE WIRING HARNESS CLAMP BRACKET
27020
54.REMOVE GENERATOR ASSEMBLY
28100
55.REMOVE STARTER ASSEMBLY
56.REMOVE DRIVE PLATE AND TORQUE CONVERTER CLUTCH SETTING BOLT (for Automatic Transmission)
82121
57.DISCONNECT ENGINE WIRE
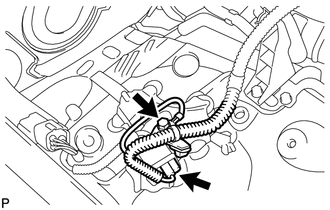
Remove the bolt and disconnect the connector.
Remove the glove compartment door (See page Vehicle Interior>INTERIOR PANELS / TRIM>INSTRUMENT PANEL SAFETY PAD>REMOVAL).
Disconnect the ECM connector.
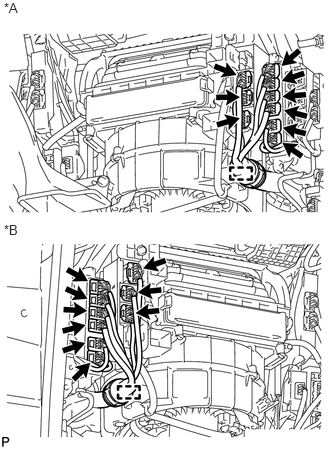
Detach the clamp and disconnect the 9 connectors.
| *A | for LHD |
| *B | for RHD |
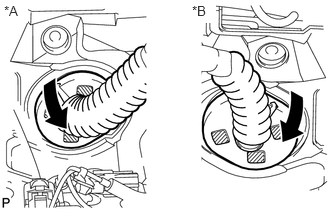
Detach the grommet from the wire harness support.
| *A | for LHD |
| *B | for RHD |
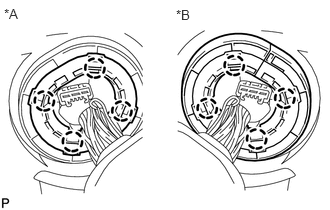
Detach the 4 claws to remove the wire harness support from the vehicle, and then pull out the ECM connector to remove it from the vehicle.
| *A | for LHD |
| *B | for RHD |
58.DISCONNECT HEATER WATER HOSE ASSEMBLY
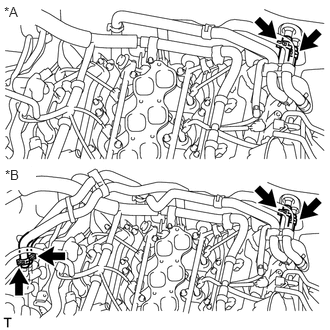
w/o Rear heater:
Disconnect the 2 hoses and heater water hose.
| *A | w/o Rear Heater |
| *B | w/ Rear Heater |
w/ Rear heater:
Disconnect the 4 hoses and heater water hose.
23801P
59.DISCONNECT NO. 1 AND NO. 2 FUEL PIPES
Remove the No. 2 fuel pipe clamp from the fuel tube connector.
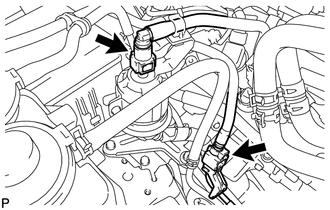
Disconnect the No. 1 and No. 2 fuel pipes (See page Engine / Hybrid System>1GR-FE (FUEL)>FUEL SYSTEM>PRECAUTION).
60.REMOVE FRONT PROPELLER SHAFT ASSEMBLY
61.REMOVE PROPELLER SHAFT ASSEMBLY
33030
62.REMOVE MANUAL TRANSMISSION ASSEMBLY (for Manual Transmission)
Remove the manual transmission from the vehicle (See page Drivetrain>RA61F (MANUAL TRANSMISSION / TRANSAXLE)>MANUAL TRANSMISSION ASSEMBLY (for 1GR-FE)>REMOVAL).
35000
63.REMOVE AUTOMATIC TRANSMISSION ASSEMBLY (for Automatic Transmission)
Remove the automatic transmission from the vehicle (See page Drivetrain>AC60F (AUTOMATIC TRANSMISSION / TRANSAXLE)>AUTOMATIC TRANSMISSION ASSEMBLY (for 1GR-FE)>REMOVAL).
12371
64.REMOVE REAR NO. 1 ENGINE MOUNTING INSULATOR (for Automatic Transmission)
12371
65.REMOVE REAR NO. 1 ENGINE MOUNTING INSULATOR (for Manual Transmission)
88704
66.DISCONNECT SUCTION HOSE SUB-ASSEMBLY
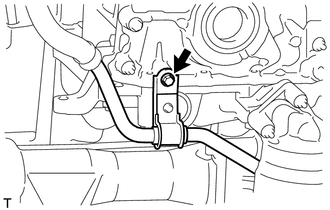
Remove the bolt and disconnect the suction hose.
67.DISCONNECT OIL COOLER TUBE SUB-ASSEMBLY (for Automatic Transmission)
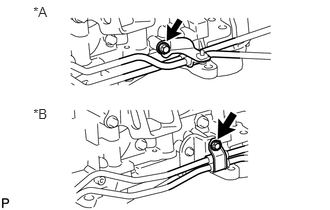
Remove the bolt and disconnect the oil cooler tube.
| *A | w/o Air Cooled Transmission Oil Cooler |
| *B | w/ Air Cooled Transmission Oil Cooler |
31210
68.REMOVE CLUTCH COVER ASSEMBLY (for Manual Transmission)
31250
69.REMOVE CLUTCH DISC ASSEMBLY (for Manual Transmission)
13405
70.REMOVE FLYWHEEL SUB-ASSEMBLY (for Manual Transmission)
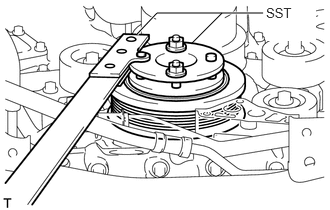
Using SST, hold the crankshaft.
- SST
- 09213-54015 (91651-60855)
09330-00021
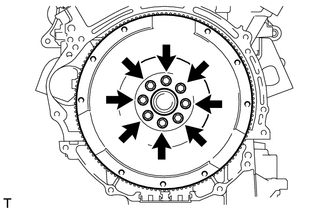
Remove the 8 bolts and flywheel.
- NOTICE:
-
Do not reuse the bolts.
32101
71.REMOVE DRIVE PLATE AND RING GEAR SUB-ASSEMBLY (for Automatic Transmission)
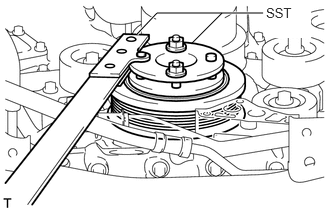
Using SST, hold the crankshaft.
- SST
- 09213-54015 (91651-60855)
09330-00021
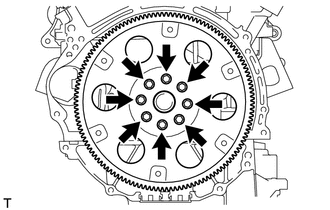
Remove the 8 bolts, rear spacer, drive plate and front spacer.
72.REMOVE ENGINE ASSEMBLY
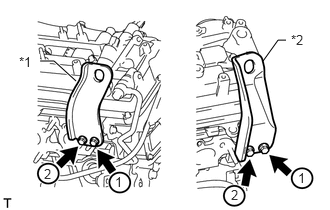
Install 2 engine hangers with 4 bolts as shown in the illustration.
- Torque:
- 33 N*m (337 kgf*cm, 24 ft.*lbf)
| *1 | No. 1 Engine Hanger |
| *2 | No. 2 Engine Hanger |
- HINT:
No. 1 Engine Hanger 12281-31110 No. 2 Engine Hanger 12282-31140 Bolt 91671-C0830
Attach an engine sling device and hang the engine with a chain block.
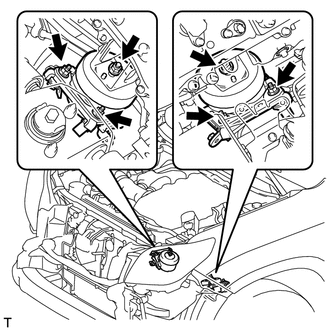
Remove the 6 nuts from the front engine mounting insulator LH and RH.
Lift the engine out of the vehicle carefully.
- NOTICE:
-
Make sure the engine is clear of all wiring and hoses.
Remove the front engine mounting insulator LH and RH.
Place the engine onto a work bench.
73.INSTALL ENGINE STAND
Install the engine onto an engine stand with bolts.