P0230 Fuel Pump Primary Circuit
Diagnostic trouble codes · Vehicles built Sep 2011 – Dec 2011
DESCRIPTION
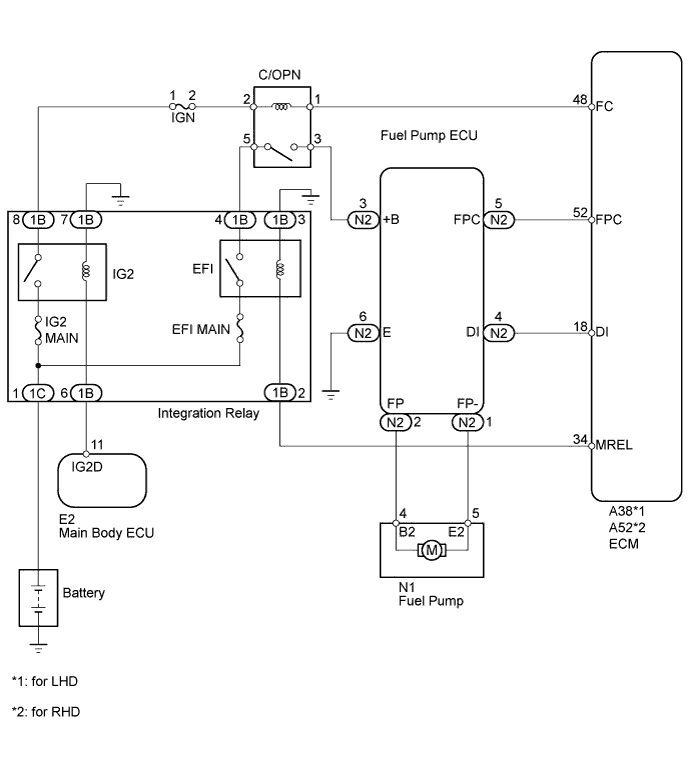
When a malfunction in the fuel pump circuit is detected, DTC P0230 is stored.The fuel pump circuit consists of the ECM, fuel pump and fuel pump ECU (which operates the fuel pump). Based on the engine output, the ECM determines the fuel pump speed. The speed is then converted to a duty signal and sent to the fuel pump ECU. Based on the signal sent from the ECM, the fuel pump ECU adjusts the fuel pump operation speed between 3 settings. The fuel pump ECU also has a self-diagnosis function. Based on the fuel pump circuit condition, the fuel pump ECU outputs a diagnostic signal (DI) to the ECM, and the ECM determines if there is a malfunction in the fuel pump circuit.
| DTC Code |
DTC Detection Condition |
Trouble Area |
| P0230 |
When either condition below is met (1 trip detection logic):
|
|
MONITOR DESCRIPTION
To monitor the fuel pump circuit, the ECM checks the fuel pump control signal (FPC) and diagnostic signal (DI). The FPC voltage varies between approximately 0 V to approximately 12 V (duty signal). Based on the condition of the fuel pump ECU malfunction, the DI voltage varies between approximately 0 V and approximately 12 V. The ECM then compares the variance of the FPC voltage and DI voltage, and determines if the fuel pump circuit is malfunctioning. When the ECM determines that the fuel pump circuit is malfunctioning, a DTC is stored immediately.WIRING DIAGRAM

INSPECTION PROCEDURE
This troubleshooting procedure is based on the premise that the engine is started. If the engine is not started, proceed to the Problem Symptoms Table (Click here).| 1. CHECK FOR DTC (B1500) |

Connect the intelligent tester to the DLC3.
Turn the engine switch on (IG).
Turn the tester on.
Enter the following menus: Body / (desired system) / DTC.
Read the DTC.
Result Result
Proceed to
DTC B1500 is not output
A
DTC B1500 is output
B
|
|
||||

| A | |
 |
| 2. PERFORM ACTIVE TEST USING INTELLIGENT TESTER (FUEL PUMP) |
Connect the intelligent tester to the DLC3.
Turn the engine switch on (IG) and turn the tester on.
Enter the following menus: Powertrain / Engine and ECT / Active Test / Control the Fuel Pump / Speed.
Check whether operating sounds can be heard while operating the relay using the tester.
- OK:
- Operating sounds can be heard from fuel pump.
|
|
||||

| OK | |
|
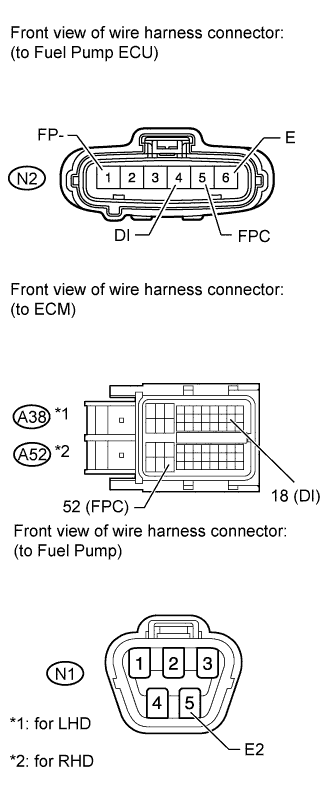
| 3. CHECK HARNESS AND CONNECTOR (FUEL PUMP ECU - ECM - FUEL PUMP) |
 |
Disconnect the fuel pump ECU connector.
Disconnect the ECM connector.
Measure the resistance according to the value(s) in the table below.
- Standard Resistance (for LHD):
Tester Connection
Condition
Specified Condition
N2-5 (FPC) - A38-52 (FPC)
Always
Below 1 Ω
N2-4 (DI) - A38-18 (DI)
Always
Below 1 Ω
N2-6 (E) - Body ground
Always
Below 1 Ω
N2-5 (FPC) or A38-52 (FPC) - Body ground
Always
10 kΩ or more
N2-4 (DI) or A38-18 (DI) - Body ground
Always
10 kΩ or more
N2-1 (FP-) or N1-5 (E2) - Body ground
Always
10 kΩ or more
- Standard Resistance (for RHD):
Tester Connection
Condition
Specified Condition
N2-5 (FPC) - A52-52 (FPC)
Always
Below 1 Ω
N2-4 (DI) - A52-18 (DI)
Always
Below 1 Ω
N2-6 (E) - Body ground
Always
Below 1 Ω
N2-5 (FPC) or A52-52 (FPC) - Body ground
Always
10 kΩ or more
N2-4 (DI) or A52-18 (DI) - Body ground
Always
10 kΩ or more
N2-1 (FP-) or N1-5 (E2) - Body ground
Always
10 kΩ or more
|
|
||||
| OK | |
|
| 4. REPLACE FUEL PUMP CONTROL ECU |
Replace the fuel pump control ECU.
- HINT:
- w/ Active Height Control (Click here).
- w/o Active Height Control (Click here).
- w/ Active Height Control (Click here).
| NEXT | |
|
| 5. CONFIRM WHETHER DTC OUTPUT RECURS |
Check that there is 17 L or more of fuel remaining.
Connect the intelligent tester to the DLC3.
Turn the engine switch on (IG).
Turn the tester on.
Clear DTCs (Click here).
Start the engine and idle it for 1 minute.
Enter the following menus: Powertrain / Engine and ECT / DTC.
Read the DTCs.
Result Result
Proceed to
No DTC is output
A
P0230 is output
B
|
|
||||
| A | ||
 |
||
| ||
| 6. CHECK HARNESS AND CONNECTOR (FUEL PUMP POWER SOURCE VOLTAGE) |
Disconnect the fuel pump connector.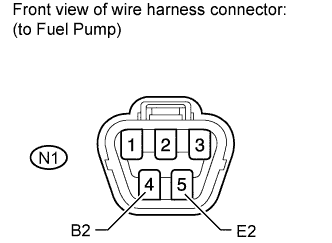
Connect the intelligent tester to the DLC3.
Turn the engine switch on (IG) and turn the tester on.
Enter the following menus: Powertrain / Engine and ECT / Active Test / Control the Fuel Pump / Speed.
Measure the voltage according to the value(s) in the table below.
- Standard Voltage:
Tester Connection
Condition
Specified Condition
N1-4 - N1-5
Engine switch on (IG)
Active Test on
11 to 14 V
| Result |
Proceed to |
| NG |
A |
| OK (for Single Tank Type) |
B |
| OK (for Double Tank Type) |
C |
|
|
||||
|
|
||||
| A | |
|
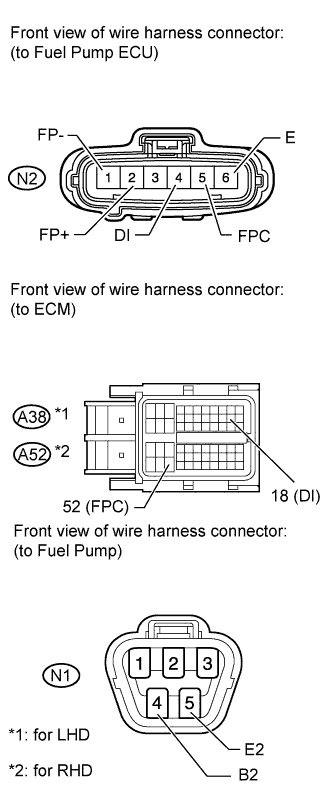
| 7. CHECK HARNESS AND CONNECTOR (ECM - FUEL PUMP CONTROL ECU - FUEL PUMP) |
 |
Disconnect the ECM connector.
Disconnect the fuel pump ECU connector.
Disconnect the fuel pump connector.
Measure the resistance according to the value(s) in the table below.
- Standard Resistance (for LHD):
Tester Connection
Condition
Specified Condition
N2-5 (FPC) - A38-52 (FPC)
Always
Below 1 Ω
N2-4 (DI) - A38-18 (DI)
Always
Below 1 Ω
N2-6 (E) - Body ground
Always
Below 1 Ω
N2-2 (FP+) - N1-4 (B2)
Always
Below 1 Ω
N2-1 (FP-) - N1-5 (E2)
Always
Below 1 Ω
N2-5 (FPC) or A38-52 (FPC) - Body ground
Always
10 kΩ or more
N2-4 (DI) or A38-18 (DI) - Body ground
Always
10 kΩ or more
N2-2 (FP+) or N1-4 (B2) - Body ground
Always
10 kΩ or more
N2-1 (FP-) or N1-5 (E2) - Body ground
Always
10 kΩ or more
- Standard Resistance (for RHD):
Tester Connection
Condition
Specified Condition
N2-5 (FPC) - A52-52 (FPC)
Always
Below 1 Ω
N2-4 (DI) - A52-18 (DI)
Always
Below 1 Ω
N2-6 (E) - Body ground
Always
Below 1 Ω
N2-2 (FP+) - N1-4 (B2)
Always
Below 1 Ω
N2-1 (FP-) - N1-5 (E2)
Always
Below 1 Ω
N2-5 (FPC) or A52-52 (FPC) - Body ground
Always
10 kΩ or more
N2-4 (DI) or A52-18 (DI) - Body ground
Always
10 kΩ or more
N2-2 (FP+) or N1-4 (B2) - Body ground
Always
10 kΩ or more
N2-1 (FP-) or N1-5 (E2) - Body ground
Always
10 kΩ or more
|
|
||||
| OK | |
|
| 8. CHECK HARNESS AND CONNECTOR (FUEL PUMP CONTROL ECU POWER SOURCE VOLTAGE) |
Disconnect the fuel pump ECU connector.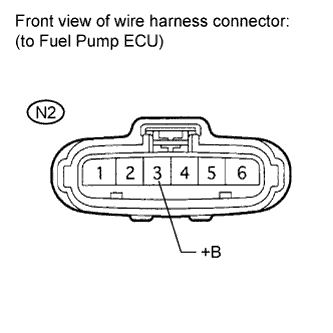
Measure the voltage according to the value(s) in the table below.
- Standard Voltage:
Tester Connection
Switch Condition
Specified Condition
N2-3 (+B) - Body ground
Engine switch on (IG)
11 to 14 V
|
|
||||
| OK | |
|
| 9. REPLACE FUEL PUMP CONTROL ECU |
Replace the fuel pump control ECU.
- HINT:
- w/ Active Height Control (Click here).
- w/o Active Height Control (Click here).
- w/ Active Height Control (Click here).
| NEXT | |
|
| 10. CONFIRM WHETHER DTC OUTPUT RECURS |
Check that there is 17 L or more of fuel remaining.
Connect the intelligent tester to the DLC3.
Turn the engine switch on (IG).
Turn the tester on.
Clear DTCs (Click here).
Start the engine and idle it for 1 minute.
Enter the following menus: Powertrain / Engine and ECT / DTC.
Read the DTCs.
Result Result
Proceed to
No DTC is output
A
P0230 is output
B
|
|
||||
| A | ||
|
||
| ||
| 11. INSPECT CIRCUIT OPENING RELAY (C/OPN) |
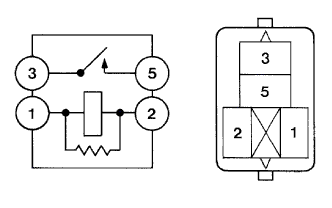 |
Remove the circuit opening relay (C/OPN) from the engine room relay block.
Measure the resistance according to the value(s) in the table below.
- Standard Resistance:
Tester Connection
Condition
Specified Condition
3 - 5
Battery voltage not applied to terminals 1 and 2
10 kΩ or higher
3 - 5
Battery voltage applied to terminals 1 and 2
Below 1 Ω
|
|
||||
| OK | |
|
| 12. CHECK CIRCUIT OPENING RELAY |
Check the operating sound of the relay when the engine switch is turned on (IG).
- OK:
Tester Connection
Condition
Specified Condition
C/OPN relay
Engine switch on (IG)
Operating sound heard
|
|
||||
| OK | |
|
| 13. CHECK HARNESS AND CONNECTOR (FUEL PUMP ECU - CIRCUIT OPENING RELAY - INTEGRATION RELAY) |
Remove the circuit opening relay (C/OPN) and integration relay from the engine room relay block.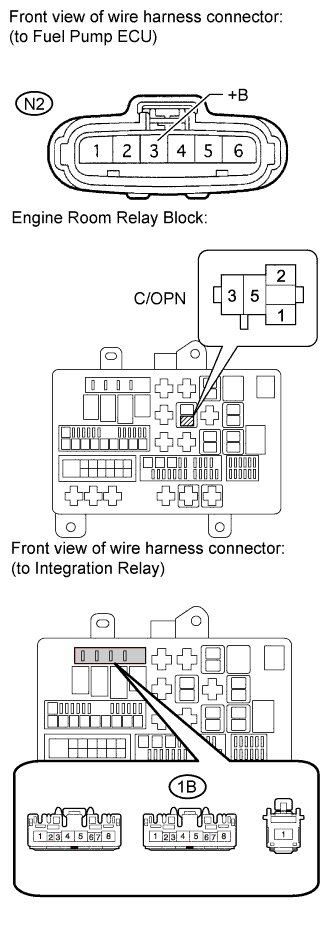
Disconnect the fuel pump ECU connector.
Measure the resistance according to the value(s) in the table below.
- Standard Resistance:
Tester Connection
Condition
Specified Condition
N2-3 (+B) - C/OPN relay terminal 3
Always
Below 1 Ω
1B-4 - C/OPN relay terminal 5
Always
Below 1 Ω
N2-3 (+B) or C/OPN relay terminal 3 - Body ground
Always
10 kΩ or more
1B-4 or C/OPN relay terminal 5 - Body ground
Always
10 kΩ or more
|
|
||||
| OK | ||
|
||
| ||
| 14. CHECK FUSE (IGN) |
Remove the IGN fuse from the integration relay.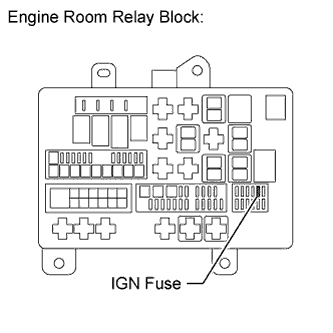
Measure the resistance according to the value(s) in the table below.
- Standard Resistance:
Tester Connection
Condition
Specified Condition
IGN fuse
Always
Below 1 Ω
Reinstall the IGN fuse.
|
|
||||
| OK | |
|
| 15. CHECK HARNESS AND CONNECTOR (ECM - CIRCUIT OPENING RELAY - INTEGRATION RELAY) |
Remove the circuit opening relay (C/OPN) and integration relay from the engine room relay block.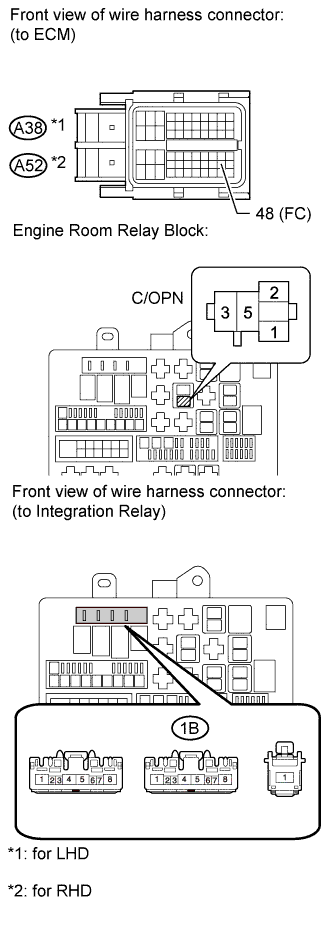
Disconnect the ECM connector.
Measure the resistance according to the value(s) in the table below.
- Standard Resistance (for LHD):
Tester Connection
Condition
Specified Condition
A38-48 (FC) - C/OPN relay terminal 1
Always
Below 1 Ω
1B-8 - C/OPN relay terminal 2
Always
Below 1 Ω
A38-48 (FC) - C/OPN relay terminal 1 or Body ground
Always
10 kΩ or more
1B-8 or C/OPN relay terminal 2 - Body ground
Always
10 kΩ or more
- Standard Resistance (for RHD):
Tester Connection
Condition
Specified Condition
A52-48 (FC) - C/OPN relay terminal 1
Always
Below 1 Ω
1B-8 - C/OPN relay terminal 2
Always
Below 1 Ω
A52-48 (FC) - C/OPN relay terminal 1 or Body ground
Always
10 kΩ or more
1B-8 or C/OPN relay terminal 2 - Body ground
Always
10 kΩ or more
|
|
||||
| OK | ||
|
||
| ||