P0617 Starter Relay Circuit High
Diagnostic trouble codes · Vehicles built Sep 2011 – Dec 2011
DESCRIPTION
While the engine is being cranked, positive battery voltage is applied to terminal STA of the ECM. If the ECM detects the starter control (STA) signal while the vehicle is being driven, it determines that there is a malfunction in the STA circuit. The ECM then illuminates the MIL and stores the DTC.This monitor runs when the vehicle is driven at 20 km/h (12.4 mph) for over 20 seconds.
| DTC Code |
DTC Detection Condition |
Trouble Area |
| P0617 |
When conditions (a), (b) and (c) are met, a positive (+B) battery voltage of 10.5 V or higher is applied to the ECM for 20 seconds (1 trip detection logic).
|
|
WIRING DIAGRAM
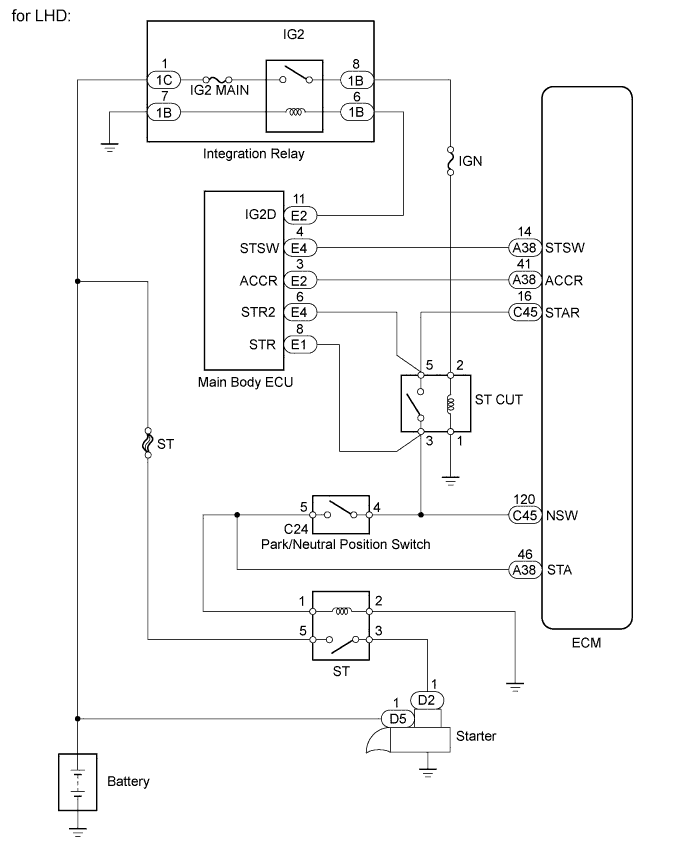

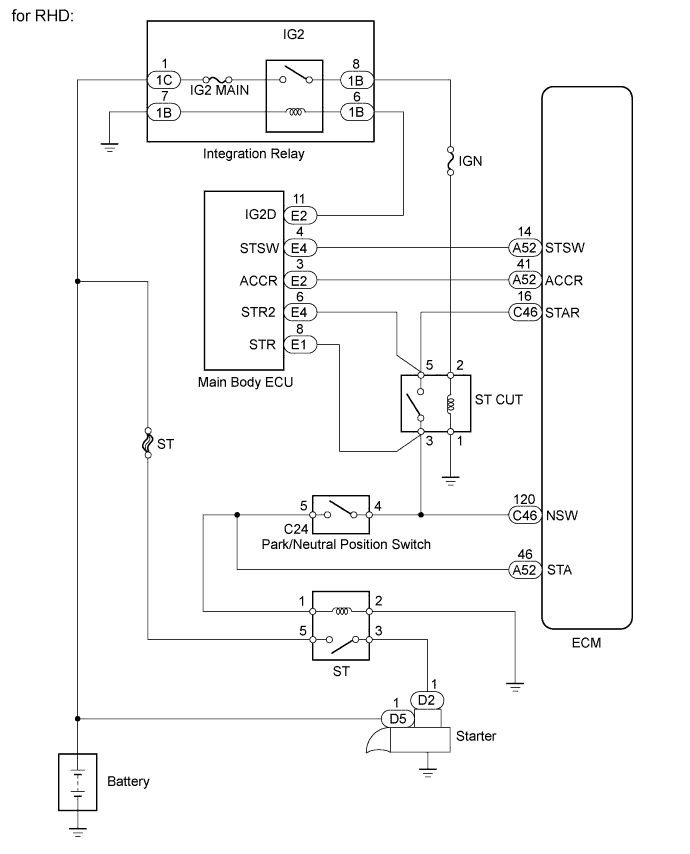
INSPECTION PROCEDURE
- HINT:
- The following troubleshooting flowchart is based on the premise that the engine is cranked normally.
If the engine will not crank, proceed to the Problem Symptoms Table (Click here).
- Read freeze frame data using the intelligent tester. Freeze frame data records the engine condition when malfunctions are detected. When troubleshooting, freeze frame data can help determine if the vehicle was moving or stationary, if the engine was warmed up or not, if the air-fuel ratio was lean or rich, and other data from the time the malfunction occurred.
- The following troubleshooting flowchart is based on the premise that the engine is cranked normally.
| 1. READ VALUE USING INTELLIGENT TESTER (STARTER SIGNAL) |

Connect the intelligent tester to the DLC3.
Turn the engine switch on (IG) and turn the tester on.
Enter the following menus: Powertrain / Engine and ECT / Activate Test / Activate the Starter Relay.
Enter the following menus: Powertrain / Engine and ECT / Data List / All Data / Starter Signal.
Check the Starter Signal on the intelligent tester.
- OK:
Activate Test
Starter Signal
ON
ON
OFF
OFF
|
|
||||

| OK | ||
 |
||
| ||
| 2. INSPECT PARK/NEUTRAL POSITION SWITCH ASSEMBLY |
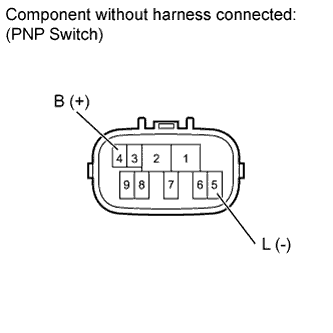 |
Disconnect the PNP switch connector.
Measure the resistance according to the value(s) in the table below.
- Standard Resistance:
Tester Connection
Condition
Specified Condition
4 (B) - 5 (L)
Shift lever in P or N
Below 1 Ω
4 (B) - 5 (L)
Shift lever not in P or N
10 kΩ or higher
|
|
||||

| OK | |
 |
| 3. INSPECT STARTER CUT RELAY (ST CUT) |
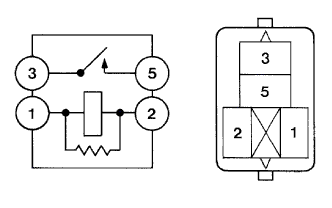 |
Remove the circuit opening relay (ST CUT) from the engine room relay block.
Measure the resistance according to the value(s) in the table below.
- Standard Resistance:
Tester Connection
Condition
Specified Condition
3 - 5
Battery voltage not applied to terminals 1 and 2
10 kΩ or higher
3 - 5
Battery voltage applied to terminals 1 and 2
Below 1 Ω
|
|
||||
| OK | |
|
| 4. CHECK HARNESS AND CONNECTOR (ECM - ST CUT RELAY) |
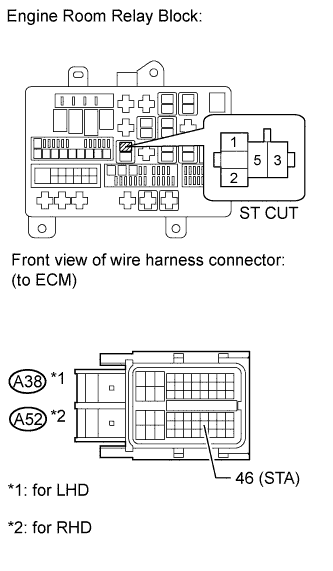 |
Move the shift lever to P or N.
Disconnect the ECM connector.
Remove the ST CUT relay from the engine room relay block.
Measure the resistance according to the value(s) in the table below.
- Standard Resistance (for LHD):
Tester Connection
Condition
Specified Condition
A38-46 (STA) or ST CUT relay terminal 3 - Body ground
Always
10 kΩ or more
- Standard Resistance (for RHD):
Tester Connection
Condition
Specified Condition
A52-46 (STA) or ST CUT relay terminal 3 - Body ground
Always
10 kΩ or more
|
|
||||
| OK | |
|
| 5. CHECK HARNESS AND CONNECTOR (MAIN BODY ECU - ECM) |
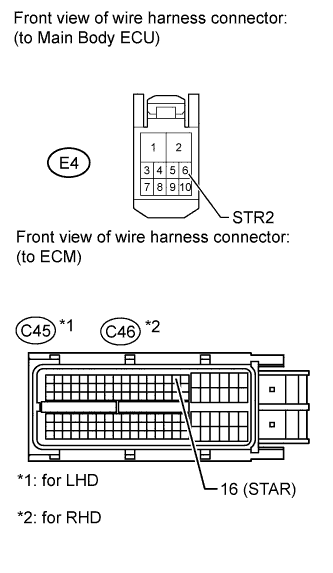 |
Disconnect the ECM connector.
Disconnect the main body ECU connector.
Measure the resistance according to the value(s) in the table below.
- Standard Resistance (for LHD):
Tester Connection
Condition
Specified Condition
E4-6 (STR2) or C45-16 (STR2) - Body ground
Always
10 kΩ or more
- Standard Resistance (for RHD):
Tester Connection
Condition
Specified Condition
E4-6 (STR2) or C46-16 (STR2) - Body ground
Always
10 kΩ or more
|
|
||||
| OK | |
|
| 6. CHECK HARNESS AND CONNECTOR (ECM - ST CUT RELAY) |
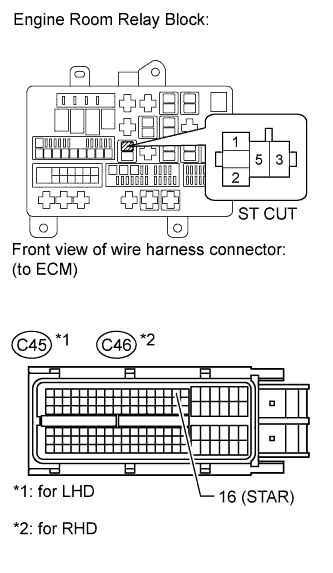 |
Disconnect the ECM connector.
Remove the ST CUT relay from the engine room relay block.
Measure the resistance according to the value(s) in the table below.
- Standard Resistance (for LHD):
Tester Connection
Condition
Specified Condition
C45-16 (STAR) or ST CUT relay terminal 5 - Body ground
Always
10 kΩ or more
- Standard Resistance (for RHD):
Tester Connection
Condition
Specified Condition
C46-16 (STAR) or ST CUT relay terminal 5 - Body ground
Always
10 kΩ or more
|
|
||||
| OK | |
|
| 7. CHECK HARNESS AND CONNECTOR (ST CUT RELAY - INTEGRATION RELAY) |
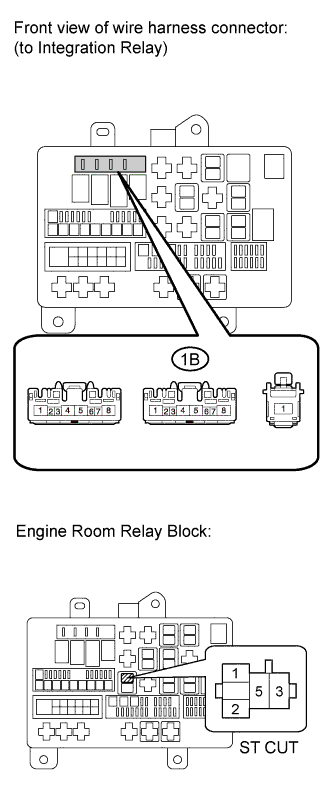 |
Remove the ST CUT relay and integration relay from the engine room relay block.
Measure the resistance according to the value(s) in the table below.
- Standard Resistance:
Tester Connection
Condition
Specified Condition
1B-8 or ST CUT relay terminal 2 - Body ground
Always
10 kΩ or more
|
|
||||
| OK | ||
|
||
| ||