P0335 Crankshaft Position Sensor "A" Circuit
Diagnostic trouble codes · Vehicles built from Jan 2012
Also covers:
- P0337 Crankshaft Position Sensor "A" Circuit Low Input
- P0338 Crankshaft Position Sensor "A" Circuit High Input
- P0339 Crankshaft Position Sensor "A" Circuit Intermittent
DESCRIPTION
The crankshaft position sensor system consists of a crankshaft angle sensor rotor and Magnetoresistive Element (MRE) type sensor. The crankshaft angle sensor rotor has 34 teeth at 10° intervals (2 teeth are missing for detecting top dead center), and is installed to the rear end of the crankshaft. The crankshaft position sensor generates 34 signals per crankshaft revolution. The ECM uses the G2 signal to distinguish between the cylinders, and uses the NE signal to detect the crankshaft position and engine speed.| DTC No. |
DTC Detection Condition |
Trouble Area |
| P0335 |
Either condition is met:
|
|
| P0337 |
Output voltage of crankshaft position sensor is 0.3 V or less for 4 seconds (1 trip detection logic). |
|
| P0338 |
Output voltage of crankshaft position sensor is 4.7 V or higher for 4 seconds (1 trip detection logic). |
|
| P0339 |
Under conditions (a), (b) and (c), no crankshaft position sensor signal is sent to the ECM for 0.05 seconds or more (1 trip detection logic): (a) Engine speed is 1000 rpm or more. (b) Starter signal is off. (c) 3 seconds or more have elapsed since the starter signal switched from on to off. |
|
-
Reference: Inspection using an oscilloscope.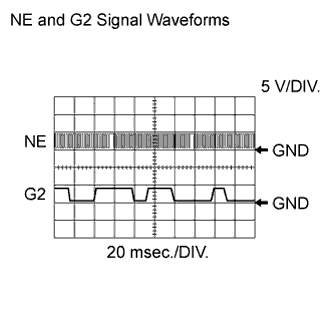

- Standard:
for RHD Tester Connection
Tool Setting
Condition
Specified Condition
C46-110 (NE+) - C46-111 (NE-)
5 V/DIV., 20 msec./DIV.
Cranking or idling
The correct waveform is as shown
C46-90 (G2) - C46-89 (G2-)
5 V/DIV., 20 msec./DIV.
Cranking or idling
The correct waveform is as shown
for LHD Tester Connection
Tool Setting
Condition
Specified Condition
C45-110 (NE+) - C45-111 (NE-)
5 V/DIV., 20 msec./DIV.
Cranking or idling
The correct waveform is as shown
C45-90 (G2) - C45-89 (G2-)
5 V/DIV., 20 msec./DIV.
Cranking or idling
The correct waveform is as shown
- HINT:
- G2 is the camshaft position sensor signal, and NE is the crankshaft position sensor signal.
MONITOR DESCRIPTION
If there is no signal from the crankshaft position sensor despite the crankshaft revolving, the ECM interprets this as a malfunction of the sensor.When the sensor output voltage remains at below 0.3 V, or higher than 4.7 V for more than 4 seconds, the ECM stores a DTC.
CONFIRMATION DRIVING PATTERN
- Start the engine and run it at idle for 20 seconds or more.
WIRING DIAGRAM
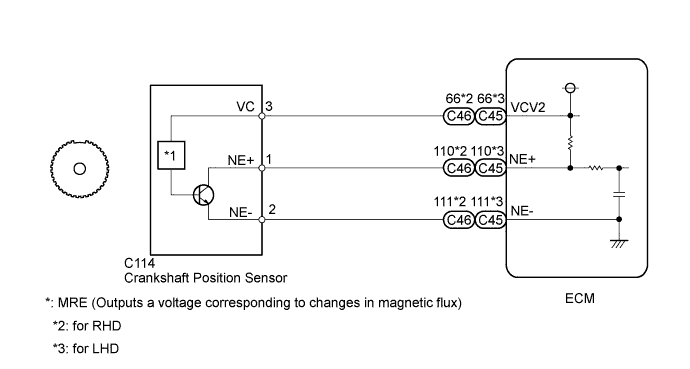
INSPECTION PROCEDURE
- HINT:
- If no problem is found by this diagnostic troubleshooting procedure, check for problems by referring to the engine mechanical section.
- The engine speed can be checked by using the GTS. To perform the check, follow the procedures below:
- Connect the GTS to the DLC3.
- Start the engine.
- Turn the GTS on.
- Enter the following menus: Powertrain / Engine and ECT / Data List / All Data / Engine Speed.
- The engine speed may be indicated as zero despite the engine running normally. This is caused by a lack of NE signals from the crankshaft position sensor. Alternatively, the engine speed may be indicated as lower than the actual engine speed if the crankshaft position sensor output voltage is insufficient.
- Read freeze frame data using the GTS. Freeze frame data records the engine conditions when malfunctions are detected. When troubleshooting, freeze frame data can help determine if the vehicle was moving or stationary, if the engine was warmed up or not, if the air-fuel ratio was lean or rich, and other data from the time the malfunction occurred.
- If no problem is found by this diagnostic troubleshooting procedure, check for problems by referring to the engine mechanical section.
| 1. READ VALUE USING GTS (ENGINE SPEED) |

Connect the GTS to the DLC3.
Turn the engine switch on (IG).
Turn the GTS on.
Enter the following menus: Powertrain / Engine and ECT / Data List / All Data / Engine Speed.
Start the engine.
Read the values displayed on the GTS while the engine is running.
- Standard:
- Correct values are displayed.
- HINT:
- To check the engine speed change, display the graph on the GTS.
- If the engine does not start, check the engine speed while cranking.
- If the engine speed indicated on the GTS remains zero (0), there may be an open or short in the Crankshaft Position sensor circuit.
- To check the engine speed change, display the graph on the GTS.
|
|
||||

| OK | ||
 |
||
| ||
| 2. INSPECT CRANKSHAFT POSITION SENSOR (SENSOR POWER SOURCE) |
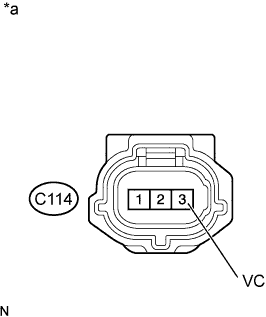 |
Disconnect the crankshaft position sensor connector.
Measure the voltage according to the value(s) in the table below.
- Standard Voltage:
Tester Connection
Switch Condition
Specified Condition
C114-3 (VC) - Body ground
Engine switch on (IG)
4.5 to 5.0 V
Text in Illustration *a
Front view of wire harness connector
(to Crankshaft Position Sensor)
|
|
||||
| OK | |
 |
| 3. CHECK HARNESS AND CONNECTOR (CRANKSHAFT POSITION SENSOR - ECM) |
Disconnect the crankshaft position sensor connector.
Disconnect the ECM connector.
Measure the resistance according to the value(s) in the table below.
- Standard Resistance:
for RHD Tester Connection
Condition
Specified Condition
C114-1 (NE+) - C46-110 (NE+)
Always
Below 1 Ω
C114-2 (NE-) - C46-111 (NE-)
Always
Below 1 Ω
C114-1 (NE+) or C46-110 (NE+) - Body ground
Always
10 kΩ or higher
C114-2 (NE-) or C46-111 (NE-) - Body ground
Always
10 kΩ or higher
for LHD Tester Connection
Condition
Specified Condition
C114-1 (NE+) - C45-110 (NE+)
Always
Below 1 Ω
C114-2 (NE-) - C45-111 (NE-)
Always
Below 1 Ω
C114-1 (NE+) or C45-110 (NE+) - Body ground
Always
10 kΩ or higher
C114-2 (NE-) or C45-111 (NE-) - Body ground
Always
10 kΩ or higher
|
|
||||

| OK | |
|
| 4. CHECK SENSOR INSTALLATION (CRANKSHAFT POSITION SENSOR) |
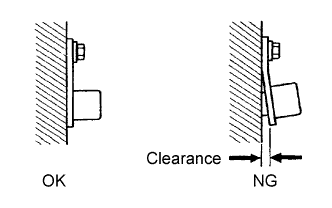 |
Check the crankshaft position sensor installation.
- OK:
- Sensor is installed correctly.
|
|
||||
| OK | |
|
| 5. INSPECT CRANKSHAFT ANGLE SENSOR ROTOR (TEETH OF SENSOR ROTOR) |
Check the teeth of the sensor rotor.
- OK:
- Sensor rotor does not have any cracks or deformation.
|
|
||||
| OK | |
|
| 6. REPLACE CRANKSHAFT POSITION SENSOR |
Replace the crankshaft position sensor (Click here).
| NEXT | |
|
| 7. CHECK WHETHER DTC OUTPUT RECURS (DTC P0335, P0337, P0338 AND/OR P0339) |
Connect the GTS to the DLC3.
Turn the engine switch on (IG).
Turn the GTS on.
Clear DTCs (Click here).
Start the engine.
Enter the following menus: Powertrain / Engine and ECT / Trouble Codes.
Read DTCs.
Result Result
Proceed to
No DTC is output
A
P0335, P0337, P0338 or P0339 is output
B
- HINT:
- If the engine does not start, replace the ECM.
|
|
||||
| A | ||
|
||
| ||
| 8. CHECK HARNESS AND CONNECTOR (CRANKSHAFT POSITION SENSOR - ECM) |
Disconnect the crankshaft position sensor connector.
Disconnect the ECM connector.
Measure the resistance according to the value(s) in the table below.
- Standard Resistance:
for RHD Tester Connection
Condition
Specified Condition
C114-3 (VC) - C46-66 (VCV2)
Always
Below 1 Ω
C114-3 (VC) or C46-66 (VCV2) - Body ground
Always
10 kΩ or higher
for LHD Tester Connection
Condition
Specified Condition
C114-3 (VC) - C45-66 (VCV2)
Always
Below 1 Ω
C114-3 (VC) or C45-66 (VCV2) - Body ground
Always
10 kΩ or higher
|
|
||||
| OK | ||
|
||
| ||