TEST MODE PROCEDURE
Troubleshooting · Vehicles built Sep 2011 – Dec 2011
Versions by build date: Sep 2011 – Dec 2011 from Jan 2012
| TEST MODE (SIGNAL CHECK) PROCEDURE (SST CHECK WIRE) |
- HINT:
- After replacing the master cylinder solenoid and/or yaw rate and G sensor or performing a vehicle height adjustment, make sure to perform yaw rate and G sensor zero point calibration (Click here).
- If the ignition switch is turned from ON to ACC or off during test mode (signal check), DTCs of the signal check function will be cleared.
- During test mode (signal check), the skid control ECU stores all DTCs of the test mode (signal check) function. By performing the test mode (signal check), the codes are cleared if normality is confirmed. The codes left over are the codes where an abnormality was found.
- After replacing the master cylinder solenoid and/or yaw rate and G sensor or performing a vehicle height adjustment, make sure to perform yaw rate and G sensor zero point calibration (Click here).
Turn the ignition switch off.
Check that the steering wheel is centered and move the shift lever to P.
Using SST, connect terminals 12 (TS) and 4 (CG) of the DLC3.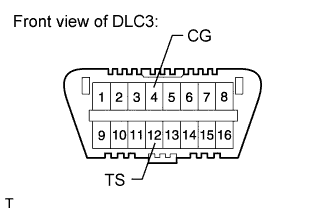

- SST
- 09843-18040
Turn the ignition switch to ON.
Check that "VSC TEST MODE" is displayed on the multi-information display*1 and check that the ABS warning light and VSC OFF indicator lights*2 blink in test mode.
- HINT:
- If the G sensor zero point calibration data is cleared, the ABS warning light comes on.
- If the G sensor zero point calibration data is not cleared and the ABS warning light and VSC OFF indicator lights*2 do not blink, inspect the 12 (TS) and 4 (CG) terminal circuit and the ABS warning light and VSC OFF indicator light*2 circuits.
- *1: w/ Multi-information Display
- *2: w/o Multi-information Display
- If the G sensor zero point calibration data is cleared, the ABS warning light comes on.
Trouble Area
See Procedure
TS and CG terminal circuit
Click here
ABS warning light circuit
Click here or Click here
VSC OFF indicator light circuit
Click here or Click here
Start the engine.
Using a check wire, perform the ABS sensor (G sensor, master cylinder pressure sensor, center differential lock detection switch and speed sensor) and VSC sensor (yaw rate sensor and CRAWL switch) signal checks in test mode (ABS sensor: See procedure "A" to "E", VSC sensor: See procedure "F" to "I").
| G SENSOR SIGNAL CHECK (SST CHECK WIRE) (Procedure "A") |
Check that the ABS warning light is blinking in test mode.
Keep the vehicle stationary on a level surface for 2 seconds or more.
| MASTER CYLINDER PRESSURE SENSOR SIGNAL CHECK (SST CHECK WIRE) (Procedure "B") |
Check that the ABS warning light is blinking in test mode.
Leave the vehicle in a stationary condition and release the brake pedal for 1 second or more, and then quickly depress the brake pedal with a force of 98 N (10 kgf, 22.0 lbf) or more for 1 second or more.
- HINT:
- At this time, the ABS warning light stays on for 3 seconds.
- The ABS warning light comes on for 3 seconds every time the brake pedal operation above is performed.
- At this time, the ABS warning light stays on for 3 seconds.
| CENTER DIFFERENTIAL LOCK DETECTION SWITCH SIGNAL CHECK (SST CHECK WIRE) (Procedure "C") |
Check that the ABS warning light is blinking in test mode.
Check the center differential lock switch.
Push the center differential lock switch on to lock the center differential.
Push the center differential lock switch off to unlock the center differential.
| SPEED SENSOR SIGNAL CHECK (SST CHECK WIRE) (Procedure "D") |
Check that the ABS warning light is blinking in test mode.
Check the reverse signal.
Drive the vehicle in reverse for more than 1 second at 3 km/h (2 mph) or more.
- HINT:
- Drive the vehicle in reverse and check the speed sensor signal. Note that the signal check cannot be completed if the vehicle speed is 45 km/h (28 mph) or more.
Check the forward signal.
Drive the vehicle straight forward.
Drive the vehicle at a speed of 45 km/h (28 mph) or more for several seconds and check that the ABS warning light goes off.- NOTICE:
- The signal check may not be completed if the vehicle has its wheels spun or the steering wheel is turned during this check.
Stop the vehicle.
- NOTICE:
- The speed sensor signal check may not be completed if the speed sensor signal check is started while turning the steering wheel or spinning the wheels.
- If the signal check has not been completed, the ABS warning light blinks while driving and the ABS system does not operate.
- The speed sensor signal check may not be completed if the speed sensor signal check is started while turning the steering wheel or spinning the wheels.
- HINT:
- When the signal check has been completed, the ABS warning light goes off while driving and blinks in the test mode pattern while stationary.
| READ DTC OF ABS SENSOR (SST CHECK WIRE) (Procedure "E") |
Using SST, connect terminals 13 (TC) and 4 (CG) of the DLC3.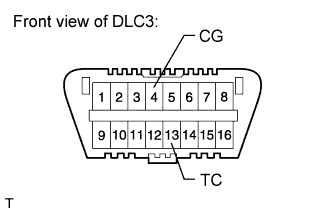
- SST
- 09843-18040
Read the number of blinks of the ABS warning light.
- HINT:
- See the list of DTCs (See procedure "J").
- If every sensor is normal, the normal system code is output (a cycle of 0.25 seconds on and 0.25 seconds off is repeated).
- If more than 1 malfunction is detected at the same time, the lowest numbered code will be output first.
- See the list of DTCs (See procedure "J").
After the check, disconnect SST from terminals 13 (TC) and 4 (CG) of the DLC3.
| CRAWL SWITCH SIGNAL CHECK (SST CHECK WIRE) (Procedure "G") |
Check that "VSC TEST MODE" is displayed on the multi-information display*1 or check that the VSC OFF indicator light*2 is blinking in the test mode.
- HINT:
- *1: w/ Multi-information Display
- *2: w/o Multi-information Display
- *1: w/ Multi-information Display
Check the CRAWL switch.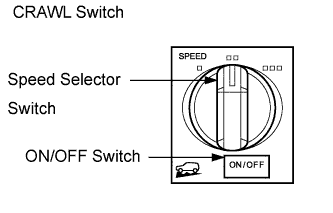
Turn the ON/OFF switch on.
Turn the ON/OFF switch off.
Turn the speed selector switch to low.
Turn the speed selector switch to middle.
Turn the speed selector switch to high.
Turn the speed selector switch to low.
| YAW RATE SENSOR SIGNAL CHECK (SST CHECK WIRE) (Procedure "H") |
Check that "VSC TEST MODE" is displayed on the multi-information display*1 or check that the VSC OFF indicator light*2 is blinking in test mode.
- HINT:
- *1: w/ Multi-information Display
- *2: w/o Multi-information Display
- *1: w/ Multi-information Display
Check the zero point voltage of the yaw rate sensor.
Keep the vehicle stationary on a level surface for 1 second or more.
Check the output of the yaw rate sensor and the direction of the steering angle sensor.
Move the shift lever to D and drive the vehicle at a vehicle speed of 5 km/h (3 mph) or more, and then turn the steering wheel either to the left or right 90° or more until the vehicle makes a 180° turn.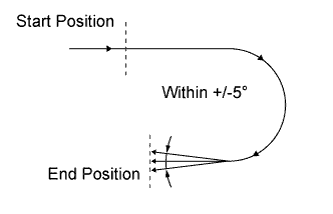
Stop the vehicle and move the shift lever to P. Check that the skid control buzzer sounds for 3 seconds.
- HINT:
- If the skid control buzzer sounds, the signal check has completed normally.
- If the skid control buzzer does not sound, check the skid control buzzer circuit (Click here), then perform the signal check again.
- If the skid control buzzer still does not sound, there is a malfunction in the yaw rate sensor, so check the DTC.
- Drive the vehicle in a 180° circle. At the end of the turn, the direction of the vehicle should be within 175 to 185° of its start position.
- Do not spin the wheels.
- If the skid control buzzer sounds, the signal check has completed normally.
| READ DTC OF VSC SENSOR (SST CHECK WIRE) (Procedure "I") |
Using SST, connect terminals 13 (TC) and 4 (CG) of the DLC3.
- SST
- 09843-18040
Read the codes output on the multi-information display*1 or read the number of blinks of the VSC OFF indicator light*2.
- HINT:
- See the list of DTCs (See procedure "J").
- If every sensor/switch is normal, "DIAG VSC OK" is displayed on the multi-information display*1 or the normal system code is output (a cycle of 0.25 seconds ON and 0.25 seconds OFF is repeated)*2.
- If more than 1 malfunction is detected at the same time, the lowest numbered code will be output first.
- *1: w/ Multi-information Display
- *2: w/o Multi-information Display
- See the list of DTCs (See procedure "J").
After performing the check, turn the ignition switch off and disconnect SST from terminals 13 (TC) and 4 (CG) of the DLC3.
Turn the ignition switch to ON.
| DTC OF SIGNAL CHECK FUNCTION (SST CHECK WIRE) (Procedure "J") |
| DTC Code |
Detection Item |
Trouble Area |
| C1271/71 |
Front Speed Sensor RH Output Voltage Malfunction |
|
| C1272/72 |
Front Speed Sensor LH Output Voltage Malfunction |
|
| C1273/73 |
Rear Speed Sensor RH Output Voltage Malfunction |
|
| C1274/74 |
Rear Speed Sensor LH Output Voltage Malfunction |
|
| C1275/75 |
Abnormal Change in Output Signal of Front Speed Sensor RH |
Speed sensor rotor |
| C1276/76 |
Abnormal Change in Output Signal of Front Speed Sensor LH |
Speed sensor rotor |
| C1277/77 |
Abnormal Change in Output Signal of Rear Speed Sensor RH |
Speed sensor rotor |
| C1278/78 |
Abnormal Change in Output Signal of Rear Speed Sensor LH |
Speed sensor rotor |
| C1279/79 |
G Sensor Output Voltage Malfunction |
|
| C1281/81 |
Master Cylinder Pressure Sensor Output Malfunction |
|
| C1282/82 |
Center Differential Lock Detection Switch Malfunction |
Center differential lock switch |
| Code Code |
Detection Item |
Trouble Area |
| C0371/71 |
Yaw Rate Sensor Malfunction |
Yaw rate and G sensor |
| C1379/74 |
CRAWL Switch Malfunction |
CRAWL switch |
- HINT:
- The codes in this table are stored only in test mode (signal check).
| TEST MODE (SIGNAL CHECK) PROCEDURE (INTELLIGENT TESTER) |
- HINT:
- After replacing the master cylinder solenoid and/or yaw rate and G sensor or performing a vehicle height adjustment, make sure to perform yaw rate and G sensor zero point calibration (Click here).
- If the ignition switch is turned from ON to ACC or off during test mode (signal check), DTCs of the signal check function will be cleared.
- During test mode (signal check), the skid control ECU stores all DTCs of the test mode (signal check) function. By performing the test mode (signal check), the codes are cleared if normality is confirmed. The codes left over are the codes where an abnormality was found.
- After replacing the master cylinder solenoid and/or yaw rate and G sensor or performing a vehicle height adjustment, make sure to perform yaw rate and G sensor zero point calibration (Click here).
Turn the ignition switch off.
Check that the steering wheel is centered and move the shift lever to P.
Connect the intelligent tester to the DLC3.
Turn the ignition switch to ON.
Turn the intelligent tester on.
Enter the following menus: Chassis / ABS/VSC/TRC / Utility / Signal Check.
Check that "VSC TEST MODE" is displayed on the multi-information display*1 and check that the ABS warning light and VSC OFF indicator light*2 blink in test mode.
- HINT:
- If the G sensor zero point calibration data is cleared, the ABS warning light comes on.
- If the G sensor zero point calibration data is not cleared and the ABS warning light and VSC OFF indicator lights*2 do not blink, inspect the 12 (TS) and 4 (CG) terminal circuit and the ABS warning light and VSC OFF indicator light*2 circuits.
- *1: w/ Multi-information Display
- *2: w/o Multi-information Display
- If the G sensor zero point calibration data is cleared, the ABS warning light comes on.
Trouble Area
See Procedure
TS and CG terminal circuit
Click here
ABS warning light circuit
Click here or Click here
VSC OFF indicator light circuit
Click here or Click here
Start the engine.
Using the intelligent tester, perform the ABS sensor (G sensor, master cylinder pressure sensor, center differential lock detection switch and speed sensor) and VSC sensor (yaw rate sensor and CRAWL switch) signal checks in test mode (ABS sensor: See procedure "K" to "O", VSC sensor: See procedure "P" to "S").
| G SENSOR SIGNAL CHECK (INTELLIGENT TESTER) (Procedure "K") |
Check that the ABS warning light is blinking in test mode.
Keep the vehicle stationary on a level surface for 2 seconds or more.
| MASTER CYLINDER PRESSURE SENSOR SIGNAL CHECK (INTELLIGENT TESTER) (Procedure "L") |
Check that the ABS warning light is blinking in test mode.
Leave the vehicle in a stationary condition and release the brake pedal for 1 second or more, and then quickly depress the brake pedal with a force of 98 N (10 kgf, 22 lbf) or more for 1 second or more.
- HINT:
- At this time, the ABS warning light stays on for 3 seconds.
- The ABS warning light comes on for 3 seconds every time the brake pedal operation above is performed.
- At this time, the ABS warning light stays on for 3 seconds.
| CENTER DIFFERENTIAL LOCK DETECTION SWITCH SIGNAL CHECK (INTELLIGENT TESTER) (Procedure "M") |
Check that the ABS warning light is blinking in test mode.
Check the center differential lock switch.
Push the center differential lock switch on to lock the center differential.
Push the center differential lock switch off to unlock the center differential.
| SPEED SENSOR SIGNAL CHECK (INTELLIGENT TESTER) (Procedure "N") |
Check that the ABS warning light is blinking in test mode.
Check the reverse signal.
Drive the vehicle in reverse for more than 1 second at 3 km/h (2 mph) or more.
- HINT:
- Drive the vehicle in reverse and check the speed sensor signal. Note that the signal check cannot be completed if the vehicle speed is 45 km/h (28 mph) or more.
Check the forward signal.
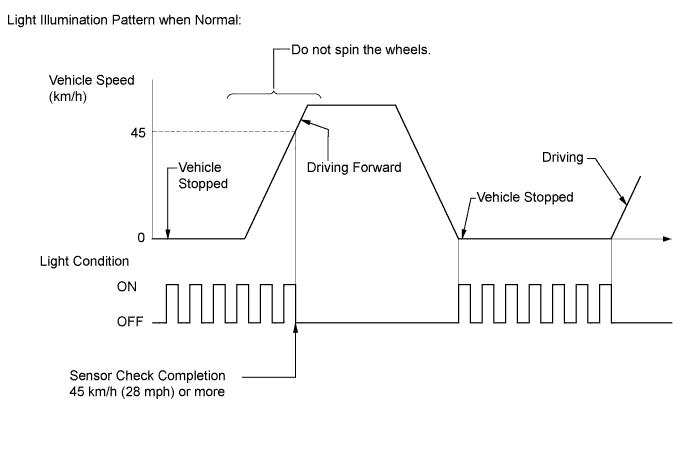
Drive the vehicle straight forward. Drive the vehicle at a speed of 45 km/h (28 mph) or more and check that the ABS warning light goes off.
- NOTICE:
- The signal check may not be completed if the vehicle has its wheels spun or the steering wheel is turned during this check.
Stop the vehicle.
- NOTICE:
- The speed sensor signal check may not be completed if the speed sensor signal check is started while turning the steering wheel or spinning the wheels.
- If the signal check has not been completed, the ABS warning light blinks while driving and the ABS system does not operate.
- The speed sensor signal check may not be completed if the speed sensor signal check is started while turning the steering wheel or spinning the wheels.
- HINT:
- When the signal check has been completed, the ABS warning light goes off while driving and blinks in the test mode pattern while stationary.
| READ DTC OF ABS SENSOR (INTELLIGENT TESTER) (Procedure "O") |
Read the DTC(s) by following the intelligent tester screen.
- HINT:
- Refer to the intelligent tester operator's manual for further details.
- See the list of DTCs (See procedure "T").
- Refer to the intelligent tester operator's manual for further details.
| CRAWL SWITCH SIGNAL CHECK (INTELLIGENT TESTER) (Procedure "Q") |
Check that "VSC TEST MODE" is displayed on the multi-information display*1 or check that the VSC OFF indicator light*2 is blinking in the test mode.
- HINT:
- *1: w/ Multi-information Display
- *2: w/o Multi-information Display
- *1: w/ Multi-information Display
Check the CRAWL switch.
Turn the ON/OFF switch on.
Turn the ON/OFF switch off.
Turn the speed selector switch to low.
Turn the speed selector switch to middle.
Turn the speed selector switch to high.
Turn the speed selector switch to low.
| YAW RATE SENSOR SIGNAL CHECK (INTELLIGENT TESTER) (Procedure "R") |
Check that "VSC TEST MODE" is displayed on the multi-information display*1 or check that the VSC OFF indicator light*2 is blinking in test mode.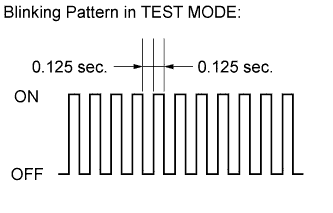
- HINT:
- *1: w/ Multi-information Display
- *2: w/o Multi-information Display
- *1: w/ Multi-information Display
Check the zero point voltage of the yaw rate sensor.
Keep the vehicle stationary on a level surface for 1 second or more.
Check the output of the yaw rate sensor and the direction of the steering angle sensor.
Move the shift lever to D and drive the vehicle at a vehicle speed of 5 km/h (3 mph) or more, and then turn the steering wheel either to the left or right 90° or more until the vehicle makes a 180° turn.
Stop the vehicle and move the shift lever to P. Check that the skid control buzzer sounds for 3 seconds.
- HINT:
- If the skid control buzzer sounds, the signal check has completed normally.
- If the skid control buzzer does not sound, check the skid control buzzer circuit (Click here), then perform the signal check again.
- If the skid control buzzer still does not sound, there is a malfunction in the yaw rate sensor, so check the DTC.
- Drive the vehicle in a 180° circle. At the end of the turn, the direction of the vehicle should be within 175° to 185° of its start position.
- Do not spin the wheels.
- If the skid control buzzer sounds, the signal check has completed normally.
| READ DTC OF VSC SENSOR (INTELLIGENT TESTER) (Procedure "S") |
Read the DTC(s) by following the intelligent tester screen.
- HINT:
- Refer to the intelligent tester operator's manual for further details.
- See the list of DTCs (See procedure "T").
- Refer to the intelligent tester operator's manual for further details.
| DTC OF SIGNAL CHECK FUNCTION (INTELLIGENT TESTER) (Procedure "T") |
| DTC Code |
Detection Item |
Trouble Area |
| C1271/71 |
Front Speed Sensor RH Output Voltage Malfunction |
|
| C1272/72 |
Front Speed Sensor LH Output Voltage Malfunction |
|
| C1273/73 |
Rear Speed Sensor RH Output Voltage Malfunction |
|
| C1274/74 |
Rear Speed Sensor LH Output Voltage Malfunction |
|
| C1275/75 |
Abnormal Change in Output Signal of Front Speed Sensor RH |
Speed sensor rotor |
| C1276/76 |
Abnormal Change in Output Signal of Front Speed Sensor LH |
Speed sensor rotor |
| C1277/77 |
Abnormal Change in Output Signal of Rear Speed Sensor RH |
Speed sensor rotor |
| C1278/78 |
Abnormal Change in Output Signal of Rear Speed Sensor LH |
Speed sensor rotor |
| C1279/79 |
G Sensor Output Voltage Malfunction |
|
| C1281/81 |
Master Cylinder Pressure Sensor Output Malfunction |
|
| C1282/82 |
Center Differential Lock Detection Switch Malfunction |
Center differential lock switch |
| DTC Code |
Detection Item |
Trouble Area |
| C0371/71 |
Yaw Rate Sensor Malfunction |
Yaw rate and G sensor |
| C1379/74 |
CRAWL Switch Malfunction |
CRAWL switch |
- HINT:
- The codes in this table are stored only in test mode (signal check).