REMOVAL
Removal / installation · Vehicles built Sep 2011 – Dec 2011
| 1. DISCHARGE FUEL SYSTEM PRESSURE |

Discharge the fuel system pressure (Click here).
| 2. DISCONNECT CABLE FROM NEGATIVE BATTERY TERMINAL |
- CAUTION:
- Wait at least 90 seconds after disconnecting the cable from the negative (-) battery terminal to disable the SRS system.
- NOTICE:
- When disconnecting the cable, some systems need to be initialized after the cable is reconnected (Click here).
| 3. REMOVE FRONT FENDER SPLASH SHIELD SUB-ASSEMBLY LH |
  |
Remove the 3 bolts and screw.
Turn the clip indicated by the arrow in the illustration to remove the fender splash shield.
| 4. REMOVE FRONT FENDER SPLASH SHIELD SUB-ASSEMBLY RH |
- HINT:
- Use the same procedures described for the LH side.
| 5. REMOVE NO. 1 ENGINE UNDER COVER SUB-ASSEMBLY |
Remove the 10 bolts and No. 1 engine under cover.
| 6. REMOVE NO. 2 ENGINE UNDER COVER |
Remove the 2 bolts and No. 2 engine under cover.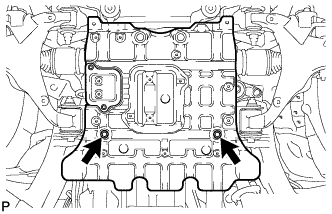
| 7. DRAIN ENGINE COOLANT |
- CAUTION:
- Do not remove the radiator cap while the engine and radiator are still hot. Pressurized, hot engine coolant and steam may be released and cause serious burns.
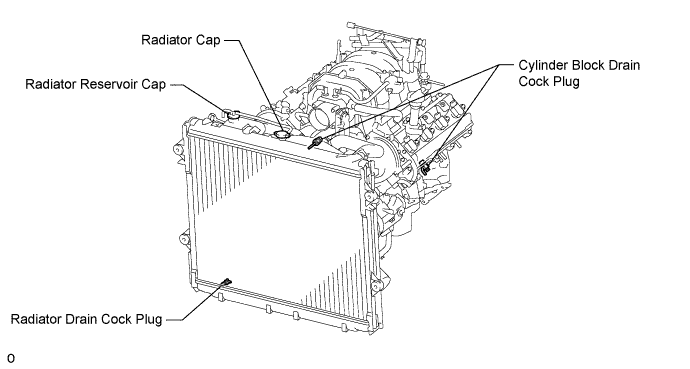
Loosen the radiator drain cock plug.
Remove the radiator cap. Then drain the coolant.
- HINT:
- Collect the coolant in a container and dispose of it according to the regulations in your area.
Loosen the 2 cylinder block drain cock plugs. Then drain the coolant from the engine.
Tighten the 2 cylinder block drain cock plugs.
- Torque:
- 13 N*m{ 130 kgf*cm , 9 ft.*lbf }
Tighten the radiator drain cock plug by hand.
| 8. DRAIN ENGINE OIL |
Remove the oil drain plug and gasket, and drain the engine oil into a container.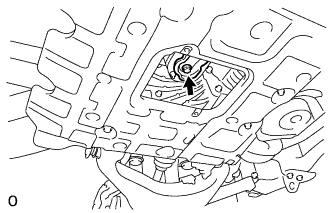
| 9. DISCONNECT FRONT NO. 2 EXHAUST PIPE ASSEMBLY |
Disconnect the air fuel ratio sensor connector.
Disconnect the heated oxygen sensor connector.
Remove the 3 nuts and 2 bolts, disconnect the front No. 2 exhaust pipe from the exhaust manifold LH and center exhaust pipe, and then remove the 2 gaskets.
- HINT:
- It is not necessary to remove the front No. 2 exhaust pipe from the vehicle.
Remove the bolt and disconnect the exhaust manifold LH from the No. 2 manifold stay.
| 10. DISCONNECT FRONT EXHAUST PIPE ASSEMBLY |
Disconnect the air fuel ratio sensor connector.
Disconnect the heated oxygen sensor connector.
Detach the heated oxygen sensor wire clamp.
Remove the 3 nuts and 2 bolts, disconnect the front exhaust pipe from the exhaust manifold RH and center exhaust pipe, and then remove the 2 gaskets.
- HINT:
- It is not necessary to remove the front exhaust pipe from the vehicle.
Remove the bolt and disconnect the exhaust manifold RH from the manifold stay RH.
| 11. REMOVE COWL TOP VENTILATOR LOUVER SUB-ASSEMBLY |
Remove the cowl top ventilator louver (Click here).
| 12. REMOVE INTAKE MANIFOLD |
Remove the intake manifold (Click here).
| 13. REMOVE AIR TUBE SUB-ASSEMBLY RH (w/ Secondary Air Injection System) |
Remove the 2 bolts, 2 nuts and air tube sub-assembly.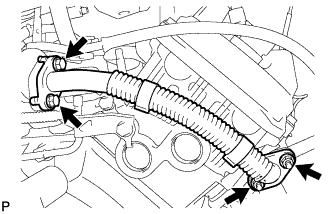
Remove the 2 gaskets.
| 14. REMOVE NO. 3 AIR TUBE (w/ Secondary Air Injection System) |
Remove the 2 bolts, 2 nuts and No. 3 air tube.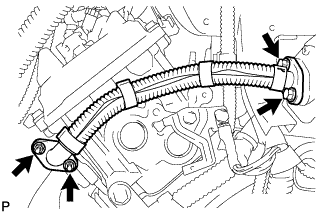
Remove the 2 gaskets.
| 15. REMOVE NO. 1 AIR SWITCHING VALVE ASSEMBLY (w/ Secondary Air Injection System) |
Remove the vacuum switching valve hose from the No. 1 air switching valve.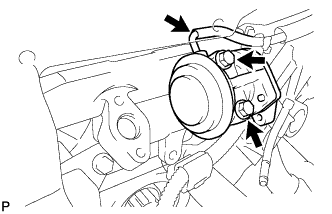
Remove the 2 bolts, gasket and No. 1 air switching valve from the rear water by-pass joint.
| 16. REMOVE NO. 2 AIR SWITCHING VALVE ASSEMBLY (w/ Secondary Air Injection System) |
Remove the vacuum switching valve hose from the No. 2 air switching valve.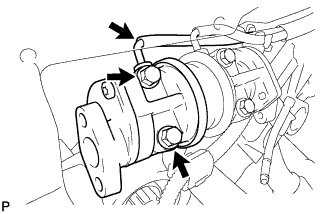
Remove the 2 bolts, gasket and No. 2 air switching valve from the rear water by-pass joint.
| 17. REMOVE WATER INLET HOUSING |
Remove the 2 bolts holding the water inlet housing to the water pump.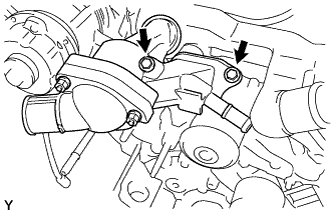
Disconnect the water inlet housing from the front water by-pass joint and water pump. Then remove the water inlet and inlet housing assembly.
Remove the O-ring from the water inlet housing.
| 18. REMOVE FRONT WATER BY-PASS JOINT |
Remove the 4 nuts, front water by-pass joint and 2 gaskets.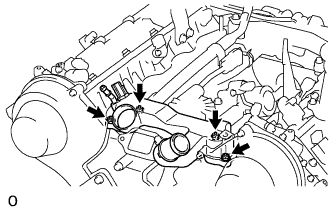
| 19. REMOVE WATER BY-PASS PIPE SUB-ASSEMBLY |
Disconnect the connector.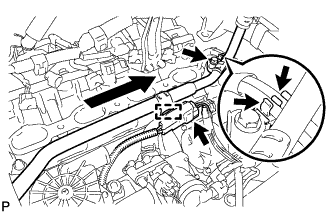
Disconnect the wire harness clamp from the water by-pass pipe.
Disconnect the 2 vacuum switching valve hoses from the water by-pass pipe clamp.
Remove the bolt.
Pull out the water by-pass pipe.
Remove the O-ring from the water by-pass pipe.
| 20. REMOVE REAR WATER BY-PASS JOINT |
Remove the 4 nuts, water by-pass joint and 2 gaskets.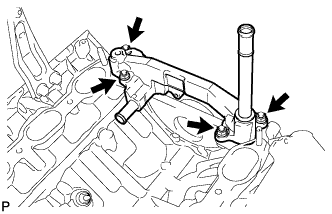
| 21. REMOVE REAR NO. 2 TIMING BELT PLATE RH |
Remove the 2 bolts, stud bolt and timing belt plate.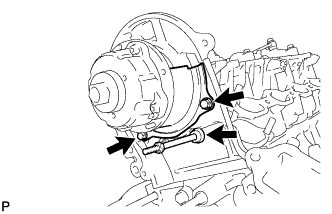
| 22. REMOVE REAR NO. 2 TIMING BELT PLATE LH |
Remove the 2 bolts and timing belt plate.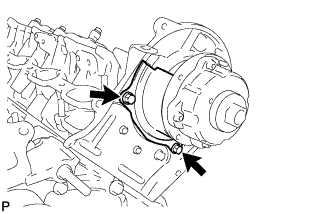
| 23. REMOVE REAR TIMING BELT PLATE RH |
Remove the bolt and rear timing belt plate.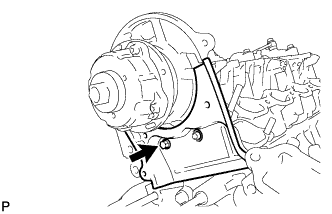
| 24. REMOVE REAR TIMING BELT PLATE LH |
Remove the bolt and rear timing belt plate.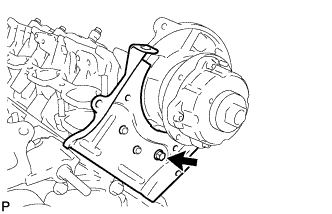
| 25. REMOVE CAMSHAFT |
Remove the camshaft (Click here).
| 26. REMOVE CAMSHAFT TIMING TUBE ASSEMBLY |
Mount the hexagonal portion of the camshaft in a vise.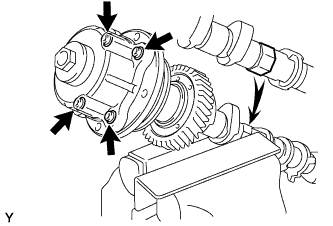
- NOTICE:
- Be careful not to damage the camshaft.
- Do not loosen or remove the 4 bolts shown in the illustration. If any of them are loosened or removed, the backlash of the gear in the timing tube will go out of adjustment. In this case, replace the timing tube assembly with a new one.
- Be careful not to damage the camshaft.
Remove the screw plug and seal washer.
Using a 10 mm hexagon wrench, remove the bolt and timing tube.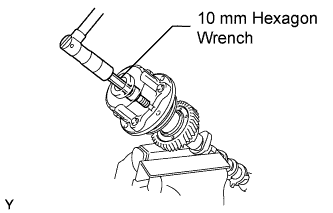
| 27. REMOVE CAMSHAFT DRIVE GEAR |
Using SST and a 5 mm hexagon wrench, remove the 4 bolts, drive gear and oil seal.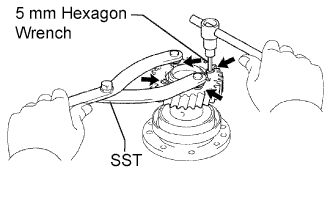
- SST
- 09960-10010
(09962-01000, 09963-00500)
- NOTICE:
- Be careful not to damage the timing tube.
| 28. REMOVE VALVE LIFTER |
Remove the valve lifters and adjusting shims from the cylinder head.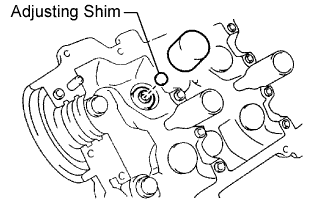
- HINT:
- Arrange the removed parts in the correct order.
| 29. REMOVE CYLINDER HEAD SUB-ASSEMBLY |
Uniformly loosen the 10 cylinder head bolts on the cylinder head in several passes, in the sequence shown in the illustration.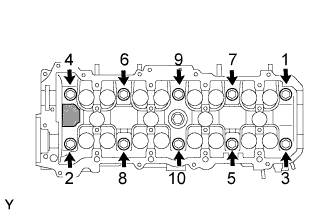
Remove the bolts and plate washers.
- NOTICE:
- Cylinder head warpage or cracking could result from removing bolts in the incorrect order.
- Do not drop the plate washer for the cylinder head bolt of the cylinder head.
- Cylinder head warpage or cracking could result from removing bolts in the incorrect order.
Remove the cylinder head by prying between the cylinder block and cylinder head with a screwdriver.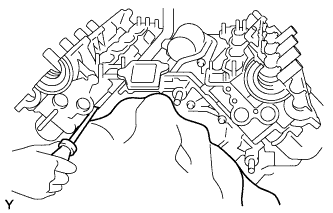
- NOTICE:
- Be careful not to damage the contact surfaces of the cylinder head and cylinder block.
- The cylinder head should not be tilted so as to secure the valve lifter. If the cylinder head is tilted, remove the valve lifter and check that the adjusting shim is set correctly.
- Be careful not to damage the contact surfaces of the cylinder head and cylinder block.
| 30. REMOVE CYLINDER HEAD GASKET |
| 31. REMOVE CYLINDER HEAD LH |
Uniformly loosen the 10 cylinder head bolts on the cylinder head in several passes, in the sequence shown in the illustration.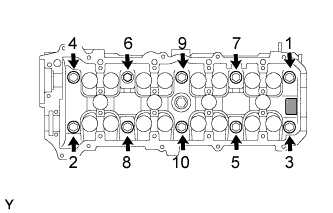
Remove the bolts and plate washers.
- NOTICE:
- Cylinder head warpage or cracking could result from removing bolts in the incorrect order.
- Do not drop the plate washer for the cylinder head bolt of the cylinder head.
- Cylinder head warpage or cracking could result from removing bolts in the incorrect order.
Remove the cylinder head by prying between the cylinder block and cylinder head with a screwdriver.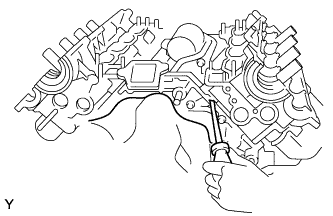
- NOTICE:
- Be careful not to damage the contact surfaces of the cylinder head and cylinder block.
- The cylinder head should not be tilted so as to secure the valve lifter. If the cylinder head is tilted, remove the valve lifter and check that the adjusting shim is set correctly.
- Be careful not to damage the contact surfaces of the cylinder head and cylinder block.
| 32. REMOVE CYLINDER HEAD GASKET LH |