INSPECTION
Inspection · Vehicles built from Jan 2012
Versions by build date: Sep 2011 – Dec 2011 from Jan 2012
| INSPECT INDICATOR LIGHT |

Check the 4LO indicator light.
Start the engine.
Stop the vehicle.
for Automatic Transmission: Move the shift lever to N.
for Manual Transmission: Depress the clutch pedal.Turn the transfer position switch from H4 to L4.
Check the 4LO indicator light.
-
w/ VSC: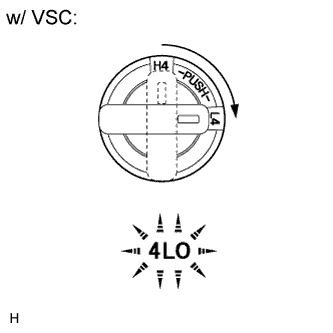

- OK:
Switch Condition
Specified Condition
Turned from H4 to L4
4LO indicator light comes on immediately or comes on after blinking
-
w/o VSC: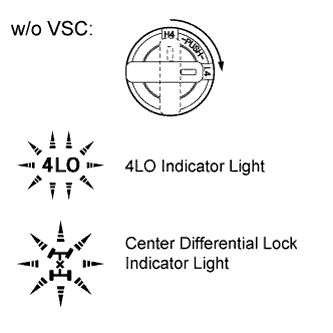
- OK:
Switch Condition
Specified Condition
Turned from H4 to L4
4LO indicator light and center differential lock indicator light come on immediately or come on after blinking
- HINT:
- For vehicles without VSC (Vehicle Stability Control), when the transfer position switch is turned from H4 to L4, the center differential will lock.
-
Check the center differential lock indicator light.
Start the engine.
Push the center differential lock switch.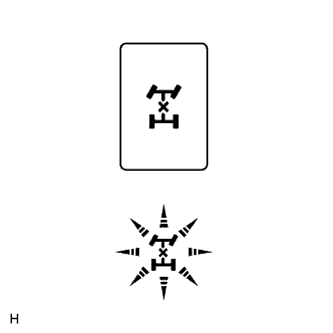
- NOTICE:
- Do not push the switch while the vehicle is turning.
- Push the switch at a vehicle speed less than 100 km/h (60 mph).
- Do not push the switch while the vehicle is turning.
Check the center differential lock indicator light.
- OK:
Switch Condition
Specified Condition
Pushed
Center differential lock indicator light comes on immediately or comes on after blinking
w/ Rear Differential Lock:
Check the rear differential lock indicator light.Start the engine.
Stop the vehicle.
for Automatic Transmission: Move the shift lever to N.
for Manual Transmission: Depress the clutch pedal.Turn the transfer position switch from H4 to L4.
- HINT:
- The rear differential can be locked only when the following conditions are met: 1) The transfer is in low, and 2) the center differential is locked. As vehicles with a rear differential lock do not have a vehicle stability control system, these conditions will be satisfied after the transfer position switch is turned to L4, the transfer shifts to low, and the center differential locks.
Turn the differential lock switch from OFF to RR.
- NOTICE:
- When locking the rear differential, make sure that the vehicle speed is less than 8 km/h (5 mph).
Check the rear differential lock indicator light.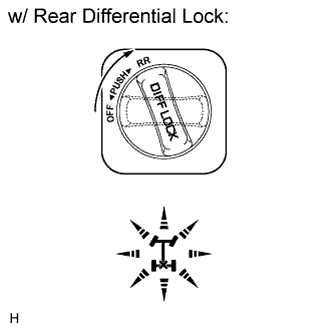
- OK:
Switch Condition
Specified Condition
After transfer position switch is turned from H4 to L4, differential lock switch is turned from OFF to RR
Rear differential lock indicator light comes on immediately or comes on after blinking
- HINT:
- The 4LO indicator light and center differential lock indicator light are both illuminated.
- When the rear differential is locked, if the transfer position switch is returned to H4, the rear differential becomes free. However, since the differential lock switch is on RR, the rear differential lock indicator light blinks, and when the differential lock switch is turned to OFF, the indicator light turns off.
- The 4LO indicator light and center differential lock indicator light are both illuminated.
| INSPECT FUSE |
Remove the 4WD fuse from the main body ECU (cowl side junction block LH).
Measure the resistance according to the value(s) in the table below.
- Standard Resistance:
Tester Connection
Condition
Specified Condition
4WD fuse
Always
Below 1 Ω
| INSPECT TRANSFER POSITION SWITCH |
Remove the transfer position switch (Click here).
Measure the resistance according to the value(s) in the table below.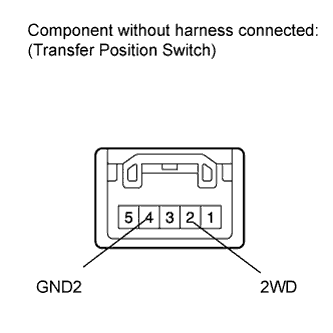
- Standard Resistance:
Tester Connection
Switch Condition
Specified Condition
2 (2WD) - 4 (GND2)
H4 position
100 kΩ or higher
L4 position
Below 1 Ω
Check the harness and connector (ECU - transfer position switch and body ground).
Disconnect the A27 ECU connector.
Disconnect the E48 transfer position switch connector.
Measure the resistance according to the value(s) in the table below.
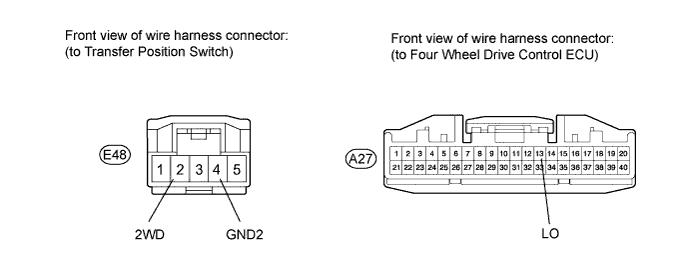
- Standard Resistance:
Tester Connection
Condition
Specified Condition
E48-2 (2WD) - A27-13 (LO)
Always
Below 1 Ω
E48-2 (2WD) - Body ground
Always
100 kΩ or higher
E48-4 (GND2) - Body ground
Always
Below 1 Ω
| INSPECT CENTER DIFFERENTIAL LOCK SWITCH |
Remove the center differential lock switch (Click here).
Measure the resistance according to the value(s) in the table below.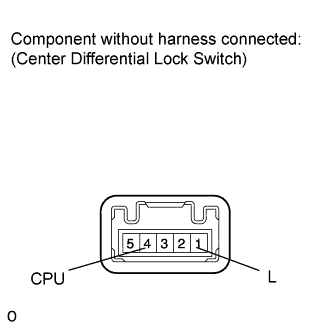
- Standard Resistance:
Tester Connection
Switch Condition
Specified Condition
1 (L) - 4 (CPU)
Switch is pressed and held
Below 1 Ω
Switch is not pressed
100 kΩ or higher
Check the harness and connector (ECU - center differential lock switch and body ground).
Disconnect the ECU connector.
Disconnect the center differential lock switch connector.
Measure the resistance according to the value(s) in the table below.
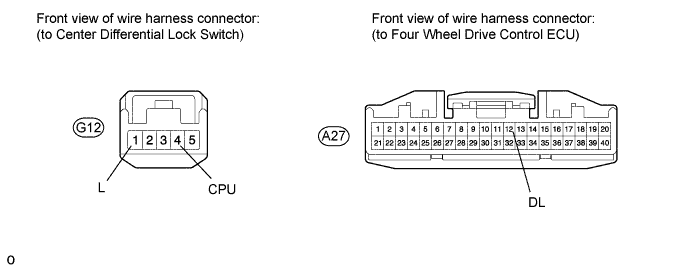
- Standard Resistance:
Tester Connection
Condition
Specified Condition
A27-12 (DL) - G12-4 (CPU)
Always
Below 1 Ω
A27-12 (DL) - Body ground
Always
100 kΩ or higher
G12-1 (L) - Body ground
Always
Below 1 Ω
| INSPECT DIFFERENTIAL LOCK SWITCH (w/ Rear Differential Lock) |
Remove the differential lock switch (Click here).
Measure the resistance according to the value(s) in the table below.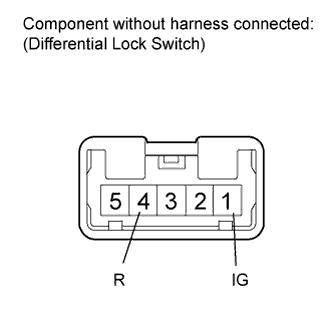
- Standard Resistance:
Tester Connection
Switch Condition
Specified Condition
1 (IG) - 4 (R)
OFF
10 kΩ or higher
RR
Below 1 Ω
Check the harness and connector (ECU - differential lock switch and body ground).
Disconnect the A27 ECU connector.
Disconnect the E87 differential lock switch connector.
Measure the resistance according to the value(s) in the table below.
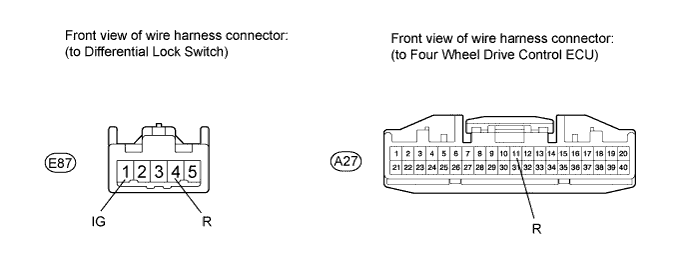
- Standard Resistance:
Tester Connection
Condition
Specified Condition
A27-11 (R) - E87-1 (IG)
Always
Below 1 Ω
A27-11 (R) - Body ground
Always
100 kΩ or higher
E87-4 (R) - Body ground
Always
Below 1 Ω
| INSPECT TRANSFER SHIFT ACTUATOR ASSEMBLY (HIGH-LOW TRANSFER SHIFT ACTUATOR) |
- HINT:
- After inspecting the ECU power supply or transfer position switch, check the high-low transfer shift actuator.
Check the harness and connector (ECU - high-low transfer shift actuator).
Disconnect the C38 actuator connector.
Disconnect the A27 and A28 ECU connectors.
Measure the resistance according to the value(s) in the table below.
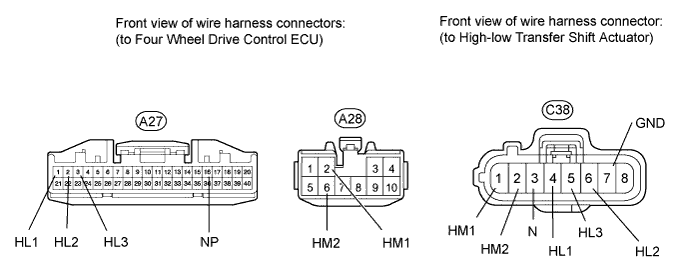
- Standard Resistance:
Tester Connection
Condition
Specified Condition
A27-1 (HL1) - C38-4 (HL1)
Always
Below 1 Ω
A27-1 (HL1) - Body ground
Always
100 kΩ or higher
A27-2 (HL2) - C38-6 (HL2)
Always
Below 1 Ω
A27-2 (HL2) - Body ground
Always
100 kΩ or higher
A27-3 (HL3) - C38-5 (HL3)
Always
Below 1 Ω
A27-3 (HL3) - Body ground
Always
100 kΩ or higher
A27-16 (NP) - C38-3 (N)
Always
Below 1 Ω
A27-16 (NP) - Body ground
Always
100 kΩ or higher
A28-2 (HM1) - C38-1 (HM1)
Always
Below 1 Ω
A28-2 (HM1) - Body ground
Always
100 kΩ or higher
A28-6 (HM2) - C38-2 (HM2)
Always
Below 1 Ω
A28-6 (HM2) - Body ground
Always
100 kΩ or higher
C38-7 (GND) - Body ground
Always
Below 1 Ω
Check the high-low transfer shift actuator.
Turn the engine switch on (IG).
Stop the vehicle.
for Automatic Transmission: Move the shift lever to N.
for Manual Transmission: Depress the clutch pedal.Check that there is an operating noise from the transfer shift actuator when the transfer position switch is turned from H4 to L4, or L4 to H4.
- OK:
- There is an operating noise.
- HINT:
- If the actuator fork cannot move from high to low, or low to high even though there is an operating noise, there may be a mechanical malfunction in the transfer.
- If there is no operating noise, there may be a malfunction in the high-low transfer shift actuator. However, it may also be a result of a mechanical malfunction in the transfer, so inspect each part.
- If the actuator fork cannot move from high to low, or low to high even though there is an operating noise, there may be a mechanical malfunction in the transfer.
Remove the transfer shift actuator assembly (Click here).
Check the high to low switch.
- Connect lines via a relay as shown in the illustration, and check that the actuator fork moves from the high to low position.
- NOTICE:
- Make sure to perform this inspection with the actuator removed from the vehicle. If this inspection is performed with the actuator installed to the vehicle, the actuator will be damaged.
- When inspecting the actuator, make sure to operate it with the lines connected via a relay. If the lines are not connected via a relay and battery voltage is directly applied to the actuator, the actuator will be damaged.
- Make sure to perform this inspection with the actuator removed from the vehicle. If this inspection is performed with the actuator installed to the vehicle, the actuator will be damaged.
- HINT:
- When performing the operation described above, use the DEFOG relay.
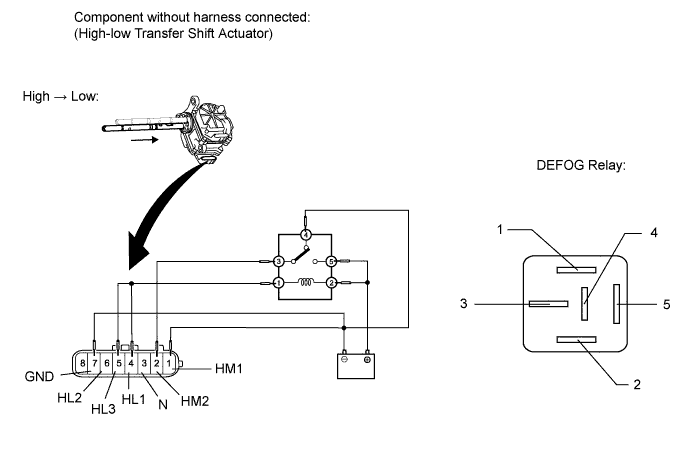
- After the high to low switch is complete, check the neutral position detection switch and limit switch.
- Measure the resistance according to the value(s) in the table below.
- Standard Resistance:
Tester Connection
Condition
Specified Condition
3 (N) - 7 (GND)
After high to low switch is complete
100 kΩ or higher
4 (HL1) - 7 (GND)
After high to low switch is complete
100 kΩ or higher
5 (HL3) - 7 (GND)
After high to low switch is complete
100 kΩ or higher
6 (HL2) - 7 (GND)
After high to low switch is complete
Below 1 Ω
- Connect lines via a relay as shown in the illustration, and check that the actuator fork moves from the high to low position.
Check the low to high switch.
- Connect lines via a relay as shown in the illustration, and check that the actuator fork moves from the low to high position.
- NOTICE:
- Make sure to perform this inspection with the actuator removed from the vehicle. If this inspection is performed with the actuator installed to the vehicle, the actuator will be damaged.
- When inspecting the actuator, make sure to operate it with the lines connected via a relay. If the lines are not connected via a relay and battery voltage is directly applied to the actuator, the actuator will be damaged.
- Make sure to perform this inspection with the actuator removed from the vehicle. If this inspection is performed with the actuator installed to the vehicle, the actuator will be damaged.
- HINT:
- When performing the operation described above, use the DEFOG relay.
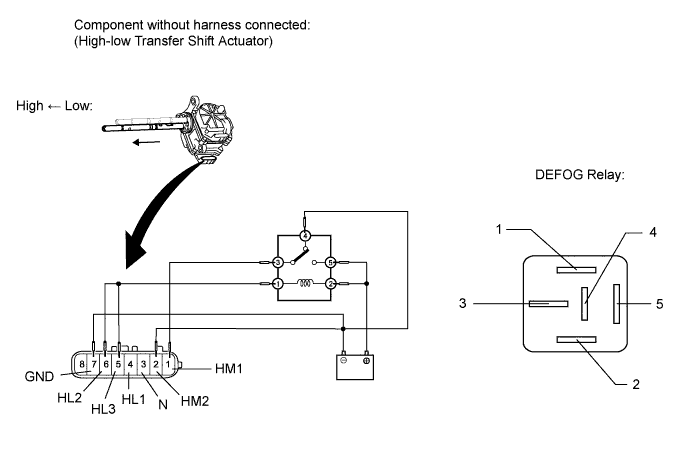
- After the low to high switch is complete, check the neutral position detection switch and limit switch.
- Measure the resistance according to the value(s) in the table below.
- Standard Resistance:
Tester Connection
Condition
Specified Condition
3 (N) - 7 (GND)
After low to high switch is complete
100 kΩ or higher
4 (HL1) - 7 (GND)
After low to high switch is complete
Below 1 Ω
5 (HL3) - 7 (GND)
After low to high switch is complete
100 kΩ or higher
6 (HL2) - 7 (GND)
After low to high switch is complete
100 kΩ or higher
- Connect lines via a relay as shown in the illustration, and check that the actuator fork moves from the low to high position.
| INSPECT TRANSFER SHIFT ACTUATOR ASSEMBLY (CENTER DIFFERENTIAL LOCK ACTUATOR) |
- HINT:
- After inspecting the ECU power supply or center differential lock switch, inspect the center differential lock actuator.
Check the harness and connector (ECU - center differential lock actuator).
Disconnect the C37 actuator connector.
Disconnect the A27 and A28 ECU connectors.
Measure the resistance according to the value(s) in the table below.
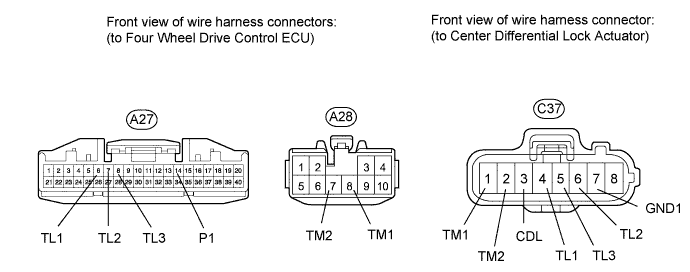
- Standard Resistance:
Tester Connection
Condition
Specified Condition
A27-6 (TL1) - C37-4 (TL1)
Always
Below 1 Ω
A27-6 (TL1) - Body ground
Always
100 kΩ or higher
A27-7 (TL2) - C37-6 (TL2)
Always
Below 1 Ω
A27-7 (TL2) - Body ground
Always
100 kΩ or higher
A27-8 (TL3) - C37-5 (TL3)
Always
Below 1 Ω
A27-8 (TL3) - Body ground
Always
100 kΩ or higher
A27-14 (P1) - C37-3 (CDL)
Always
Below 1 Ω
A27-14 (P1) - Body ground
Always
100 kΩ or higher
A28-7 (TM2) - C37-2 (TM2)
Always
Below 1 Ω
A28-7 (TM2) - Body ground
Always
100 kΩ or higher
A28-8 (TM1) - C37-1 (TM1)
Always
Below 1 Ω
A28-8 (TM1) - Body ground
Always
100 kΩ or higher
C37-7 (GND) - Body ground
Always
Below 1 Ω
Check the center differential lock actuator.
Turn the engine switch on (IG).
Check that there is an operating noise from the transfer shift actuator when the center differential lock switch is pressed to switch from free to lock, or lock to free.
- OK:
- There is an operating noise.
- HINT:
- If the actuator fork cannot move from free to lock, or lock to free even though there is an operating noise, there may be a mechanical malfunction in the transfer.
- If there is no operating noise, there may be a malfunction in the center differential lock actuator. However, it may also be a result of a mechanical malfunction in the transfer, so inspect each part.
- If the actuator fork cannot move from free to lock, or lock to free even though there is an operating noise, there may be a mechanical malfunction in the transfer.
Remove the transfer shift actuator assembly (Click here).
Check the free to lock switch.
- Connect lines via a relay as shown in the illustration, and check that the actuator fork moves from the free to lock position.
- NOTICE:
- Make sure to perform this inspection with the actuator removed from the vehicle. If this inspection is performed with the actuator installed to the vehicle, the actuator will be damaged.
- When inspecting the actuator, make sure to operate it with the lines connected via a relay. If the lines are not connected via a relay and battery voltage is directly applied to the actuator, the actuator will be damaged.
- Make sure to perform this inspection with the actuator removed from the vehicle. If this inspection is performed with the actuator installed to the vehicle, the actuator will be damaged.
- HINT:
- When performing the operation described above, use the DEFOG relay.
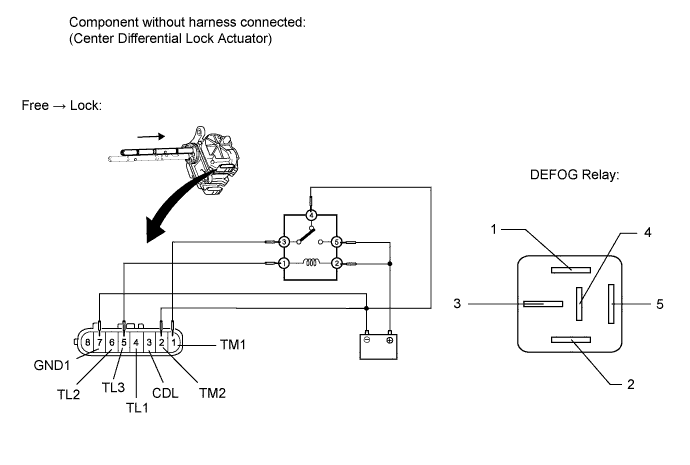
- After the free to lock switch is complete, check the center differential lock detection switch and limit switch.
- Measure the resistance according to the value(s) in the table below.
- Standard Resistance:
Tester Connection
Condition
Specified Condition
3 (CDL) - 7 (GND1)
After free to lock switch is complete
Below 1 Ω
4 (TL1) - 7 (GND1)
After free to lock switch is complete
100 kΩ or higher
5 (TL3) - 7 (GND)
After free to lock switch is complete
100 kΩ or higher
6 (TL2) - 7 (GND1)
After free to lock switch is complete
Below 1 Ω
- Connect lines via a relay as shown in the illustration, and check that the actuator fork moves from the free to lock position.
Check the lock to free switch.
- Connect lines via a relay as shown in the illustration, and check that the actuator fork moves from the lock to free position.
- NOTICE:
- Make sure to perform this inspection with the actuator removed from the vehicle. If this inspection is performed with the actuator installed to the vehicle, the actuator will be damaged.
- When inspecting the actuator, make sure to operate it with the lines connected via a relay. If the lines are not connected via a relay and battery voltage is directly applied to the actuator, the actuator will be damaged.
- Make sure to perform this inspection with the actuator removed from the vehicle. If this inspection is performed with the actuator installed to the vehicle, the actuator will be damaged.
- HINT:
- When performing the operation described above, use the DEFOG relay.
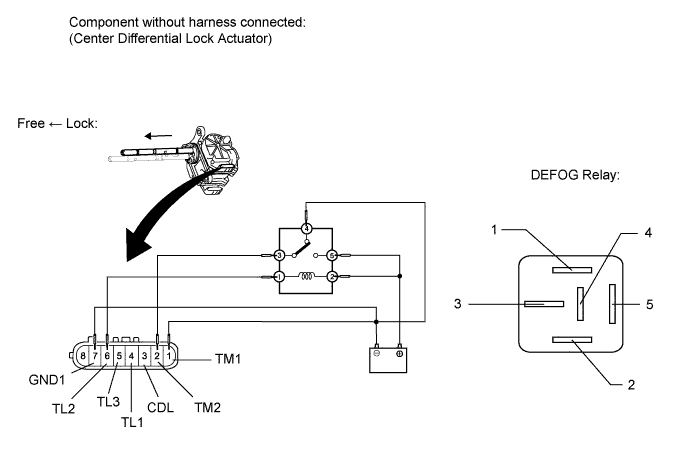
- After the lock to free switch is complete, check the center differential lock detection switch and limit switch.
- Measure the resistance according to the value(s) in the table below.
- Standard Resistance:
Tester Connection
Condition
Specified Condition
3 (CDL) - 7 (GND1)
After lock to free switch is complete
100 kΩ or higher
4 (TL1) - 7 (GND1)
After lock to free switch is complete
100 kΩ or higher
5 (TL3) - 7 (GND1)
After lock to free switch is complete
Below 1 Ω
6 (TL2) - 7 (GND1)
After lock to free switch is complete
100 kΩ or higher
- Connect lines via a relay as shown in the illustration, and check that the actuator fork moves from the lock to free position.
| INSPECT DIFFERENTIAL LOCK SHIFT ACTUATOR (w/ Rear Differential Lock) |
- HINT:
- After inspecting the transfer position switch, transfer shift actuator and differential lock switch, check the differential lock shift actuator.
Check the harness and connector (ECU - differential lock shift actuator).
Disconnect the f1 actuator connector.
Disconnect the A27 and A28 ECU connectors.
Measure the resistance according to the value(s) in the table below.
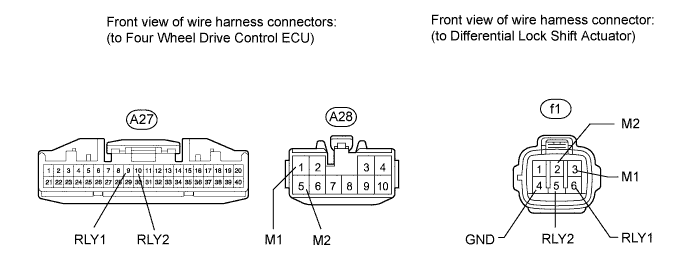
- Standard Resistance:
Tester Connection
Condition
Specified Condition
A27-9 (RLY1) - f1-6 (RLY1)
Always
Below 1 Ω
A27-9 (RLY1) - Body ground
Always
100 kΩ or higher
A27-10 (RLY2) - f1-5 (RLY2)
Always
Below 1 Ω
A27-10 (RLY2) - Body ground
Always
100 kΩ or higher
A28-1 (M1) - f1-3 (M1)
Always
Below 1 Ω
A28-1 (M1) - Body ground
Always
100 kΩ or higher
A28-5 (M2) - f1-2 (M2)
Always
Below 1 Ω
A28-5 (M2) - Body ground
Always
100 kΩ or higher
f1-4 (GND) - Body ground
Always
Below 1 Ω
Check the harness and connector (ECU - differential lock position switch).
Disconnect the f2 differential lock position switch connector.
Disconnect the A27 ECU connector.
Measure the resistance according to the value(s) in the table below.
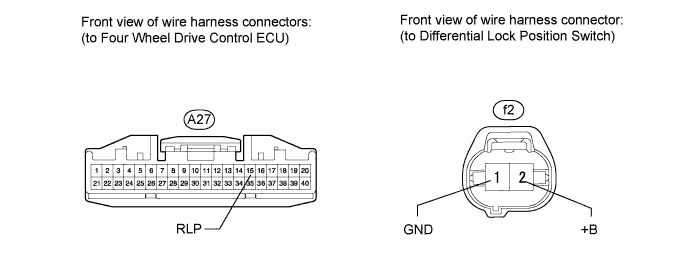
- Standard Resistance:
Tester Connection
Condition
Specified Condition
A27-15 (RLP) - f2-2 (+B)
Always
Below 1 Ω
A27-15 (RLP) - Body ground
Always
100 kΩ or higher
f2-1 (GND) - Body ground
Always
Below 1 Ω
Check the differential lock shift actuator.
Turn the engine switch on (IG).
Check that there is an operating noise from the differential lock shift actuator when the differential lock switch is switch from OFF to RR (free to lock), or RR to OFF (lock to free).
- NOTICE:
- Perform this operation when the transfer is in low and the center differential is locked.
- When locking the rear differential, make sure that the vehicle speed is less than 8 km/h (5 mph).
- Perform this operation when the transfer is in low and the center differential is locked.
- HINT:
- Perform this operation when the transfer is in low and the center differential is locked.
- OK:
- There is an operating noise.
- HINT:
- If the actuator fork cannot move from free to lock or lock to free even though there is an operating noise, there may be a mechanical malfunction in the rear differential.
- If there is no operating noise, there may be a malfunction in the differential lock shift actuator. However, it may also be a result of a mechanical malfunction in the rear differential, so inspect each part.
- If the actuator fork cannot move from free to lock or lock to free even though there is an operating noise, there may be a mechanical malfunction in the rear differential.
Remove the differential lock shift actuator assembly (Click here).
Check the free to lock switch.
- Connect lines via a relay as shown in the illustration, and check that the actuator fork moves from the free to lock position.
- NOTICE:
- Make sure to perform this inspection with the actuator removed from the vehicle. If this inspection is performed with the actuator installed to the vehicle, the actuator will be damaged.
- When inspecting the actuator, make sure to operate it with the lines connected via a relay. If the lines are not connected via a relay and battery voltage is directly applied to the actuator, the actuator will be damaged.
- Make sure to perform this inspection with the actuator removed from the vehicle. If this inspection is performed with the actuator installed to the vehicle, the actuator will be damaged.
- HINT:
- When performing the operation described above, use the DEFOG relay.
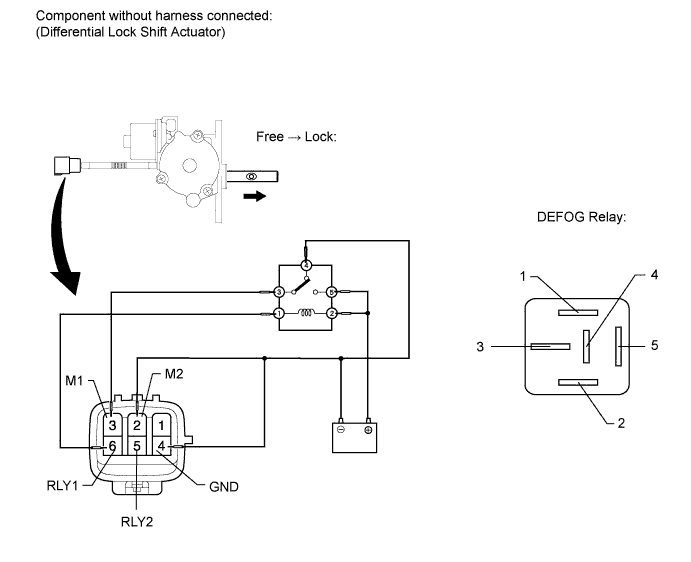
- After the free to lock switch is complete, check the limit switch.
- Measure the resistance according to the value(s) in the table below.
- Standard Resistance:
Tester Connection
Condition
Specified Condition
5 (RLY2) - 4 (GND)
After free to lock switch is complete
Below 12.5 Ω
6 (RLY1) - 4 (GND)
After free to lock switch is complete
500 kΩ or higher
- Connect lines via a relay as shown in the illustration, and check that the actuator fork moves from the free to lock position.
Check the lock to free switch.
- Connect lines via a relay as shown in the illustration, and check that the actuator fork moves from the lock to free position.
- NOTICE:
- Make sure to perform this inspection with the actuator removed from the vehicle. If this inspection is performed with the actuator installed to the vehicle, the actuator will be damaged.
- When inspecting the actuator, make sure to operate it with the lines connected via a relay. If the lines are not connected via a relay and battery voltage is directly applied to the actuator, the actuator will be damaged.
- Make sure to perform this inspection with the actuator removed from the vehicle. If this inspection is performed with the actuator installed to the vehicle, the actuator will be damaged.
- HINT:
- When performing the operation described above, use the DEFOG relay.
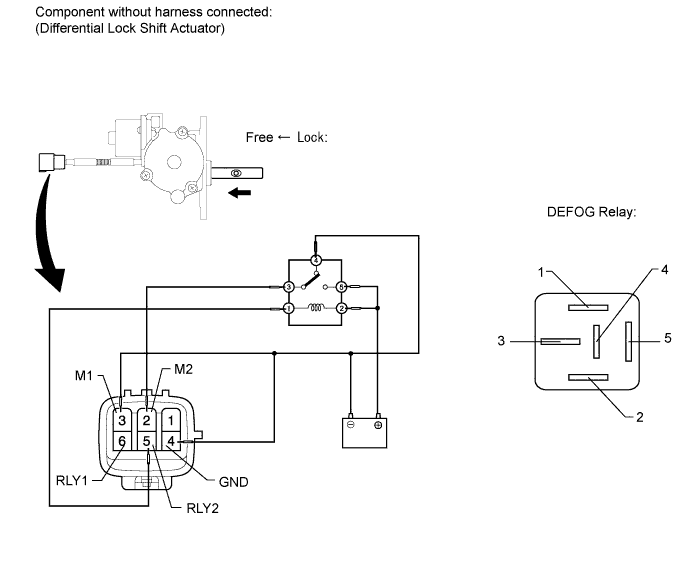
- After the lock to free switch is complete, check the limit switch.
- Measure the resistance according to the value(s) in the table below.
- Standard Resistance:
Tester Connection
Condition
Specified Condition
5 (RLY2) - 4 (GND)
After lock to free switch is complete
500 kΩ or higher
6 (RLY1) - 4 (GND)
After lock to free switch is complete
Below 12.5 Ω
- Connect lines via a relay as shown in the illustration, and check that the actuator fork moves from the lock to free position.
Inspect the rear differential lock position switch.
Remove the rear differential lock position switch (Click here).
Measure the resistance according to the value(s) in the table below.
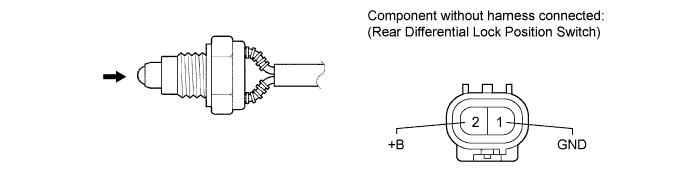
- Standard Resistance:
Tester Connection
Switch Condition
Specified Condition
2 (+B) - 1 (GND)
Pushed
Below 1 Ω
Not pushed
100 kΩ or higher
| INSPECT 4 WHEEL DRIVE CONTROL ECU |
Check the four wheel drive control ECU.
Measure the resistance and voltage according to the value(s) in the table below.
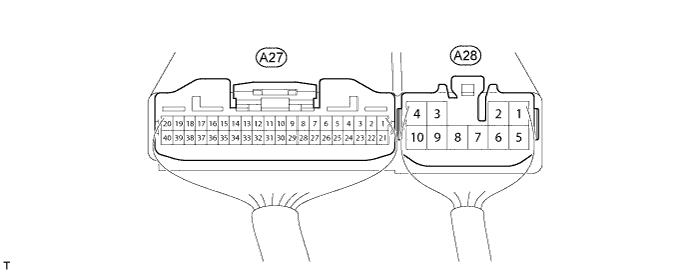
If there is a malfunction, inspect the harnesses, connectors, transfer position switch, center differential lock switch, and transfer shift actuator assembly. If these are normal, replace the four wheel drive control ECU (Click here).Tester Connection
Terminal Description
Condition
Specified Condition
A27-1 (HL1) - A28-4 (GND)
High-low transfer shift actuator limit switch
Engine switch on (IG)
Transfer in high position
Below 1.5 V
Engine switch on (IG)
Transfer in low position
11 to 14 V
Engine switch on (IG)
Transfer in neutral position
11 to 14 V
A27-2 (HL2) - A28-4 (GND)
High-low transfer shift actuator limit switch
Engine switch on (IG)
Transfer in high position
11 to 14 V
Engine switch on (IG)
Transfer in low position
Below 1.5 V
Engine switch on (IG)
Transfer in neutral position
11 to 14 V
A27-3 (HL3) - A28-4 (GND)
High-low transfer shift actuator limit switch
Engine switch on (IG)
Transfer in high position
11 to 14 V
Engine switch on (IG)
Transfer in low position
11 to 14 V
Engine switch on (IG)
Transfer in neutral position
Below 1.5 V
A27-5 (TT) - A27-25 (TGND)*1
Temperature sensor
Engine switch on (IG)
0 to 5 V
A27-6 (TL1) - A28-4 (GND)
Center differential lock actuator limit switch
Engine switch on (IG)
Center differential in free position
11 to 14 V
Engine switch on (IG)
Center differential in lock position
11 to 14 V
Engine switch on (IG)
Transfer in neutral position
Below 1.5 V
A27-7 (TL2) - A28-4 (GND)
Center differential lock actuator limit switch
Engine switch on (IG)
Center differential in free position
11 to 14 V
Engine switch on (IG)
Center differential in lock position
Below 1.5 V
Engine switch on (IG)
Transfer in neutral position
11 to 14 V
A27-8 (TL3) - A28-4 (GND)
Center differential lock actuator limit switch
Engine switch on (IG)
Center differential in free position
Below 1.5 V
Engine switch on (IG)
Center differential in lock position
11 to 14 V
Engine switch on (IG)
Transfer in neutral position
11 to 14 V
A27-9 (RLY1) - A28-4 (GND)*2
Differential lock shift actuator limit switch
Engine switch on (IG)
Rear differential in free position
Below 0.5 V
Engine switch on (IG)
Rear differential in lock position
11 to 14 V
A27-10 (RLY2) - A28-4 (GND)*2
Differential lock shift actuator limit switch
Engine switch on (IG)
Rear differential in free position
11 to 14 V
Engine switch on (IG)
Rear differential in lock position
Below 0.5 V
A27-11 (R) - A28-4 (GND)*2
Differential lock switch
Engine switch on (IG)
Differential lock switch in OFF position
11 to 14 V
Engine switch on (IG)
Differential lock switch in RR position
Below 1.5 V
A27-12 (DL) - A28-4 (GND)
Transfer position switch
Engine switch on (IG)
Transfer in high position
11 to 14 V
Engine switch on (IG)
Transfer in low position
Below 1.5 V
A27-13 (LO) - A28-4 (GND)
Center differential lock switch
Engine switch on (IG)
Center differential lock switch pressed and held
Below 1.5 V
Engine switch on (IG)
Center differential lock switch not pressed
11 to 14 V
A27-14 (P1) - A28-4 (GND)
Center differential lock detection switch
Engine switch on (IG)
Center differential in free position
11 to 14 V
Engine switch on (IG)
Center differential in lock position
Below 1.5 V
A27-15 (RLP) - A28-4 (GND)*2
Rear differential lock position switch
Engine switch on (IG)
Rear differential in free position
11 to 14 V
Engine switch on (IG)
Rear differential in lock position
Below 1.5 V
A27-16 (NP) - A28-4 (GND)
Transfer shift actuator neutral position detection switch
Engine switch on (IG)
Transfer in neutral position
Below 1.5 V
Engine switch on (IG)
Transfer in high or low position
11 to 14 V
A27-17 (MTN) - A28-4 (GND)*3
Clutch start switch
Engine switch on (IG)
Clutch pedal released
11 to 14 V
Engine switch on (IG)
Clutch pedal depressed
Below 2 V
A27-19 (CAN+) - A27-20 (CAN-)
CAN communication line
Engine switch off
54 to 69 Ω
A27-21 (L4) - A28-4 (GND)
Transfer shift actuator Low detection switch
Transfer position switch in H4 position
11 to 14 V
Engine switch on (IG)
Transfer position switch in L4 position
Below 1.5 V
A28-1 (M1) - A28-4 (GND)*2
Differential lock shift actuator motor
Engine switch on (IG)
Transfer in low position
Center differential in lock position
Differential lock switch OFF → RR
(During operation of differential lock shift actuator motor from free to lock)
11 to 14 V
Engine switch on (IG)
Transfer in low position
Center differential in lock position
Differential lock switch RR → OFF or transfer position switch L4 → H4
(During operation of differential lock shift actuator motor from lock to free)
Below 1.5 V
A28-2 (HM1) - A28-4 (GND)
High-low transfer shift actuator motor
Engine switch on (IG)
Transfer position switch H4 → L4
(During operation of high-low transfer shift actuator motor from high to low)
Below 1.5 V or alternating between below 1.5 V and 11 to 14 V
Engine switch on (IG)
Transfer position switch L4 → H4
(During operation of high-low transfer shift actuator motor from low to high)
11 to 14 V
A28-3 (IG) - A28-4 (GND)
IG power
Engine switch on (IG)
11 to 14 V
A28-4 (GND) - Body ground
Ground
Always
Below 1 Ω
A28-5 (M2) - A28-4 (GND)*2
Differential lock shift actuator motor
Engine switch on (IG)
Transfer in low position
Center differential in lock position
Differential lock switch OFF → RR
(During operation of differential lock shift actuator motor from free to lock)
Below 1.5 V
Engine switch on (IG)
Transfer in low position
Center differential in lock position
Differential lock switch RR → OFF or transfer position switch L4 → H4
(During operation of differential lock shift actuator motor from lock to free)
11 to 14 V
A28-6 (HM2) - A28-4 (GND)
High-low transfer shift actuator motor
Engine switch on (IG)
Transfer position switch H4 → L4
(During operation of high-low transfer shift actuator motor from high to low)
11 to 14 V
Engine switch on (IG)
Transfer position switch L4 → H4
(During operation of high-low transfer shift actuator motor from low to high)
Below 1.5 V or alternating between below 1.5 V and 11 to 14 V
A28-7 (TM2) - A28-4 (GND)
Center differential lock actuator motor
Engine switch on (IG)
Center differential position free → lock
Below 1.5 V or alternating between below 1.5 V and 11 to 14 V
Engine switch on (IG)
Center differential position lock → free
11 to 14 V
A28-8 (TM1) - A28-4 (GND)
Center differential lock actuator motor
Engine switch on (IG)
Center differential position free → lock
11 to 14 V
Engine switch on (IG)
Center differential position lock → free
Below 1.5 V or alternating between below 1.5 V and 11 to 14 V
- HINT:
- *1: w/ Temperature Sensor
- *2: w/ Rear Differential Lock
- *3: for Manual Transmission
- *1: w/ Temperature Sensor