INSTALLATION
Removal / installation · Vehicles built Sep 2011 – Dec 2011
| 1. INSTALL NO. 1 FUEL TANK HEAT INSULATOR |

Install the heat insulator with the 4 clips.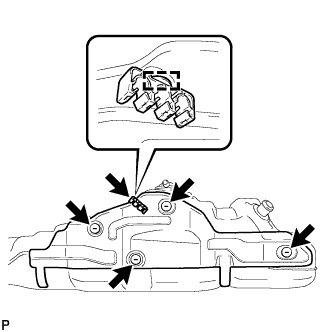

Install the fuel tube clamp to the heat insulator.
| 2. INSTALL FUEL TANK TO FILLER PIPE HOSE |
Install the hose to the fuel tank as shown in the illustration.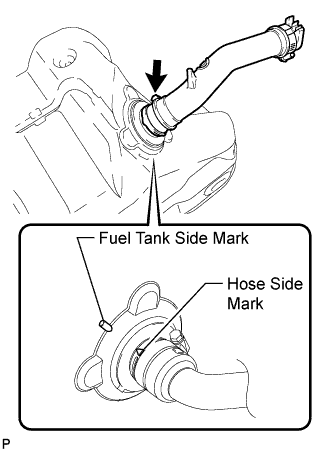
- HINT:
- Align the fuel tank side mark with the hose side mark when installing the hose.
-
Tighten the hose clamp until the end of the hose clamp contacts the stopper as shown in the illustration.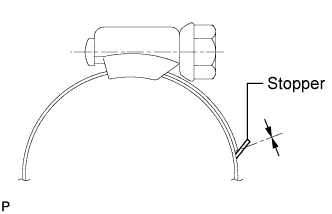
- Align the fuel tank side mark with the hose side mark when installing the hose.
| 3. INSTALL FUEL SUCTION WITH PUMP AND GAUGE TUBE ASSEMBLY |
Apply a light coat of gasoline or grease to a new gasket, and install it to the fuel tank.
Install the fuel suction with pump and gauge tube into the fuel tank.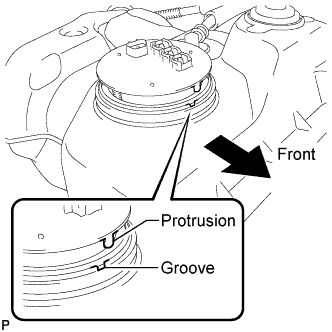
- NOTICE:
- Be careful not to bend the arm of the fuel sender gauge.
- HINT:
- Align the protrusion of the fuel suction with pump and gauge tube with the groove of the fuel tank.
Put the retainer on the fuel tank. While holding the fuel suction with pump and gauge tube, tighten the retainer one complete turn by hand.
Set SST on the retainer.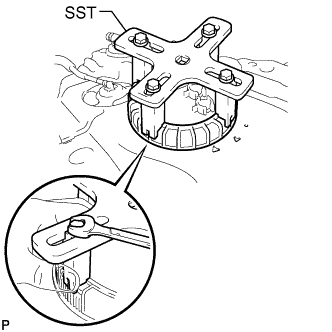
- SST
- 09808-14030
- HINT:
- Hold the fuel suction tube assembly upright by hand to ensure that the fuel suction tube gasket is not moved out of position.
- Securely attach the claws of SST to the protrusions of the retainer and fix SST in place.
- Install SST while pressing the claws of SST against the retainer (toward the center of SST).
- Hold the fuel suction tube assembly upright by hand to ensure that the fuel suction tube gasket is not moved out of position.
Using SST, tighten the retainer until the mark on the retainer is within range A on the fuel tank as shown in the illustration.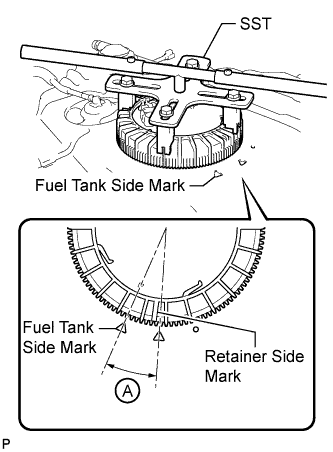
- SST
- 09808-14030
- HINT:
- Fit the tips of SST onto the ribs of the retainer.
| 4. INSTALL FUEL TANK MAIN TUBE SUB-ASSEMBLY AND FUEL TANK RETURN TUBE SUB-ASSEMBLY (for Single Tank Type) |
Install the 2 fuel tank tubes and No. 1 fuel tube joint with the 3 tube joint clips.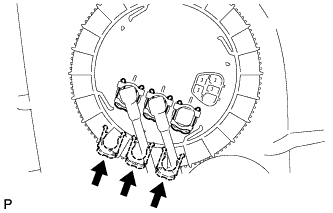
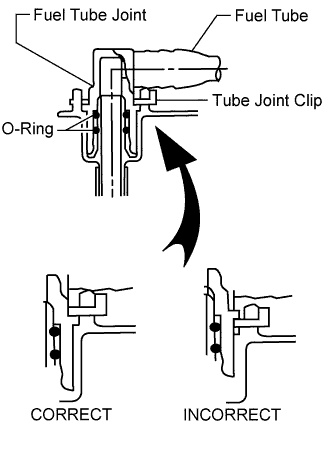
- NOTICE:
- Check that there are no scratches or foreign objects on the connecting parts.
- Check that the fuel tube joints are inserted securely.
- Check that the tube joint clips are on the collars of the fuel tube joints.
- After installing the tube joint clips, check that the fuel tube joints cannot be pulled off.
- Check that there are no scratches or foreign objects on the connecting parts.
Install the 2 fuel tank tubes to the fuel tank.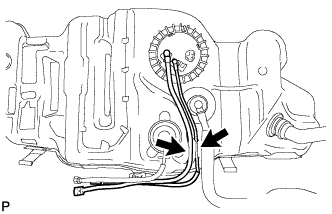
| 5. INSTALL FUEL TANK MAIN TUBE, FUEL TANK RETURN TUBE AND NO. 2 FUEL TANK MAIN TUBE SUB-ASSEMBLY (for Double Tank Type) |
Install the 3 fuel tank tubes with the 3 tube joint clips.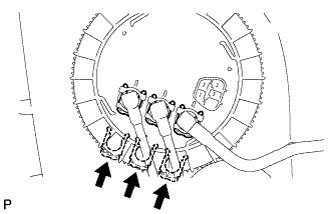
- NOTICE:
- Check that there are no scratches or foreign objects on the connecting parts.
- Check that the fuel tube joints are inserted securely.
- Check that the tube joint clips are on the collars of the fuel tube joints.
- After installing the tube joint clips, check that the fuel tube joints cannot be pulled off.
- Check that there are no scratches or foreign objects on the connecting parts.
Install the 3 fuel tank tubes to the fuel tank.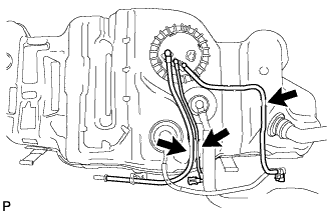
| 6. INSTALL FUEL TANK SUB-ASSEMBLY |
Set the fuel tank on a transmission jack and raise the fuel tank.
- NOTICE:
- Do not allow the fuel tank to contact the vehicle, especially the differential.
Raise the transmission jack.
Install the 2 fuel tank bands with the 2 pins and 2 clips.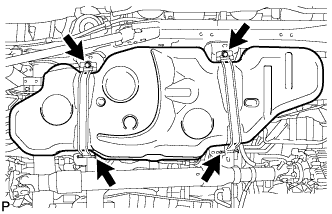
Connect the 2 fuel tank bands with the 2 bolts.
- Torque:
- 40 N*m{ 408 kgf*cm , 30 ft.*lbf }
| 7. CONNECT FUEL TANK TO FILLER PIPE HOSE (for Single Tank Type) |
Connect the hose to the filler pipe as shown in the illustration.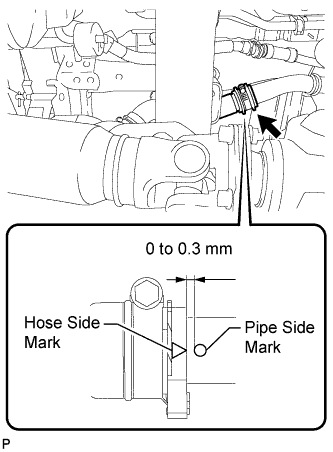
- HINT:
- Install the hose so that the distance between the fuel tank inlet pipe side mark and fuel tank to filler pipe hose side mark is 0 to 0.3 mm (0 to 0.0118 in.) as shown in the illustration.
-
Tighten the hose clamp until the end of the hose clamp contacts the stopper as shown in the illustration.
- Install the hose so that the distance between the fuel tank inlet pipe side mark and fuel tank to filler pipe hose side mark is 0 to 0.3 mm (0 to 0.0118 in.) as shown in the illustration.
| 8. CONNECT FUEL TANK TO FILLER PIPE HOSE (for Double Tank Type) |
Connect the hose to the filler pipe as shown in the illustration.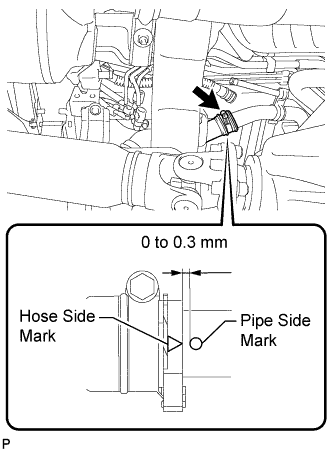
- HINT:
- Install the hose so that the distance between the fuel tank inlet pipe side mark and fuel tank to filler pipe hose side mark is 0 to 0.3 mm (0 to 0.0118 in.) as shown in the illustration.
-
Tighten the hose clamp until the end of the hose clamp contacts the stopper as shown in the illustration.
- Install the hose so that the distance between the fuel tank inlet pipe side mark and fuel tank to filler pipe hose side mark is 0 to 0.3 mm (0 to 0.0118 in.) as shown in the illustration.
| 9. CONNECT FUEL TANK BREATHER TUBE (for Single Tank Type) |
Connect the fuel tank breather tube to the filler pipe and push the retainer.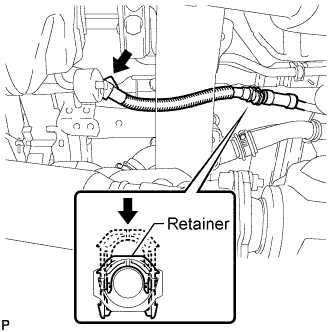
- HINT:
- Push the parts together firmly until a "click" sound is heard.
- NOTICE:
- Before installing the tube connectors to the pipes, check if there is any damage or foreign matter in the connectors.
- After the connection, check if the connectors and pipes are securely connected by trying to pull them apart.
- Before installing the tube connectors to the pipes, check if there is any damage or foreign matter in the connectors.
Attach the fuel tube clamp.
| 10. CONNECT FUEL TANK BREATHER TUBE (for Double Tank Type) |
Connect the fuel tank breather tube to the filler pipe and push the retainer.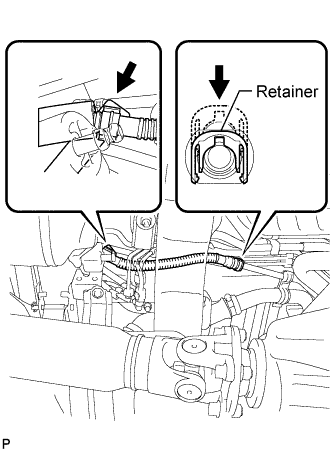
- HINT:
- Push the parts together firmly until a "click" sound is heard.
- NOTICE:
- Before installing the tube connectors to the pipes, check if there is any damage or foreign matter in the connectors.
- After the connection, check if the connectors and pipes are securely connected by trying to pull them apart.
- Before installing the tube connectors to the pipes, check if there is any damage or foreign matter in the connectors.
Attach the fuel tube clamp.
| 11. CONNECT NO. 2 FUEL MAIN TUBE SUB-ASSEMBLY (for Double Tank Type) |
Connect the fuel main tube and push the retainer.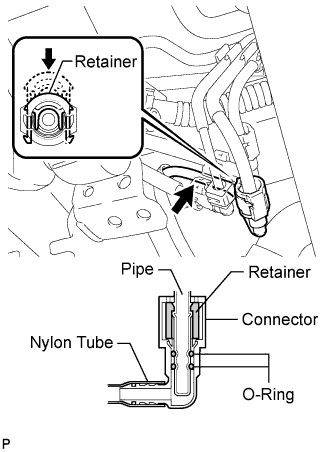
- HINT:
- Push the parts together firmly until a "click" sound is heard.
- NOTICE:
- Before installing the tube connectors to the pipes, check if there is any damage or foreign matter in the connectors.
- After the connection, check if the connectors and pipes are securely connected by trying to pull them apart.
- Before installing the tube connectors to the pipes, check if there is any damage or foreign matter in the connectors.
Attach the fuel tube clamp.
| 12. CONNECT NO. 2 FUEL TANK BREATHER TUBE (for Double Tank Type) |
Connect the fuel tank breather tube and push the retainer.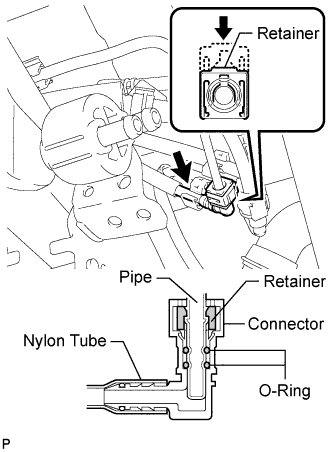
- HINT:
- Push the parts together firmly until a "click" sound is heard.
- NOTICE:
- Before installing the tube connectors to the pipes, check if there is any damage or foreign matter in the connectors.
- After the connection, check if the connectors and pipes are securely connected by trying to pull them apart.
- Before installing the tube connectors to the pipes, check if there is any damage or foreign matter in the connectors.
Attach the fuel tube clamp.
| 13. CONNECT FUEL TANK RETURN TUBE (for Single Tank Type) |
Connect the fuel tank return tube and push the retainer.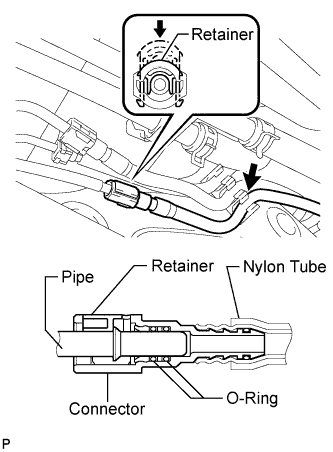
- HINT:
- Push the parts together firmly until a "click" sound is heard.
- NOTICE:
- Before installing the tube connectors to the pipes, check if there is any damage or foreign matter in the connectors.
- After the connection, check if the connectors and pipes are securely connected by trying to pull them apart.
- Before installing the tube connectors to the pipes, check if there is any damage or foreign matter in the connectors.
Attach the fuel tube clamp.
| 14. CONNECT FUEL TANK RETURN TUBE (for Double Tank Type) |
Connect the fuel tank return tube and push the retainer.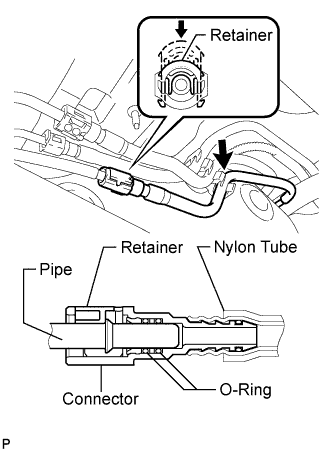
- HINT:
- Push the parts together firmly until a "click" sound is heard.
- NOTICE:
- Before installing the tube connectors to the pipes, check if there is any damage or foreign matter in the connectors.
- After the connection, check if the connectors and pipes are securely connected by trying to pull them apart.
- Before installing the tube connectors to the pipes, check if there is any damage or foreign matter in the connectors.
Attach the fuel tube clamp.
| 15. CONNECT NO. 2 FUEL TANK BREATHER TUBE (for Single Tank Type) |
Connect the fuel tank breather tube and push the retainer.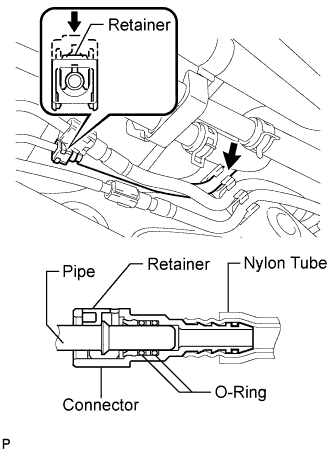
- HINT:
- Push the parts together firmly until a "click" sound is heard.
- NOTICE:
- Before installing the tube connectors to the pipes, check if there is any damage or foreign matter in the connectors.
- After the connection, check if the connectors and pipes are securely connected by trying to pull them apart.
- Before installing the tube connectors to the pipes, check if there is any damage or foreign matter in the connectors.
Attach the fuel tube clamp.
| 16. CONNECT FUEL TANK MAIN TUBE SUB-ASSEMBLY (for Single Tank Type) |
Connect the fuel tank main tube and push the retainer.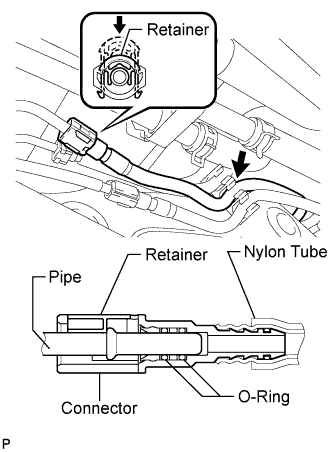
- HINT:
- Push the parts together firmly until a "click" sound is heard.
- NOTICE:
- Before installing the tube connectors to the pipes, check if there is any damage or foreign matter in the connectors.
- After the connection, check if the connectors and pipes are securely connected by trying to pull them apart.
- Before installing the tube connectors to the pipes, check if there is any damage or foreign matter in the connectors.
Attach the fuel tube clamp.
| 17. CONNECT FUEL TANK MAIN TUBE SUB-ASSEMBLY (for Double Tank Type) |
Connect the fuel tank main tube and push the retainer.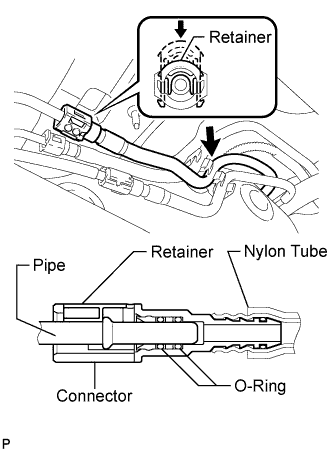
- HINT:
- Push the parts together firmly until a "click" sound is heard.
- NOTICE:
- Before installing the tube connectors to the pipes, check if there is any damage or foreign matter in the connectors.
- After the connection, check if the connectors and pipes are securely connected by trying to pull them apart.
- Before installing the tube connectors to the pipes, check if there is any damage or foreign matter in the connectors.
Attach the fuel tube clamp.
| 18. INSTALL NO. 1 FUEL TANK PROTECTOR SUB-ASSEMBLY |
Install the tank protector with the 5 bolts.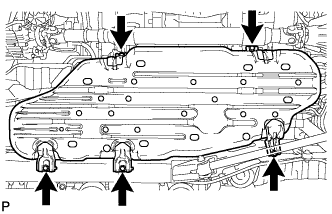
- Torque:
- 20 N*m{ 204 kgf*cm , 15 ft.*lbf }
| 19. INSTALL FUEL TANK CAP ASSEMBLY |
| 20. INSTALL REAR FLOOR NO. 2 SERVICE HOLE COVER |
Connect the fuel pump and fuel sender gauge connector.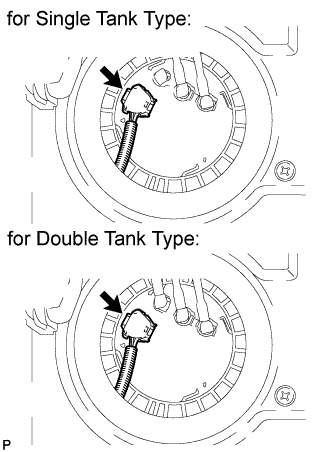
Install the service hole cover with new butyl tape.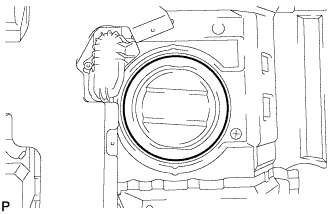
w/ Rear Air Conditioning System: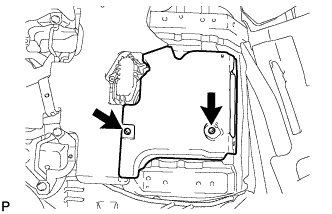
Install the air duct and 2 screws.
| 21. INSTALL FRONT FLOOR CARPET ASSEMBLY |
| 22. INSTALL REAR AIR DUCT GUIDE (w/ Rear Air Conditioning System) |
Attach the claw to install the guide.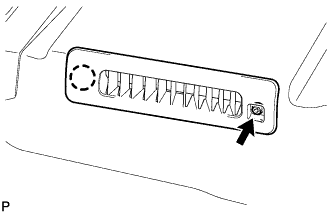
Install the screw.
- HINT:
- Use the same procedures for both sides.
| 23. INSTALL AIR DUCT PLUG (w/ Rear Air Conditioning System) |
Attach the 2 claws to install the plug.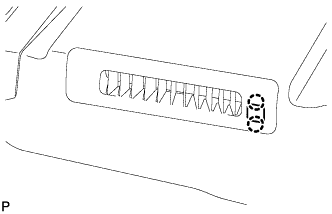
- HINT:
- Use the same procedures for both sides.
| 24. INSTALL FRONT QUARTER TRIM PANEL ASSEMBLY LH |
w/ Sliding Roof:
Install the front quarter trim panel assembly LH (Click here).
w/o Sliding Roof:
Install the front quarter trim panel assembly LH (Click here).
| 25. INSTALL FRONT QUARTER TRIM PANEL ASSEMBLY RH |
w/ Sliding Roof:
Install the front quarter trim panel assembly RH (Click here).
w/o Sliding Roof:
Install the front quarter trim panel assembly RH (Click here).
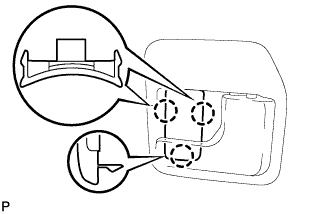
| 26. INSTALL REAR SEAT COVER CAP (w/ Rear No. 2 Seat, except Face to Face Seat Type) |
 |
- HINT:
- Use the same procedure to install the rear seat cover cap on the other side.
Attach the 3 claws to install the rear seat cover cap.
| 27. INSTALL REAR FLOOR MAT REAR SUPPORT PLATE |
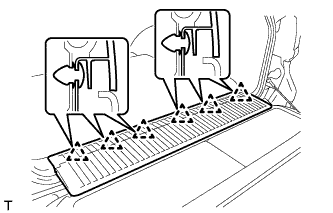 |
Attach the 6 clips to install the support plate.
| 28. INSTALL REAR DOOR SCUFF PLATE LH |
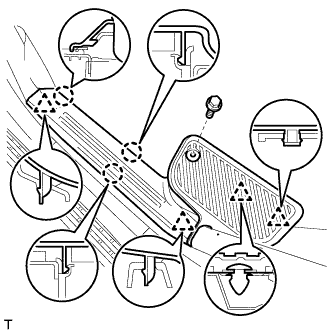 |
Attach the 3 claws and 4 clips to install the scuff plate.
Install the screw.
| 29. INSTALL REAR DOOR SCUFF PLATE RH |
- HINT:
- Use the same procedures described for the LH side.
| 30. INSTALL REAR STEP COVER |
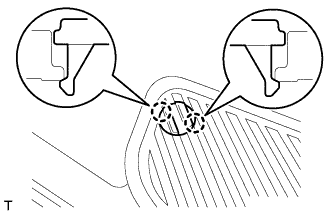 |
- HINT:
- Use the same procedure to install the step cover on the other side.
Attach the 2 claws to install the step cover.
| 31. INSTALL REAR NO. 2 SEAT PROTECTOR |
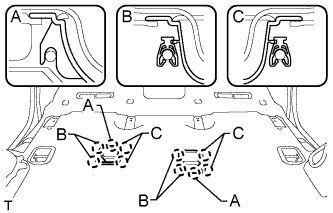 |
Attach the 10 claws to install the 2 seat protectors.
| 32. INSTALL REAR NO. 1 SEAT PROTECTOR |
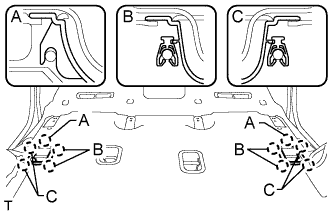 |
Attach the 10 claws to install the 2 seat protectors.
| 33. INSTALL REAR NO. 2 SEAT ASSEMBLY |
for Face to Face Seat Type:
Install the rear No. 2 seat assembly (Click here).
except Face to Face Seat Type:
Install the rear No. 2 seat assembly (Click here).
| 34. INSTALL REAR NO. 1 SEAT ASSEMBLY RH (for 60/40 Split Seat Type 40 Side) |
Install the rear No. 1 seat assembly RH (Click here).
| 35. INSTALL REAR NO. 1 SEAT ASSEMBLY LH (for 60/40 Split Seat Type 60 Side) |
Install the rear No. 1 seat assembly LH (Click here).
| 36. CONNECT CABLE TO NEGATIVE BATTERY TERMINAL |
- NOTICE:
- When disconnecting the cable, some systems need to be initialized after the cable is reconnected (Click here).
| 37. CHECK SRS WARNING LIGHT |
Check the SRS warning light (Click here).
| 38. ADD FUEL |
| 39. INSPECT FOR FUEL LEAK |
Connect the intelligent tester to the DLC3.
Turn the engine switch on (IG) and intelligent tester ON.
- NOTICE:
- Do not start the engine.
Enter the following menus: Powertrain / Engine and ECT / Active Test / Activate the Fuel Pump Speed Control.
Check that there are no fuel leaks after doing maintenance anywhere on the fuel system.
Check that the pulsation damper screw rises up when the fuel pump operates.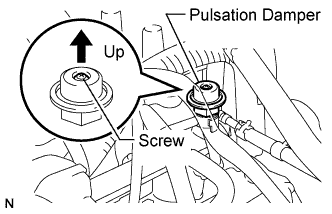
If the operation is not as specified, check the following parts:- Fusible link
- Fuses
- Circuit opening relay (C/OPN)
- Fuel pump
- ECM
- Wiring connections
- Fusible link
Turn the engine switch off.
Disconnect the intelligent tester from the DLC3.