REMOVAL
Removal / installation · Vehicles built from Jan 2012
Versions by build date: Sep 2011 – Dec 2011 from Jan 2012
| 1. PRECAUTION |

- NOTICE:
- After turning the ignition switch off, waiting time may be required before disconnecting the cable from the battery terminal. Therefore, make sure to read the disconnecting the cable from the battery terminal notice before proceeding with work (Click here).
| 2. DISCONNECT CABLE FROM NEGATIVE BATTERY TERMINAL (w/ Passenger Side Knee Airbag) |
- CAUTION:
- Wait at least 90 seconds after disconnecting the cable from the negative (-) battery terminal to disable the SRS system.
- NOTICE:
- When disconnecting the cable, some systems need to be initialized after the cable is reconnected (Click here).
| 3. REMOVE FRONT DOOR SCUFF PLATE RH |
w/ Sliding Roof:
Remove the front door scuff plate (Click here).
w/o Sliding Roof:
Remove the front door scuff plate (Click here).
| 4. REMOVE NO. 1 INSTRUMENT PANEL FINISH PANEL CUSHION |
w/o Console Box Lid:
Remove the No. 1 instrument panel finish panel cushion (Click here).
w/ Cool Box:
Remove the No. 1 instrument panel finish panel cushion (Click here).
w/o Cool Box:
Remove the No. 1 instrument panel finish panel cushion (Click here).
| 5. REMOVE LOWER INSTRUMENT PANEL PAD SUB-ASSEMBLY RH |
w/o Console Box Lid:
Remove the lower instrument panel pad sub-assembly RH (Click here).
w/ Cool Box:
Remove the lower instrument panel pad sub-assembly RH (Click here).
w/o Cool Box:
Remove the lower instrument panel pad sub-assembly RH (Click here).
| 6. REMOVE NO. 2 INSTRUMENT PANEL UNDER COVER SUB-ASSEMBLY (w/ Floor Under Cover) |
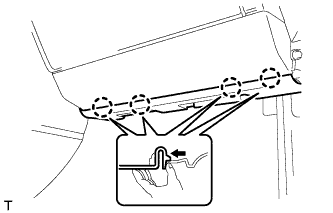  |
Detach the 4 claws and remove the No. 2 instrument panel under cover.
| 7. REMOVE FRONT PASSENGER SIDE KNEE AIRBAG ASSEMBLY (w/ Passenger Side Knee Airbag) |
Remove the 4 bolts.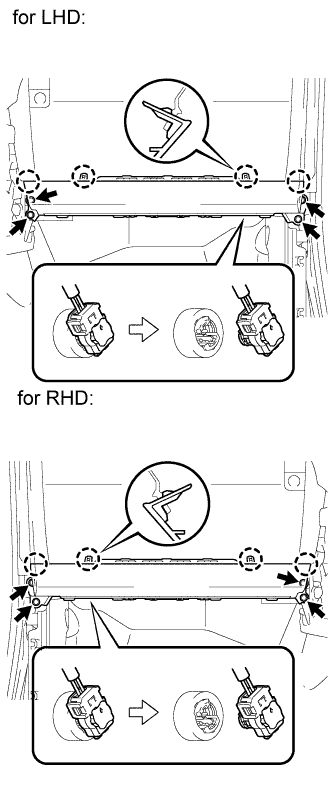
Detach the 4 claws and remove the front passenger side knee airbag.
Disconnect the connector.
- NOTICE:
- When handling the airbag connector, take care not to damage the airbag wire harness.
| 8. REMOVE LOWER INSTRUMENT PANEL (w/o Passenger Side Knee Airbag) |
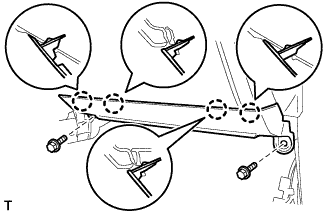 |
Remove the 2 bolts.
Detach the 4 claws and remove the lower instrument panel.
| 9. REMOVE NO. 3 INSTRUMENT CLUSTER FINISH PANEL GARNISH |
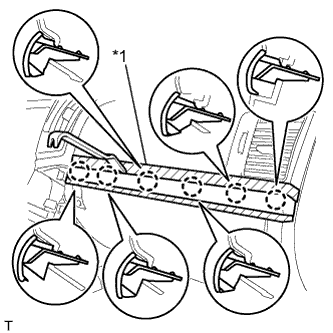 |
Place protective tape as shown in the illustration.
Text in Illustration *1
Protective Tape
Using a moulding remover, detach the 6 claws and remove the No. 3 instrument cluster finish panel garnish.
| 10. REMOVE INSTRUMENT PANEL BOX DOOR KNOB |
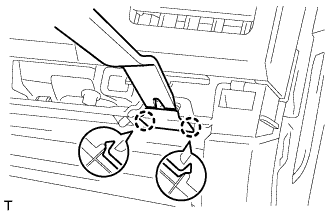 |
Using a moulding remover, detach the 2 claws and remove the instrument panel box door knob.
| 11. REMOVE LOWER NO. 2 INSTRUMENT PANEL FINISH PANEL |
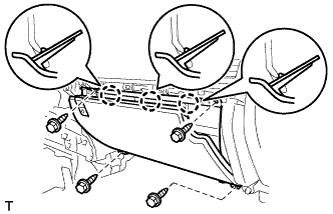 |
Remove the 4 bolts.
Detach the 3 claws.
Disconnect the connector and remove the lower No. 2 instrument panel finish panel.
| 12. REMOVE NETWORK GATEWAY ECU |
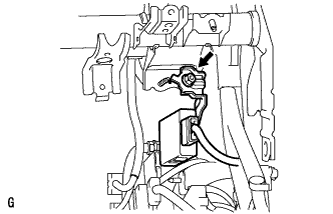 |
Disconnect the connector.
Remove the nut and ECU.