REMOVAL
Removal / installation · Vehicles built Sep 2011 – Dec 2011
| 1. DISCHARGE FUEL SYSTEM PRESSURE |

Discharge the fuel system pressure (Click here).
| 2. DISCONNECT CABLE FROM NEGATIVE BATTERY TERMINAL |
- CAUTION:
- Wait at least 90 seconds after disconnecting the cable from the negative (-) battery terminal to disable the SRS system.
- NOTICE:
- When disconnecting the cable, some systems need to be initialized after the cable is reconnected (Click here).
| 3. REMOVE FRONT TIRE |
| 4. REMOVE FRONT FENDER SPLASH SHIELD SUB-ASSEMBLY LH |
  |
Remove the 3 bolts and screw.
Turn the clip indicated by the arrow in the illustration to remove the fender splash shield.
| 5. REMOVE FRONT FENDER SPLASH SHIELD SUB-ASSEMBLY RH |
- HINT:
- Use the same procedures described for the LH side.
| 6. REMOVE NO. 1 ENGINE UNDER COVER SUB-ASSEMBLY |
Remove the 10 bolts and No. 1 engine under cover.
| 7. REMOVE NO. 2 ENGINE UNDER COVER |
Remove the 2 bolts and No. 2 engine under cover.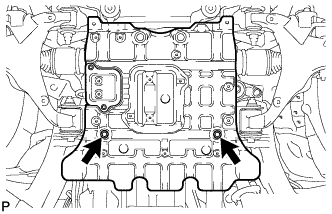
| 8. REMOVE FAN & GENERATOR V BELT |
Loosen the belt tension by turning the belt tensioner counterclockwise, and then remove the fan and generator V belt.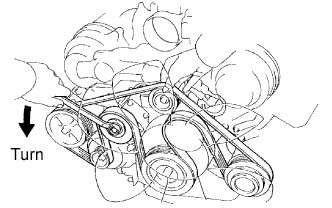
- HINT:
- The pulley bolt for the belt tensioner has left-hand thread.
| 9. DRAIN ENGINE OIL |
Remove the oil drain plug and gasket, and drain the engine oil into a container.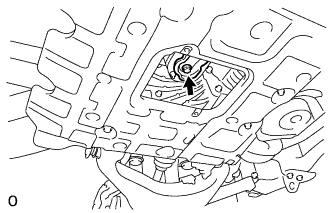
| 10. DRAIN ENGINE COOLANT |
- CAUTION:
- Do not remove the radiator cap while the engine and radiator are still hot. Pressurized, hot engine coolant and steam may be released and cause serious burns.
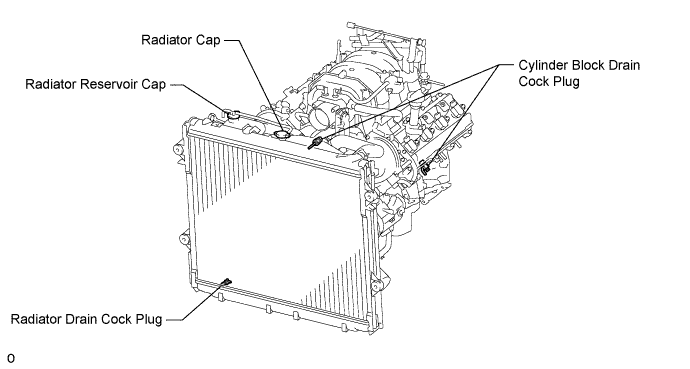
Loosen the radiator drain cock plug.
Remove the radiator cap. Then drain the coolant.
- HINT:
- Collect the coolant in a container and dispose of it according to the regulations in your area.
Loosen the 2 cylinder block drain cock plugs. Then drain the coolant from the engine.
Tighten the 2 cylinder block drain cock plugs.
- Torque:
- 13 N*m{ 130 kgf*cm , 9 ft.*lbf }
Tighten the radiator drain cock plug by hand.
| 11. REMOVE HOOD SUB-ASSEMBLY |
Remove the 2 hood stay bolts. Then disconnect the 2 hood supports.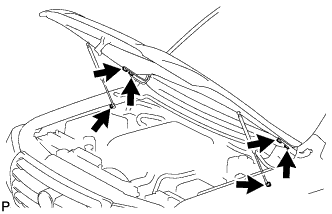
- NOTICE:
- Avoid touching the stroke portions of the rod as much as possible to prevent foreign matter from attaching to it. Be sure to hold the cylinders while servicing.
- Do not wear cotton gloves or other similar materials when handling the rod. Fibers may attach to the rod and result in gas leaks.
- Do not apply any load to the cylinders in the horizontal direction in order to prevent the rod from being deformed.
- Remove the hood support while supporting the hood by hand.
- Avoid touching the stroke portions of the rod as much as possible to prevent foreign matter from attaching to it. Be sure to hold the cylinders while servicing.
Remove the 4 bolts and hood.
| 12. REMOVE UPPER RADIATOR SUPPORT SEAL |
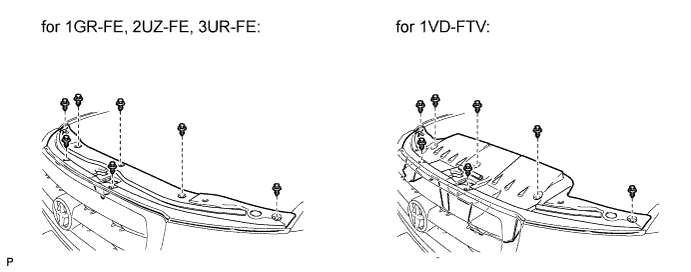
Remove the 7 clips and radiator support seal.
| 13. REMOVE COWL TOP VENTILATOR LOUVER SUB-ASSEMBLY |
Remove the cowl top ventilator louver (Click here).
| 14. REMOVE FRONT BUMPER WINCH COVER SUB-ASSEMBLY (w/ Winch) |
| 15. REMOVE RADIATOR GRILLE |
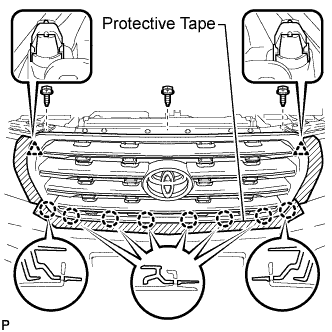 |
Put protective tape around the radiator grille.
Remove the 3 screws.
Detach the 2 clips and 8 claws, and remove the radiator grille.
| 16. REMOVE FRONT BUMPER COVER |
for Standard:
Remove the front bumper cover (Click here).
w/ Winch:
Remove the front bumper cover (Click here).
| 17. REMOVE V-BANK COVER SUB-ASSEMBLY |
Remove the 2 nuts and V-bank cover.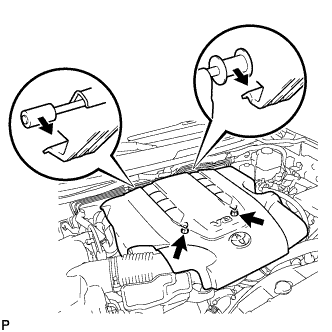
| 18. REMOVE AIR CLEANER HOSE ASSEMBLY |
Disconnect the vacuum transmitting hose and No. 2 ventilation hose.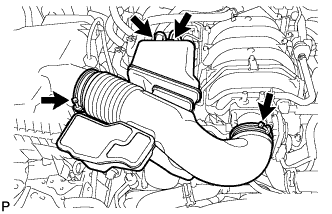
Loosen the 2 hose clamps.
Remove the air cleaner hose.
| 19. REMOVE AIR CLEANER ASSEMBLY |
Disconnect the clamp and MAF connector.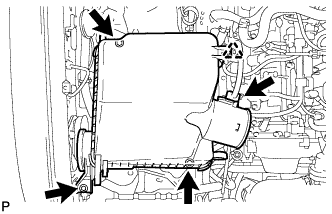
Remove the 3 bolts and air cleaner.
| 20. REMOVE NO. 1 RADIATOR HOSE |
Using needle-nose pliers, grip the claws of the clamps and slide the clamps to remove the radiator hose.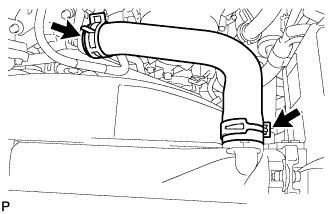
| 21. REMOVE NO. 2 RADIATOR HOSE |
Using needle-nose pliers, grip the claws of the clamps and slide the clamps to remove the radiator hose.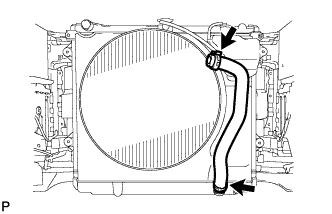
| 22. REMOVE FAN SHROUD |
Loosen the 4 nuts holding the cooling fan.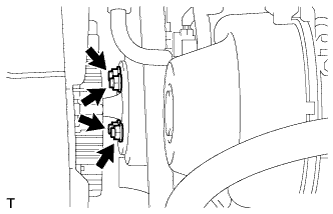
Disconnect the reservoir hose from the upper side of the radiator tank.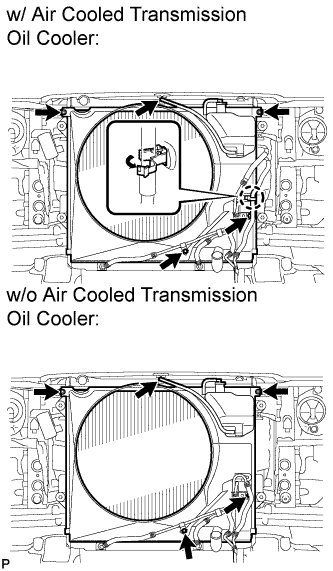
w/ Air Cooled Transmission Oil Cooler:
Detach the claw to open the flexible hose clamp.
Remove the 2 bolts and disconnect the oil cooler tube from the fan shroud.
Remove the 2 bolts holding the fan shroud.
Remove the 4 nuts of the cooling fan, and then remove the shroud together with the cooling fan.
- NOTICE:
- Be careful not to damage the radiator core.
Remove the fan pulley from the water pump.
| 23. REMOVE TRANSMISSION OIL COOLER AIR DUCT (w/ Air Cooled Transmission Oil Cooler) |
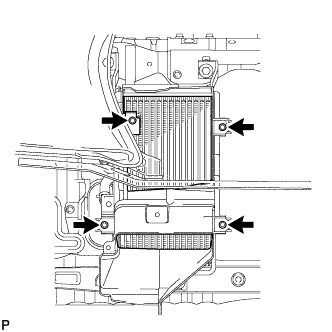 |
Remove the 4 bolts and transmission oil cooler air duct.
| 24. REMOVE RADIATOR SIDE DEFLECTOR RH (w/o Air Cooled Transmission Oil Cooler) |
Using a clip remover, remove the 4 clips and disconnect the side deflector.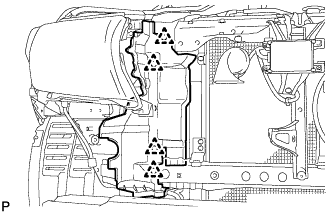
| 25. REMOVE RADIATOR SIDE DEFLECTOR LH |
Using a clip remover, remove the 4 clips and disconnect the side deflector.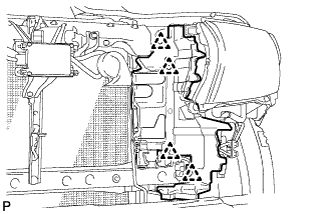
| 26. REMOVE RADIATOR ASSEMBLY |
Using needle-nose pliers, grip the claws of the clamps and slide the clamps to disconnect the 2 oil cooler hoses.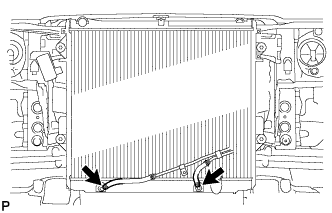
Remove the 4 bolts and radiator.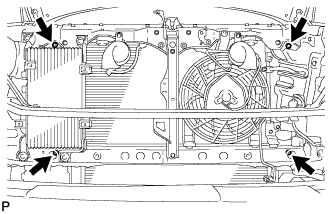
| 27. REMOVE FRONT FENDER APRON SEAL LH |
Using a clip remover, remove the 4 clips and fender apron seal.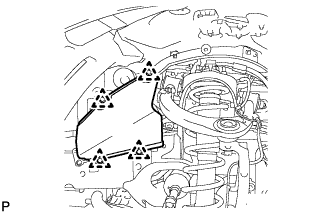
| 28. REMOVE FRONT FENDER APRON SEAL LH (w/ KDSS) |
Using a clip remover, remove the 3 clips and fender apron seal.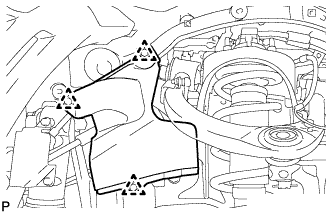
| 29. REMOVE FRONT FENDER APRON SEAL REAR LH |
Using a clip remover, remove the 4 clips and fender apron seal.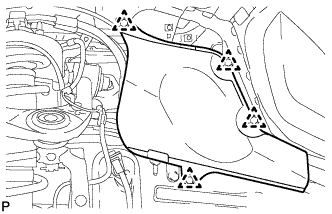
| 30. REMOVE FRONT FENDER APRON SEAL FRONT RH |
Using a clip remover, remove the 3 clips and fender apron seal.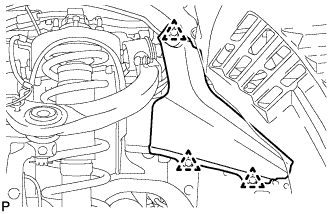
| 31. REMOVE FRONT FENDER APRON SEAL REAR RH |
Using a clip remover, remove the 4 clips and fender apron seal.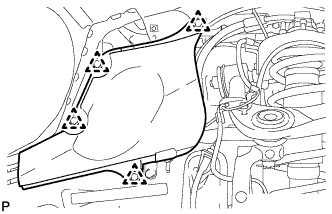
| 32. DISCONNECT COOLER COMPRESSOR ASSEMBLY |
Disconnect the connector.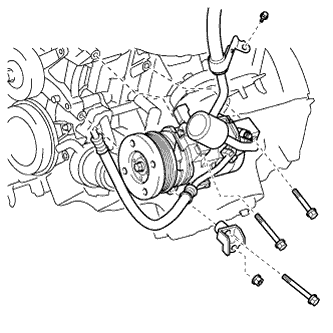
Remove the bolt. Then disconnect the cooler refrigerant suction hose from the cylinder head cover.
Remove the 3 bolts, nut and No. 1 compressor stay and disconnect the cooler compressor.
| 33. DISCONNECT VANE PUMP ASSEMBLY |
Disconnect the connector.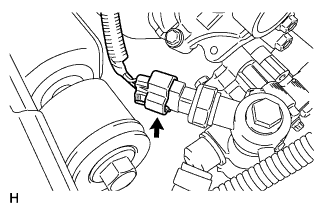
Remove the 2 bolts and nut. Then disconnect the vane pump.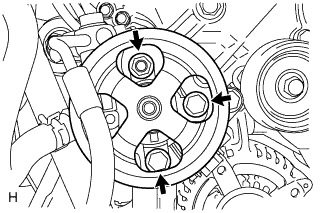
| 34. REMOVE GENERATOR ASSEMBLY |
Disconnect the generator connector.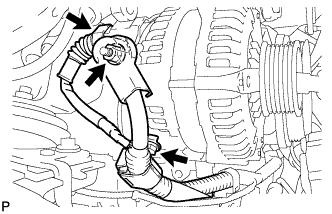
Remove the terminal cap and nut, and disconnect the generator wire.
Remove the bolt and disconnect the wire harness bracket from the generator.
Remove the bolt, 2 nuts and generator.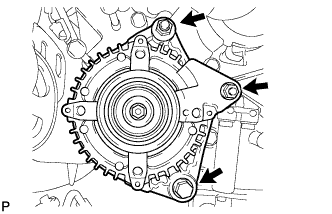
| 35. DISCONNECT FUEL HOSE |
Remove the fuel hose clamp.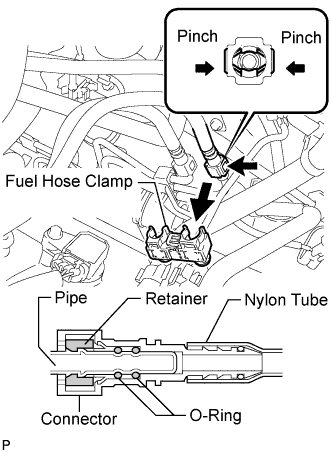
Pinch and pull the fuel hose connector to disconnect the connector from the fuel pipe.
- NOTICE:
- Check for foreign matter in the pipe and around the connector. Clean if necessary. Foreign matter may damage the O-ring or cause leaks in the seal between the pipe and connector.
- Do not use any tools to separate the pipe and connector.
- Do not forcefully bend or twist the nylon tube.
- Check for foreign matter on the pipe seal surface. Clean if necessary.
- Put the pipe and connector ends in plastic bags to prevent damage and foreign matter contamination.
- If the pipe and connector are stuck together, pinch the connector between your fingers and turn it carefully to disconnect it.
- Check for foreign matter in the pipe and around the connector. Clean if necessary. Foreign matter may damage the O-ring or cause leaks in the seal between the pipe and connector.
| 36. REMOVE NO. 2 FUEL HOSE |
for engine side:
Detach the fuel hose clamp.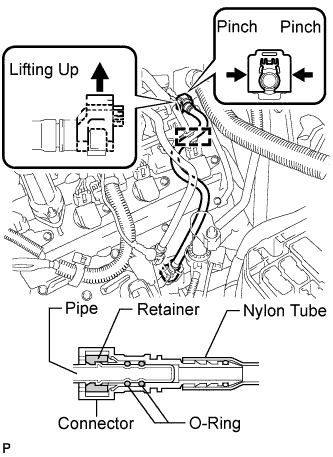
Detach the lock claw by lifting up the cover, as shown in the illustration.
Pinch and pull the No. 2 fuel hose connector to disconnect the connector from the No. 3 fuel pipe.
- NOTICE:
- Check for foreign matter in the pipe and around the connector. Clean if necessary. Foreign matter may damage the O-ring or cause leaks in the seal between the pipe and connector.
- Do not use any tools to separate the pipe and connector.
- Do not forcefully bend or twist the nylon tube.
- Check for foreign matter on the pipe seal surface. Clean if necessary.
- Put the pipe and connector ends in plastic bags to prevent damage and foreign matter contamination.
- If the pipe and connector are stuck together, pinch the connector between your fingers and turn it carefully to disconnect it.
- Check for foreign matter in the pipe and around the connector. Clean if necessary. Foreign matter may damage the O-ring or cause leaks in the seal between the pipe and connector.
for body side:
Pinch and pull the No. 2 fuel hose connector to disconnect the connector from the fuel pipe.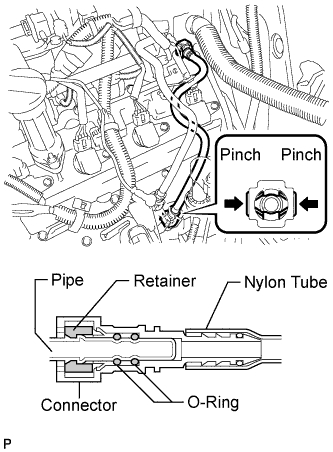
- NOTICE:
- Check for foreign matter in the pipe and around the connector. Clean if necessary. Foreign matter may damage the O-ring or cause leaks in the seal between the pipe and connector.
- Do not use any tools to separate the pipe and connector.
- Do not forcefully bend or twist the nylon tube.
- Check for foreign matter on the pipe seal surface. Clean if necessary.
- Put the pipe and connector ends in plastic bags to prevent damage and foreign matter contamination.
- If the pipe and connector are stuck together, pinch the connector between your fingers and turn it carefully to disconnect it.
- Check for foreign matter in the pipe and around the connector. Clean if necessary. Foreign matter may damage the O-ring or cause leaks in the seal between the pipe and connector.
| 37. DISCONNECT WATER HOSE SUB-ASSEMBLY |
Disconnect the water hose.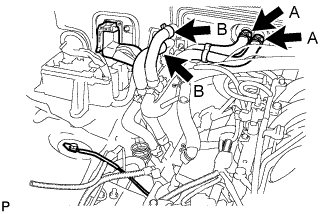
w/ Rear Heater:
Disconnect the water hoses labeled A and B.w/o Rear Heater:
Disconnect the water hoses labeled A.
| 38. DISCONNECT NO. 1 WATER BY-PASS PIPE (w/ Air Cooled Transmission Oil Cooler) |
Remove the 2 bolts and disconnect the water by-pass pipe from the cylinder head cover RH.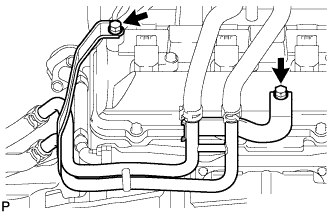
| 39. DISCONNECT WIRE HARNESS |
Disconnect the clamp and ECM connector.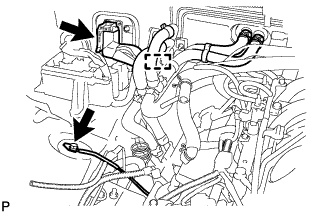
- HINT:
- Refer to the following procedures to disconnect the ECM connector (Click here).
Remove the bolt and disconnect the ground wire.
Disconnect the 4 connectors and clamp from the connector holder block.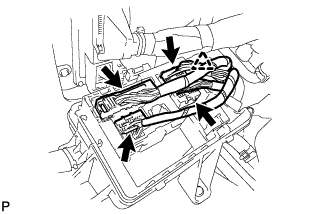
Disconnect the purge line hose from the purge VSV.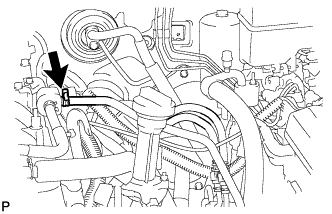
Disconnect the 2 air injection control driver connectors.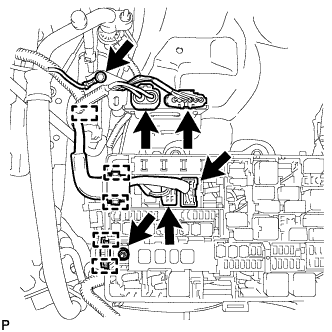
Disconnect the wire harness clamp.
Remove the bolt and disconnect the ground wire.
Disconnect the 2 clamps and 2 connectors from the engine room relay block.
Remove the nut and disconnect the 2 clamps and wire harness from the engine room relay block.
Remove the nut and disconnect the wire harness from the positive (+) battery terminal.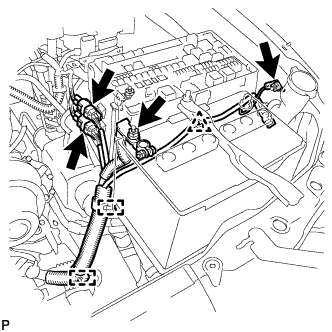
Disconnect the 2 connectors and 2 connector clamps from the engine room relay block.
Remove the bolt and disconnect the 3 clamps and ground wire.
w/ Winch: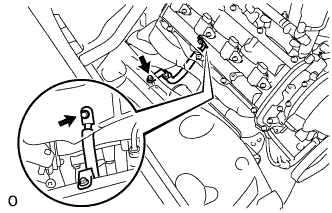
Remove the 2 bolts and disconnect the winch ground wire.
| 40. REMOVE EXHAUST TAILPIPE ASSEMBLY |
Remove the bolt, clamp and gasket.
Remove the tailpipe from the 2 exhaust pipe supports.
| 41. REMOVE EXHAUST CENTER PIPE ASSEMBLY |
Remove the 4 bolts.
Remove the center exhaust pipe from the 3 exhaust pipe supports.
Remove the 2 gaskets from the front exhaust pipe and front No. 2 exhaust pipe.
| 42. REMOVE NO. 2 EXHAUST FRONT PIPE ASSEMBLY |
Disconnect the air fuel ratio sensor connector.
Disconnect the heated oxygen sensor connector.
Remove the 3 nuts, front No. 2 exhaust pipe and gasket.
| 43. REMOVE EXHAUST FRONT PIPE ASSEMBLY |
Disconnect the air fuel ratio sensor connector.
Disconnect the heated oxygen sensor connector.
Detach the heated oxygen sensor wire clamp.
Remove the 3 nuts, front exhaust pipe and gasket.
| 44. REMOVE NO. 1 EXHAUST MANIFOLD HEAT INSULATOR |
Remove the 4 bolts and heat insulator.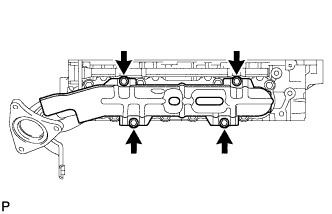
| 45. REMOVE NO. 2 EXHAUST MANIFOLD HEAT INSULATOR |
Remove the 4 bolts and heat insulator.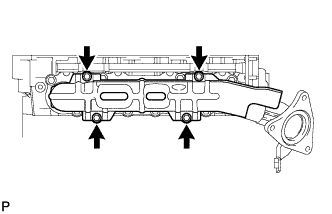
| 46. REMOVE PROPELLER SHAFT HEAT INSULATOR |
Remove the 2 bolts and insulator.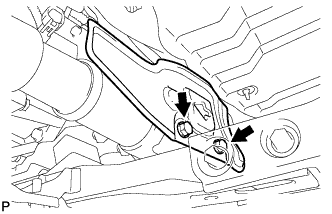
| 47. REMOVE FRONT PROPELLER SHAFT ASSEMBLY |
for 1GR-FE, 2UZ-FE and Center Grease Fitting type:
Place matchmarks on the propeller shaft flange and transfer flange.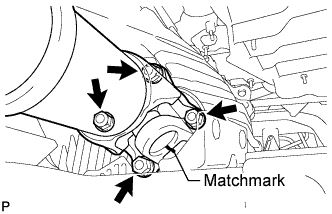
Remove the 4 nuts and 4 washers.
Place matchmarks on the propeller shaft flange and differential.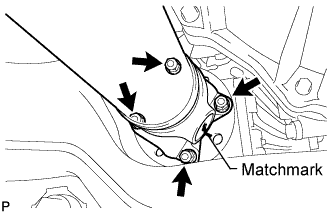
Remove the 4 nuts and 4 washers.
Remove the front propeller shaft.
for 1VD-FTV:
Place matchmarks on the propeller shaft flange and transfer flange.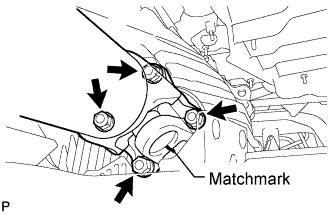
Remove the 4 nuts and 4 washers.
Place matchmarks on the propeller shaft flange and differential.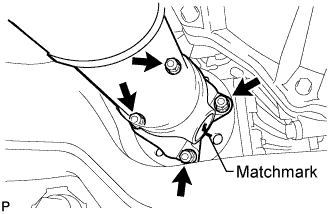
Remove the 4 nuts and 4 washers.
Remove the front propeller shaft.
| 48. REMOVE TRANSFER HEAT INSULATOR |
Remove the 4 bolts and insulator.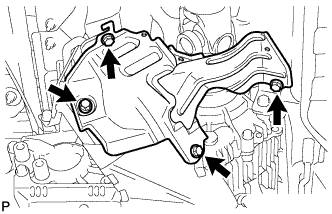
| 49. REMOVE PROPELLER SHAFT ASSEMBLY |
Place matchmarks on the propeller shaft flange and transfer.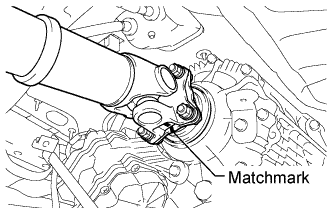
Remove the 4 nuts and 4 washers.
Place matchmarks on the propeller shaft flange and rear differential.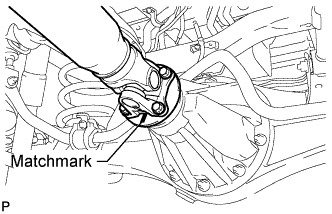
Remove the 4 nuts, 4 bolts and 4 washers.
Remove the rear propeller shaft.
| 50. REMOVE AUTOMATIC TRANSMISSION ASSEMBLY |
Remove the automatic transmission (Click here).
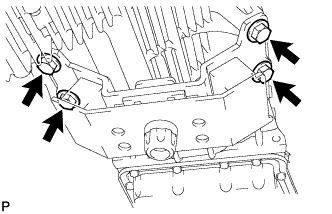
| 51. REMOVE REAR NO. 1 ENGINE MOUNTING INSULATOR |
 |
- HINT:
- Perform this procedure only when replacement of the engine mounting insulator is necessary.
Remove the 4 bolts and rear No. 1 engine mounting insulator.
| 52. REMOVE DRIVE PLATE AND RING GEAR SUB-ASSEMBLY |
Using SST, hold the crankshaft damper.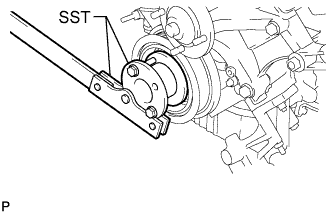
- SST
- 09213-70011
(09213-70020)
09330-00021 (09330-00030)
Remove the 8 bolts, front drive plate spacer, drive plate and rear drive plate spacer.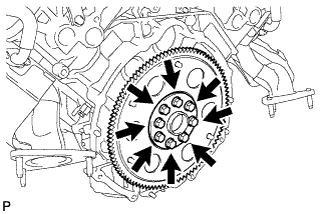
| 53. REMOVE ENGINE ASSEMBLY |
Attach an engine sling device and hang the engine with a chain block.
- NOTICE:
- Pay attention to the angle of the sling device, as the engine assembly or engine hanger No. 1 may be damaged or deformed.
Remove the 4 engine mounting insulator bolts.
Lift the engine out from the vehicle slowly and carefully.
- NOTICE:
- Make sure the engine is clear of all wiring, hoses and cables.
| 54. INSTALL ENGINE ON ENGINE STAND |
Install the engine onto an engine stand with bolts.