INSTALLATION
Removal / installation · Vehicles built Sep 2011 – Dec 2011
| 1. INSTALL FUEL SENDER GAUGE ASSEMBLY |

Install a new gasket to the sender gauge.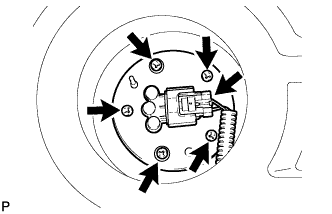

Install the sender gauge with the 5 screws.
- Torque:
- 1.5 N*m{ 15 kgf*cm , 13 in.*lbf }
- NOTICE:
- Be careful not to bend the arm of the fuel sender gauge.
Connect the sender gauge connector.
| 2. INSTALL REAR FLOOR SERVICE HOLE COVER |
Install the service hole cover with new butyl tape.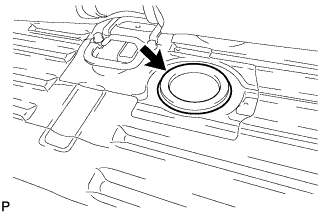
| 3. INSTALL REAR NO. 7 AIR DUCT (w/ Rear Air Conditioning System) |
Attach the 4 clips to install the air duct.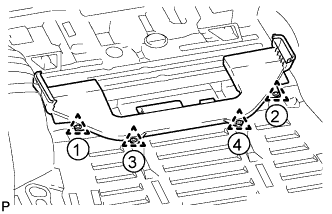
- HINT:
- Attach the clips in the order shown in the illustration.
| 4. INSTALL REAR FLOOR MAT ASSEMBLY |
Attach the 5 clips to install the floor mat.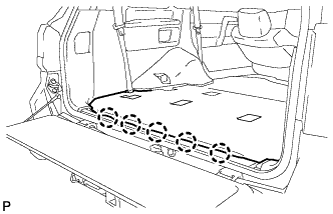
| 5. INSTALL REAR AIR DUCT GUIDE (w/ Rear Air Conditioning System) |
Attach the claw to install the guide.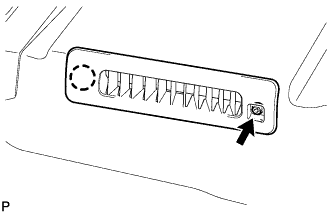
Install the screw.
- HINT:
- Use the same procedures for both sides.
| 6. INSTALL AIR DUCT PLUG (w/ Rear Air Conditioning System) |
Attach the 2 claws to install the plug.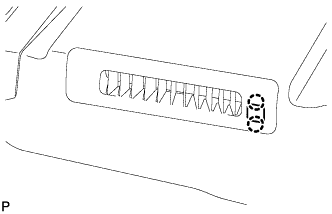
- HINT:
- Use the same procedures for both sides.
| 7. INSTALL FRONT QUARTER TRIM PANEL ASSEMBLY LH |
w/ Sliding Roof:
Install the front quarter trim panel assembly LH (Click here).
w/o Sliding Roof:
Install the front quarter trim panel assembly LH (Click here).
| 8. INSTALL FRONT QUARTER TRIM PANEL ASSEMBLY RH |
w/ Sliding Roof:
Install the front quarter trim panel assembly RH (Click here).
w/o Sliding Roof:
Install the front quarter trim panel assembly RH (Click here).
| 9. INSTALL REAR SEAT COVER CAP (w/ Rear No. 2 Seat, except Face to Face Seat Type) |
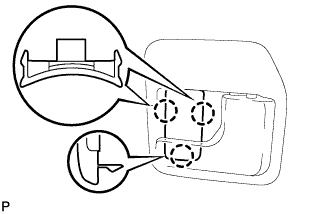 |
- HINT:
- Use the same procedure to install the rear seat cover cap on the other side.
Attach the 3 claws to install the rear seat cover cap.
| 10. INSTALL REAR FLOOR MAT REAR SUPPORT PLATE |
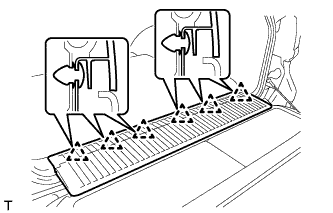 |
Attach the 6 clips to install the support plate.
| 11. INSTALL REAR DOOR SCUFF PLATE LH |
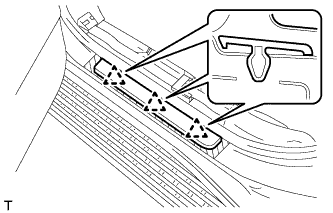 |
Attach the 3 clips to install the rear door scuff plate outside.
| 12. INSTALL REAR DOOR SCUFF PLATE RH |
- HINT:
- Use the same procedures described for the LH side.
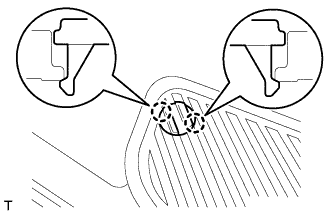
| 13. INSTALL REAR STEP COVER |
 |
- HINT:
- Use the same procedure to install the step cover on the other side.
Attach the 2 claws to install the step cover.
| 14. INSTALL REAR NO. 2 SEAT ASSEMBLY |
for Face to Face Seat Type:
Install the rear No. 2 seat assembly (Click here).
except Face to Face Seat Type:
Install the rear No. 2 seat assembly (Click here).
| 15. INSTALL REAR NO. 1 SEAT ASSEMBLY RH (for 60/40 Split Seat Type 40 Side) |
Install the rear No. 1 seat assembly RH (Click here).
| 16. INSTALL REAR NO. 1 SEAT ASSEMBLY LH (for 60/40 Split Seat Type 60 Side) |
Install the rear No. 1 seat assembly LH (Click here).
| 17. CONNECT CABLE TO NEGATIVE BATTERY TERMINAL |
- NOTICE:
- When disconnecting the cable, some systems need to be initialized after the cable is reconnected (Click here).
| 18. CHECK SRS WARNING LIGHT |
Check the SRS warning light (Click here).