Speaker Circuit
Circuit diagnosis · Vehicles built from Jan 2012
Versions by build date: Sep 2011 – Dec 2011 from Jan 2012
DESCRIPTION
The stereo component amplifier sends sound signals to the speakers.WIRING DIAGRAM
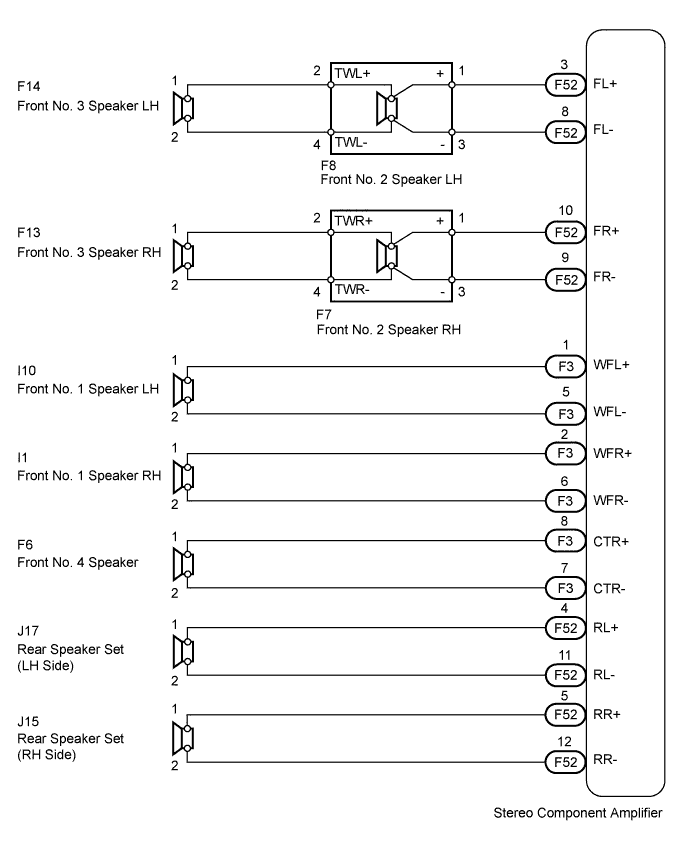

INSPECTION PROCEDURE
| 1. CHECK SPEAKER |
 |
Check the malfunctioning speakers.
Result
Result
|
Proceed to
|
Front No. 4 speaker
|
A
|
Front No. 2 speaker
|
B
|
Front No. 1 speaker
|
C
|
Front No. 3 speaker
|
D
|
Rear speaker set
|
E
|
| A |
|
 |
|
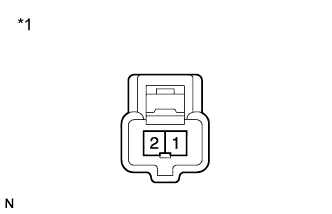
| 2. INSPECT FRONT NO. 4 SPEAKER ASSEMBLY |
|
- Disconnect the F6 speaker connector.
Measure the resistance according to the value(s) in the table below.
- Standard Resistance:
Tester Connection
|
Condition
|
Specified Condition
|
1 - 2
|
Always
|
6 Ω
|
Text in Illustration
*1
|
Component without harness connected
(Front No. 4 Speaker)
|
|
NG |
 |
|
|
|
| OK |
|
|
|
| 3. CHECK HARNESS AND CONNECTOR (STEREO COMPONENT AMPLIFIER - FRONT NO. 4 SPEAKER) |
|
Disconnect the F6 speaker connector.
Disconnect the F3 amplifier connector.
Measure the resistance according to the value(s) in the table below.
- Standard Resistance:
Tester Connection
|
Condition
|
Specified Condition
|
F3-8 (CTR+) - F6-1
|
Always
|
Below 1 Ω
|
F3-7 (CTR-) - F6-2
|
Always
|
Below 1 Ω
|
F3-8 (CTR+) - Body ground
|
Always
|
10 kΩ or higher
|
F3-7 (CTR-) - Body ground
|
Always
|
10 kΩ or higher
|
|
NG |
|
|
| REPAIR OR REPLACE HARNESS OR CONNECTOR |
|
|
| OK |
|
 |
|
| REPLACE STEREO COMPONENT AMPLIFIER ASSEMBLY (Click here)
|
|
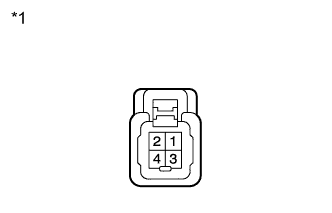
| 4. INSPECT FRONT NO. 2 SPEAKER ASSEMBLY |
|
- Disconnect the F8 and F7 speaker connectors.
Measure the resistance according to the value(s) in the table below.
- Standard Resistance:
Tester Connection
|
Condition
|
Specified Condition
|
1 - 2
|
Always
|
Below 1 Ω
|
3 - 4
|
Always
|
Below 1 Ω
|
2 - 4
|
Always
|
4 Ω
|
Text in Illustration
*1
|
Component without harness connected
(Front No. 2 Speaker)
|
|
NG |
|
|
|
|
| OK |
|
|
|
| 5. CHECK HARNESS AND CONNECTOR (STEREO COMPONENT AMPLIFIER - FRONT NO. 2 SPEAKER) |
|
Disconnect the F52 amplifier connector.
Disconnect the F8 and F7 speaker connectors.
Measure the resistance according to the value(s) in the table below.
- Standard Resistance:
- for LH:
Tester Connection
|
Condition
|
Specified Condition
|
F52-3 (FL+) - F8-1 (+)
|
Always
|
Below 1 Ω
|
F52-8 (FL-) - F8-3 (-)
|
Always
|
Below 1 Ω
|
F52-3 (FL+) - Body ground
|
Always
|
10 kΩ or higher
|
F52-8 (FL-) - Body ground
|
Always
|
10 kΩ or higher
|
- for RH:
Tester Connection
|
Condition
|
Specified Condition
|
F52-10 (FR+) - F7-1 (+)
|
Always
|
Below 1 Ω
|
F52-9 (FR-) - F7-3 (-)
|
Always
|
Below 1 Ω
|
F52-10 (FR+) - Body ground
|
Always
|
10 kΩ or higher
|
F52-9 (FR-) - Body ground
|
Always
|
10 kΩ or higher
|
|
NG |
|
|
| REPAIR OR REPLACE HARNESS OR CONNECTOR |
|
|
| OK |
|
|
|
| REPLACE STEREO COMPONENT AMPLIFIER ASSEMBLY (Click here)
|
|
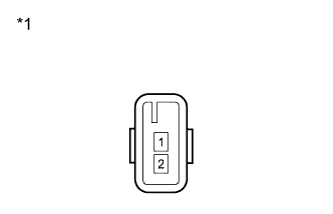
| 6. INSPECT FRONT NO. 1 SPEAKER ASSEMBLY |
|
- Disconnect the I10 and I1 speaker connectors.
Measure the resistance according to the value(s) in the table below.
- Standard Resistance:
Tester Connection
|
Condition
|
Specified Condition
|
1 - 2
|
Always
|
3 Ω
|
Text in Illustration
*1
|
Component without harness connected
(Front No. 1 Speaker)
|
|
NG |
|
|
|
|
| OK |
|
|
|
| 7. CHECK HARNESS AND CONNECTOR (STEREO COMPONENT AMPLIFIER - FRONT NO. 1 SPEAKER) |
|
Disconnect the I10 and I1 speaker connectors.
Disconnect the F3 amplifier connector.
Measure the resistance according to the value(s) in the table below.
- Standard Resistance:
- for LH:
Tester Connection
|
Condition
|
Specified Condition
|
F3-1 (WFL+) - I10-1
|
Always
|
Below 1 Ω
|
F3-5 (WFL-) - I10-2
|
Always
|
Below 1 Ω
|
F3-1 (WFL+) - Body ground
|
Always
|
10 kΩ or higher
|
F3-5 (WFL-) - Body ground
|
Always
|
10 kΩ or higher
|
- for RH:
Tester Connection
|
Condition
|
Specified Condition
|
F3-2 (WFR+) - I1-1
|
Always
|
Below 1 Ω
|
F3-6 (WFR-) - I1-2
|
Always
|
Below 1 Ω
|
F3-2 (WFR+) - Body ground
|
Always
|
10 kΩ or higher
|
F3-6 (WFR-) - Body ground
|
Always
|
10 kΩ or higher
|
|
NG |
|
|
| REPAIR OR REPLACE HARNESS OR CONNECTOR |
|
|
| OK |
|
|
|
| REPLACE STEREO COMPONENT AMPLIFIER ASSEMBLY (Click here)
|
|
| 8. INSPECT FRONT NO. 3 SPEAKER ASSEMBLY |
|
- Disconnect the F14 and F13 speaker connectors.
Measure the resistance according to the value(s) in the table below.
- Standard Resistance:
Tester Connection
|
Condition
|
Specified Condition
|
1 - 2
|
Always
|
4 Ω
|
Text in Illustration
*1
|
Component without harness connected
(Front No. 3 Speaker)
|
|
NG |
|
|
|
|
| OK |
|
|
|
| 9. INSPECT FRONT NO. 2 SPEAKER ASSEMBLY |
|
- Disconnect the F8 and F7 speaker connectors.
Measure the resistance according to the value(s) in the table below.
- Standard Resistance:
Tester Connection
|
Condition
|
Specified Condition
|
1 - 2
|
Always
|
Below 1 Ω
|
3 - 4
|
Always
|
Below 1 Ω
|
2 - 4
|
Always
|
4 Ω
|
Text in Illustration
*1
|
Component without harness connected
(Front No. 2 Speaker)
|
|
NG |
|
|
|
|
| OK |
|
|
|
| REPAIR OR REPLACE HARNESS OR CONNECTOR (FRONT NO. 2 SPEAKER - FRONT NO. 3 SPEAKER) |
|
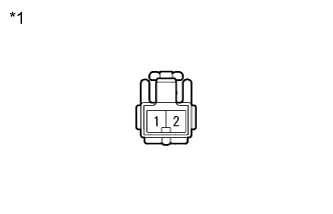
| 10. INSPECT REAR SPEAKER SET |
|
- Disconnect the J17 and J15 speaker connectors.
Measure the resistance according to the value(s) in the table below.
- Standard Resistance:
Tester Connection
|
Condition
|
Specified Condition
|
1 - 2
|
Always
|
4 Ω
|
Text in Illustration
*1
|
Component without harness connected
(Rear Speaker Set)
|
|
NG |
|
|
|
|
| OK |
|
|
|
| 11. CHECK HARNESS AND CONNECTOR (STEREO COMPONENT AMPLIFIER - REAR SPEAKER SET) |
|
Disconnect the F52 amplifier connector.
Disconnect the J17 and J15 speaker connectors.
Measure the resistance according to the value(s) in the table below.
- Standard Resistance:
- for LH:
Tester Connection
|
Condition
|
Specified Condition
|
F52-4 (RL+) - J17-1
|
Always
|
Below 1 Ω
|
F52-11 (RL-) - J17-2
|
Always
|
Below 1 Ω
|
F52-4 (RL+) - Body ground
|
Always
|
10 kΩ or higher
|
F52-11 (RL-) - Body ground
|
Always
|
10 kΩ or higher
|
- for RH:
Tester Connection
|
Condition
|
Specified Condition
|
F52-5 (RR+) - J15-1
|
Always
|
Below 1 Ω
|
F52-12 (RR-) - J15-2
|
Always
|
Below 1 Ω
|
F52-5 (RR+) - Body ground
|
Always
|
10 kΩ or higher
|
F52-12 (RR-) - Body ground
|
Always
|
10 kΩ or higher
|
|
NG |
|
|
| REPAIR OR REPLACE HARNESS OR CONNECTOR |
|
|
| OK |
|
|
|
| REPLACE STEREO COMPONENT AMPLIFIER ASSEMBLY (Click here)
|
|