Distance Control Switch Circuit
Circuit diagnosis · Vehicles built from Jan 2012
DESCRIPTION
The distance control switch sets the vehicle-to-vehicle distance control mode. The distance control switch is installed in the steering pad switch. The vehicle-to-vehicle distance set value can be changed by operating the steering pad switch (distance control switch) while the dynamic radar cruise control system is in operation. The steering pad switch uses the CAN communication line to communicate with each ECU.WIRING DIAGRAM
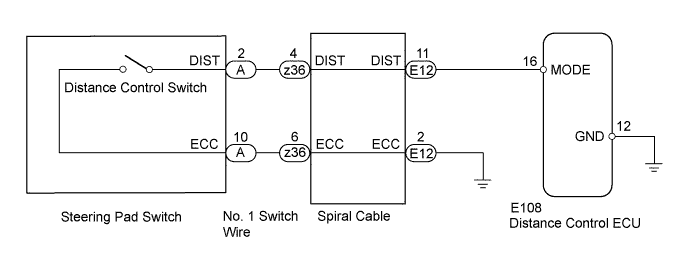

INSPECTION PROCEDURE
- CAUTION:
- The vehicle is equipped with an SRS (Supplemental Restraint System) which includes components such as airbags. Before servicing (including removal or installation of parts), be sure to read the Precaution for the SRS (Click here).
- NOTICE:
- When the distance control ECU is replaced with a new one, initialization must be performed (Click here).
| 1. READ VALUE USING INTELLIGENT TESTER (VEHICLE DISTANCE) |

Using the intelligent tester, read the Data List (Click here).
Radar Cruise Tester Display
Measurement Item/Range
Normal Condition
Diagnostic Note
Car Dist Time Setting
Vehicle distance time setting condition /
SHORT, LONG, MID or NO
Vehicle distance selected by steering pad switch (distance control switch)
-
- OK:
- Normal conditions listed above are displayed.
|
|
||||

| OK | ||
 |
||
| ||
| 2. CHECK NO. 1 SWITCH WIRE |
Disconnect the A and z36 No. 1 switch wire connectors.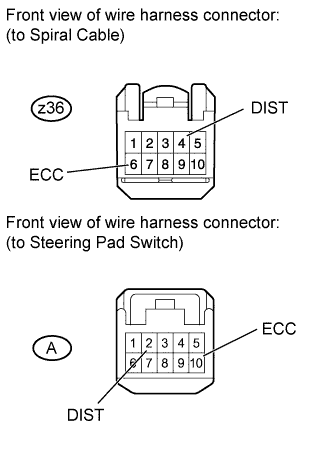
Measure the resistance according to the value(s) in the table below.
- Standard Resistance:
Tester Connection
Condition
Specified Condition
z36-4 (DIST) - A-2 (DIST)
Always
Below 1 Ω
z36-6 (ECC) - A-10 (ECC)
Always
Below 1 Ω
|
|
||||

| OK | |
 |
| 3. INSPECT STEERING PAD SWITCH |
Disconnect the steering pad switch connector from the spiral cable.
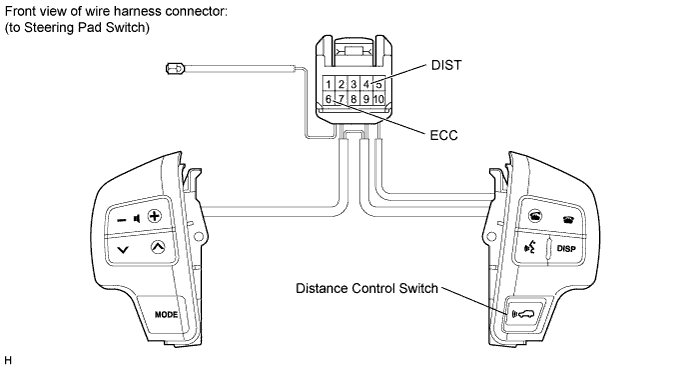
Measure the resistance according to the value(s) in the table below.
- Standard Resistance:
Tester Connection
Switch Condition
Specified Condition
4 (DIST) - 6 (ECC)
Distance control switch on (pushed)
Below 1 Ω
Distance control switch off (pushed again)
1 MΩ or higher
|
|
||||
| OK | |
|
| 4. INSPECT SPIRAL CABLE |
Check the spiral cable and connector for scratches, cracks, dents and chips. If any defects are found, replace the spiral cable with a new one.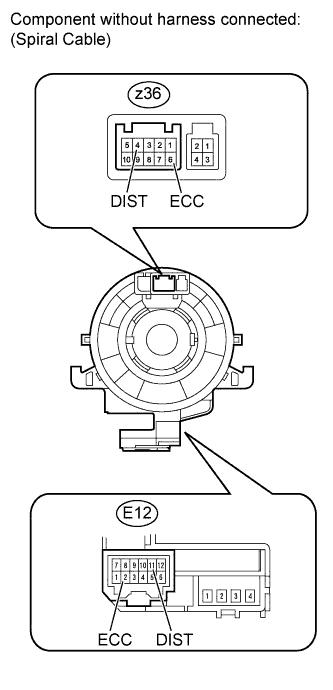
Check the spiral cable.
Set the spiral cable to the center position (Click here).
After setting the spiral cable to the center position, rotate the spiral cable 2.5 times clockwise, and measure the resistance according to the value(s) in the table below. Then rotate the spiral cable 5 times counterclockwise, and measure the resistance according to the value(s) in the table below.
- Standard Resistance:
Tester Connection
Condition
Specified Condition
z36-4 (DIST) - E12-11 (DIST)
Always
Below 1 Ω
z36-6 (ECC) - E12-2 (ECC)
After setting the spiral cable to the center position, rotate the spiral cable 2.5 times clockwise. Then while rotating the spiral cable 5 times counterclockwise, measure the resistance according to the value(s) in the table below.
- NOTICE:
- As the spiral cable may break, do not rotate the spiral cable more than the specified amount.
- Standard Resistance:
Tester Connection
Condition
Specified Condition
z36-4 (DIST) - E12-11 (DIST)
Always
Below 1 Ω
z36-6 (ECC) - E12-2 (ECC)
|
|
||||
| OK | |
|
| 5. CHECK HARNESS AND CONNECTOR (SPIRAL CABLE - DISTANCE CONTROL ECU AND BODY GROUND) |
Disconnect the E108 distance control ECU connector.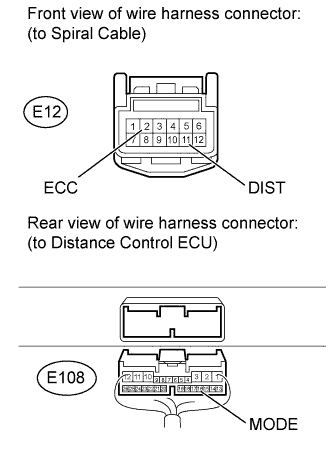
Disconnect the E12 spiral cable connector.
Measure the resistance according to the value(s) in the table below.
- Standard Resistance:
Tester Connection
Condition
Specified Condition
E12-2 (ECC) - Body ground
Always
Below 1 Ω
E12-11 (DIST) - E108-16 (MODE)
Always
Below 1 Ω
E12-11 (DIST) - Body ground
Always
10 kΩ or higher
|
|
||||
| OK | ||
|
||
| ||