P0571 Stop Light Switch Circuit Malfunction
Diagnostic trouble codes · Vehicles built from Jan 2012
DESCRIPTION
The ECM receives the brake demand signal from the stop light switch and transmits it to the master cylinder solenoid (skid control ECU). The master cylinder solenoid (skid control ECU) receives the signal from the ECM and operates the brake actuator. When the brake pedal is depressed, the stop light switch sends a signal to the ECM. When the ECM receives this signal, it cancels the cruise control. The fail-safe function operates to enable normal driving even if there is a malfunction in the stop light signal circuit. The cancellation condition occurs when voltage is applied to terminal STP. When the brake is applied, voltage is applied to terminal STP of the ECM through the STOP fuse and the stop light switch, and the ECM turns the cruise control off.| DTC Code |
DTC Detection Condition |
Trouble Area |
| P0571 |
|
|
WIRING DIAGRAM
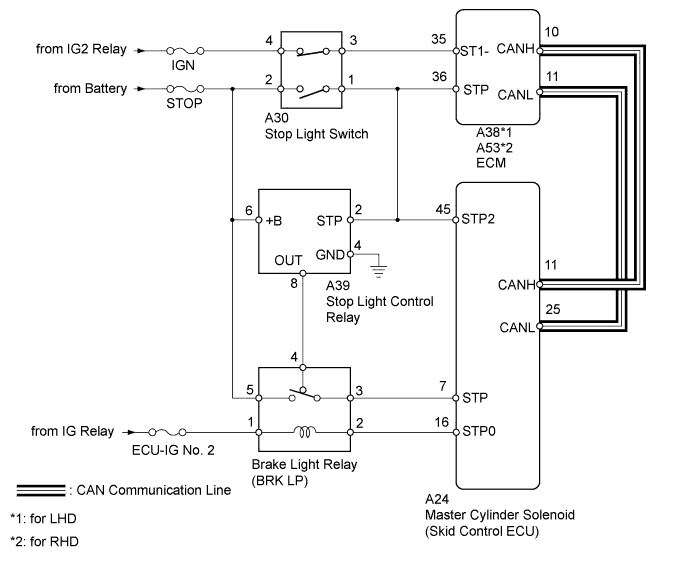

INSPECTION PROCEDURE
| 1. INSPECT FUSE (STOP, IGN, ECU-IG No. 2) |

Remove the STOP and IGN fuses from the engine room relay block.
Remove the ECU-IG No. 2 fuse from the cowl side junction block LH.
Measure the resistance according to the value(s) in the table below.
- Standard Resistance:
Tester Connection
Condition
Specified Condition
STOP fuse
Always
Below 1 Ω
IGN fuse
ECU-IG No. 2 fuse
|
|
||||

| OK | |
 |
| 2. READ VALUE USING INTELLIGENT TESTER (STOP LIGHT SWITCH) |
Using the intelligent tester, read the Data List (Click here).
Radar Cruise Tester Display
Measurement Item/Range
Normal Condition
Diagnostic Note
Stop Light SW M-CPU
Stop light switch signal (Main CPU) /
ON or OFF
ON: Brake pedal depressed
OFF: Brake pedal released
-
- OK:
- Normal conditions listed above are displayed.
|
|
||||

| OK | |
|
| 3. INSPECT BRAKE LIGHT RELAY (BRK LP) |
Remove the brake light relay from the engine room relay block.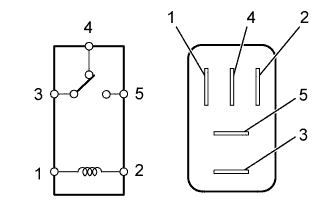
Measure the resistance according to the value(s) in the table below.
- Standard Resistance:
Tester Connection
Condition
Specified Condition
3 - 4
Battery voltage is applied to terminals 1 and 2
10 kΩ higher
Battery voltage is not applied to terminals 1 and 2
Below 1 Ω
3 - 5
Battery voltage is not applied to terminals 1 and 2
10 kΩ higher
Battery voltage is applied to terminals 1 and 2
Below 1 Ω
|
|
||||
| OK | |
|
| 4. CHECK HARNESS AND CONNECTOR (STOP LIGHT CONTROL RELAY - BATTERY AND BODY GROUND) |
Disconnect the A39 stop light control relay connector.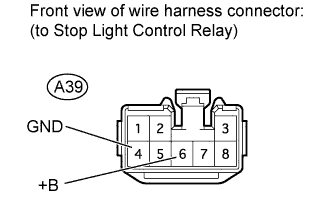
Measure the voltage according to the value(s) in the table below.
- Standard Voltage:
Tester Connection
Condition
Specified Condition
A39-6 (+B) - Body ground
Always
11 to 14 V
Measure the resistance according to the value(s) in the table below.
- Standard Resistance:
Tester Connection
Condition
Specified Condition
A39-4 (GND) - Body ground
Always
Below 1 Ω
|
|
||||
| OK | |
|
| 5. CHECK HARNESS AND CONNECTOR (STOP LIGHT CONTROL RELAY - STOP LIGHT SWITCH) |
Disconnect the A39 stop light control relay connector.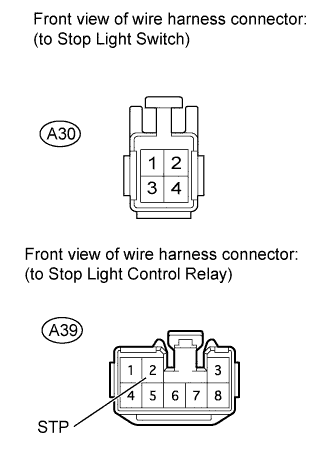
Disconnect the A30 stop light switch connector.
Measure the resistance according to the value(s) in the table below.
- Standard Resistance:
Tester Connection
Condition
Specified Condition
A30-1 - A39-2 (STP)
Always
Below 1 Ω
A30-1 - Body ground
Always
10 kΩ higher
|
|
||||
| OK | |
|
| 6. CHECK HARNESS AND CONNECTOR (STOP LIGHT CONTROL RELAY - BRAKE LIGHT RELAY) |
Disconnect the A39 stop light control relay connector.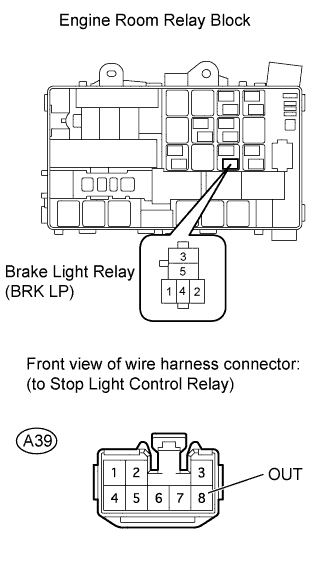
Remove the brake light relay from the engine room relay block.
Measure the resistance according to the value(s) in the table below.
- Standard Resistance:
Tester Connection
Condition
Specified Condition
A39-8 (OUT) - Brake light relay terminal 4
Always
Below 1 Ω
A39-8 (OUT) - Body ground
Always
10 kΩ higher
|
|
||||
| OK | |
|
| 7. CHECK STOP LIGHT CONTROL RELAY |
Remove the stop light control relay with its connector still connected (Click here ).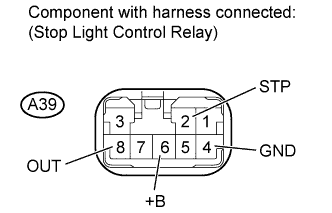
Measure the voltage according to the value(s) in the table below.
- Standard Voltage:
Tester Connection
Switch Condition
Specified Condition
A39-6 (+B) - A39-4 (GND)
Always
11 to 14 V
A39-2 (STP) - Body ground
Stop light switch on
(Brake pedal depressed)
11 to 14 V
Stop light switch off
(Brake pedal released)
Below 1 V
A39-8 (OUT) - Body ground
Stop light switch on
(Brake pedal depressed)
11 to 14 V
Stop light switch off
(Brake pedal released)
Below 1 V
|
|
||||
| OK | |
|
| 8. CHECK HARNESS AND CONNECTOR (BRAKE LIGHT RELAY - BATTERY) |
Remove the brake light relay from the engine room relay block.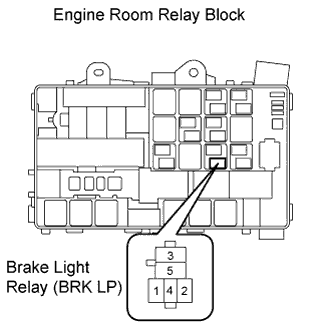
Measure the voltage according to the value(s) in the table below.
- Standard Voltage:
Tester Connection
Switch Condition
Specified Condition
Brake light relay terminal 1 - Body ground
Engine switch on (IG)
11 to 14 V
Brake light relay terminal 5 - Body ground
Always
|
|
||||
| OK | |
|
| 9. CHECK HARNESS AND CONNECTOR (BRAKE LIGHT RELAY, STOP LIGHT CONTROL RELAY - MASTER CYLINDER SOLENOID) |
Disconnect the A24 master cylinder solenoid (skid control ECU) connector.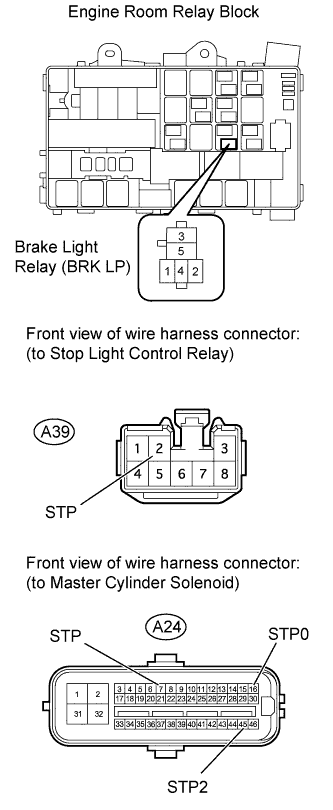
Remove the brake light relay from the engine room relay block.
Disconnect the A39 stop light control relay connector.
Measure the resistance according to the value(s) in the table below.
- Standard Resistance:
Tester Connection
Condition
Specified Condition
Brake light relay terminal 2 - A24-16 (STP0)
Always
Below 1 Ω
A39-2 (STP) - A24-45 (STP2)
Brake light relay terminal 3 - A24-7 (STP)
Brake light relay terminal 2 - Body ground
Always
10 kΩ higher
A39-2 (STP) - Body ground
Brake light relay terminal 3 - Body ground
Result Result
Proceed to
OK
(for LHD)
A
OK
(for RHD)
B
NG
C
|
|
||||
|
|
||||
| A | ||
 |
||
| ||
| 10. INSPECT STOP LIGHT SWITCH |
Remove the stop light switch (Click here).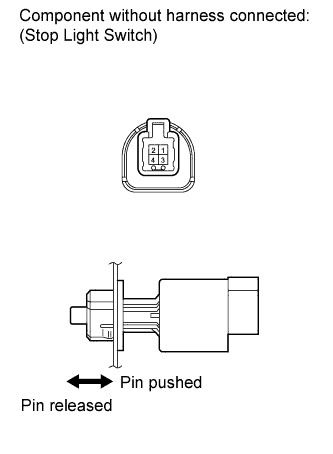
Measure the resistance according to the value(s) in the table below.
- Standard Resistance:
Tester Connection
Switch Condition
Specified Condition
1 - 2
Pin not pushed
Below 1 Ω
Pin pushed
10 kΩ higher
3 - 4
Pin not pushed
10 kΩ higher
Pin pushed
Below 1 Ω
|
|
||||
| OK | |
|
| 11. CHECK HARNESS AND CONNECTOR (STOP LIGHT SWITCH - BATTERY) |
Disconnect the A30 stop light switch connector.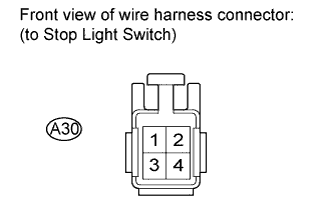
Measure the voltage according to the value(s) in the table below.
- Standard Voltage:
Tester Connection
Switch Condition
Specified Condition
A30-2 - Body ground
Engine switch on (IG)
11 to 14 V
A30-4 - Body ground
Always
|
|
||||
| OK | |
|
| 12. CHECK HARNESS AND CONNECTOR (STOP LIGHT SWITCH - ECM) |
Disconnect the A38*1 or A53*2 ECM connector.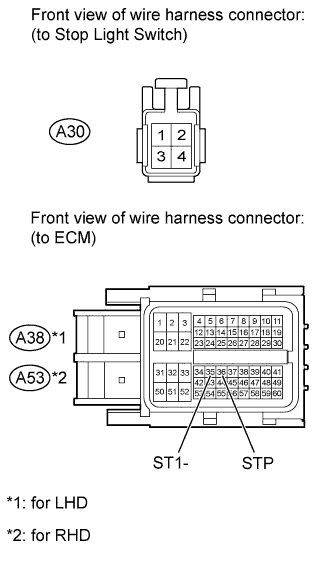
- *1: for LHD
- *2: for RHD
- *1: for LHD
Disconnect the A30 stop light switch connector.
Measure the resistance according to the value(s) in the table below.
- Standard Resistance:
for LHD Tester Connection
Condition
Specified Condition
A30-3 - A38-35 (ST1-)
Always
Below 1 Ω
A30-1 - A38-36 (STP)
A30-1 - Body ground
Always
10 kΩ higher
A30-3 - Body ground
for RHD Tester Connection
Condition
Specified Condition
A30-3 - A53-35 (ST1-)
Always
Below 1 Ω
A30-1 - A53-36 (STP)
A30-1 - Body ground
Always
10 kΩ higher
A30-3 - Body ground
| Result |
Proceed to |
| OK (1UR-FE) |
A |
| OK (3UR-FE) |
B |
| NG |
C |
|
|
||||
|
|
||||
| A | ||
|
||
| ||