Tail Gate does not Open with Back Door Remote Control
Circuit diagnosis · Vehicles built from Jan 2012
WIRING DIAGRAM
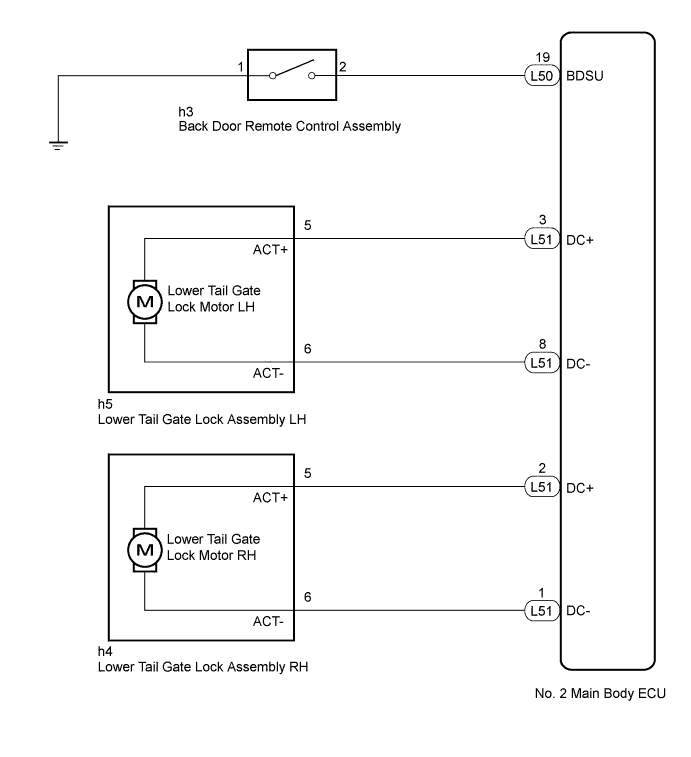

INSPECTION PROCEDURE
| 1. PERFORM ACTIVE TEST USING INTELLIGENT TESTER (TAIL GATE PANEL OPEN) |

Select the Active Test, use the intelligent tester to generate a control command, and check that the lower tail gate lock operates (Click here).
Body No. 4 Tester Display
Test Part
Control Range
Diagnostic Note
Tail Gate Panel Open
Lower tail gate lock
ON / OFF
The back door must be open.
- OK:
- Lower tail gate lock operates normally.
|
|
||||

| OK | |
 |
| 2. READ VALUE USING INTELLIGENT TESTER (HANDLE SWITCH OF TAIL GATE PANEL) |
Check the Data List for proper functioning of the back door remote control (Click here).
Body No. 4 Tester Display
Measurement Item/Range
Normal Condition
Diagnostic Note
Handle Switch of tail gate panel
Back door remote control signal / ON or OFF
ON: Back door remote control pulled
OFF: Back door remote control free
-
- OK:
- The display is as specified in the normal condition.
|
|
||||
| OK | ||
 |
||
| ||
| 3. INSPECT LOWER TAIL GATE LOCK ASSEMBLY |
for LH:
Remove the lower tail gate lock assembly LH (Click here).
Inspect the lower tail gate lock assembly LH (Click here).
for RH:
Remove the lower tail gate lock assembly RH (Click here).
Inspect the lower tail gate lock assembly RH (Click here).
| Result |
Proceed to |
| OK |
A |
| NG (for LH) |
B |
| NG (for RH) |
C |
|
|
||||
|
|
||||

| A | |
|
| 4. CHECK HARNESS AND CONNECTOR (LOWER TAIL GATE LOCK ASSEMBLY - NO. 2 MAIN BODY ECU) |
for LH:
Disconnect the h5 lower tail gate lock assembly LH connector.
Disconnect the L51 No. 2 main body ECU connector.
Measure the resistance according to the value(s) in the table below.
- Standard Resistance:
Tester Connection
Condition
Specified Condition
h5-5 (ACT+) - L51-3 (DC+)
Always
Below 1 Ω
h5-6 (ACT-) - L51-8 (DC-)
Always
Below 1 Ω
h5-5 (ACT+) - Body ground
Always
10 kΩ or higher
h5-6 (ACT-) - Body ground
Always
10 kΩ or higher
for RH:
Disconnect the h4 lower tail gate lock assembly RH connector.
Disconnect the L51 No. 2 main body ECU connector.
Measure the resistance according to the value(s) in the table below.
- Standard Resistance:
Tester Connection
Condition
Specified Condition
h4-5 (ACT+) - L51-2 (DC+)
Always
Below 1 Ω
h4-6 (ACT-) - L51-1 (DC-)
Always
Below 1 Ω
h4-5 (ACT+) - Body ground
Always
10 kΩ or higher
h4-6 (ACT-) - Body ground
Always
10 kΩ or higher
|
|
||||
| OK | ||
|
||
| ||
| 5. INSPECT BACK DOOR REMOTE CONTROL ASSEMBLY |
Remove the back door remote control assembly (Click here).
Inspect the back door remote control assembly (Click here).
|
|
||||
| OK | |
|
| 6. CHECK HARNESS AND CONNECTOR (BACK DOOR REMOTE CONTROL ASSEMBLY - NO. 2 MAIN BODY ECU AND BODY GROUND) |
Disconnect the h3 back door remote control assembly connector.
Disconnect the L50 No. 2 main body ECU connector.
Measure the resistance according to the value(s) in the table below.
- Standard Resistance:
Tester Connection
Condition
Specified Condition
h3-2 - L50-19 (BDSU)
Always
Below 1 Ω
h3-1 - Body ground
Always
Below 1 Ω
h3-2 - Body ground
Always
10 kΩ or higher
|
|
||||
| OK | ||
|
||
| ||