B15D0 MOST Communication Malfunction
Diagnostic trouble codes · Vehicles built Sep 2011 – Dec 2011
DESCRIPTION
This DTC is stored when the MOST network cannot be established after the master unit is activated.| DTC No. |
DTC Detection Condition |
Trouble Area |
| B15D0 |
MOST network cannot be established. |
|
- HINT:
- For the MOST network, the display and navigation module display is the master unit.
- Errors may occur in MOST communication between devices due to problems such as electrical noise.
- For the MOST network, the display and navigation module display is the master unit.
WIRING DIAGRAM
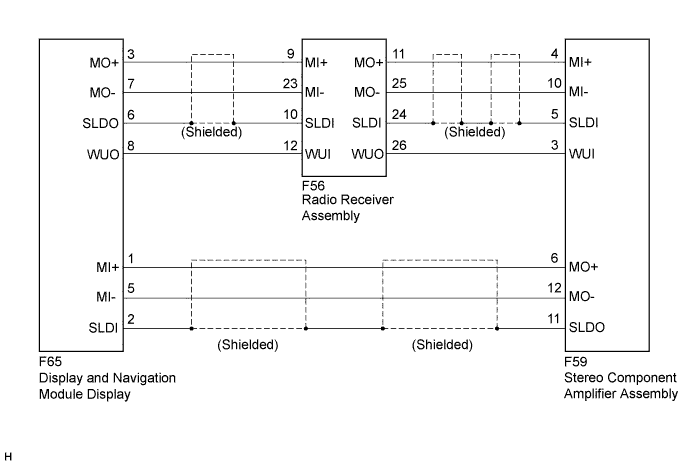

INSPECTION PROCEDURE
| 1. PERFORM MOST LINE CHECK |

Display the "MOST Line Check" screen (Click here).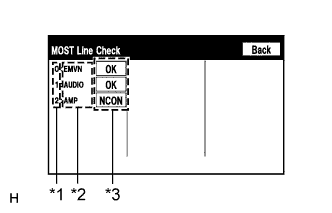
Check the result on the "MOST Line Check" screen.
Result Result
Proceed to
"NCON" is displayed for "AUDIO".
A
"NCON" is displayed for "AMP".
B
"OK" is displayed for all items.
C
- HINT:
- When "NCON" is displayed for more than 1 item, proceed to the step for the device that has the smallest node position number.
- The "MOST Line Check" screen can be displayed only when DTC B15D0 is stored.
- When "NCON" is displayed for more than 1 item, proceed to the step for the device that has the smallest node position number.
| *1 |
Node position number for devices that use MOST communication |
| *2 |
Device name |
| *3 |
Result |
|
|
||||
|
|
||||

| A | |
 |
| 2. CHECK MOST COMMUNICATION CONNECTOR |
Check MOST communication line connector.
Check if a MOST communication line connector between the display and navigation module display and radio receiver assembly has any connection problems (Click here).
Display the "MOST Line Check" screen and check the result (Click here).
Result Result
Proceed to
"NCON" is displayed for "AUDIO".
A
The screen cannot be changed to the "MOST Line Check" screen.
B
- HINT:
- When the malfunction in the MOST network is repaired, the screen cannot be changed to the "MOST Line Check" screen.
|
|
||||

| A | |
|
| 3. CHECK HARNESS AND CONNECTOR (WAKE UP SIGNAL) |
Disconnect the F56 radio receiver assembly connector.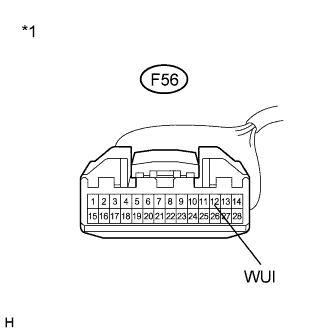
Measure the voltage according to the value(s) in the table below.
- Standard Voltage:
Tester Connection
Switch Condition
Specified Condition
F56-12 (WUI) - Body ground
Engine switch on (ACC)
4.5 V or higher
| *1 |
Front view of wire harness connector (to Radio Receiver Assembly) |
|
|
||||
| OK | ||
 |
||
| ||
| 4. CHECK HARNESS AND CONNECTOR (DISPLAY AND NAVIGATION MODULE DISPLAY - RADIO RECEIVER ASSEMBLY) |
Disconnect the F56 radio receiver assembly connector.
Disconnect the F65 display and navigation module display connector.
Measure the resistance according to the value(s) in the table below.
- Standard Resistance:
Tester Connection
Condition
Specified Condition
F56-12 (WUI) - F65-8 (WUO)
Always
Below 1 Ω
F56-12 (WUI) - Body ground
Always
10 kΩ or higher
|
|
||||
| OK | ||
|
||
| ||
| 5. CHECK MOST COMMUNICATION CONNECTOR |
Check MOST communication line connector.
Check if a MOST communication line connector between the radio receiver assembly and stereo component amplifier assembly has any connection problems (Click here).
Display the "MOST Line Check" screen and check the result (Click here).
Result Result
Proceed to
"NCON" is displayed for "AMP".
A
The screen cannot be changed to the "MOST Line Check" screen.
B
- HINT:
- When the malfunction in the MOST network is repaired, the screen cannot be changed to the "MOST Line Check" screen.
|
|
||||
| A | |
|
| 6. CHECK HARNESS AND CONNECTOR (WAKE-UP SIGNAL) |
Disconnect the F59 stereo component amplifier assembly connector.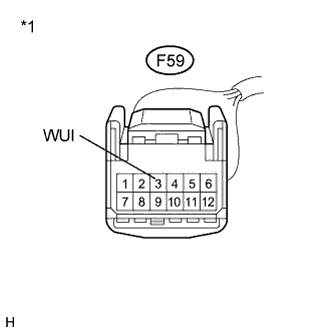
Measure the voltage according to the value(s) in the table below.
- Standard Voltage:
Tester Connection
Condition
Specified Condition
F59-3 (WUI) - Body ground
Engine switch on (ACC)
4.5 V or higher
| *1 |
Front view of wire harness connector (to Stereo Component Amplifier Assembly) |
|
|
||||
| OK | ||
|
||
| ||
| 7. CHECK HARNESS AND CONNECTOR (STEREO COMPONENT AMPLIFIER ASSEMBLY - RADIO RECEIVER ASSEMBLY) |
Disconnect the F59 stereo component amplifier assembly connector.
Disconnect the F56 radio receiver assembly connector.
Measure the resistance according to the value(s) in the table below.
- Standard Resistance:
Tester Connection
Condition
Specified Condition
F59-3 (WUI) - F56-26 (WUO)
Always
Below 1 Ω
F59-3 (WUI) - Body ground
Always
10 kΩ or higher
|
|
||||
| OK | ||
|
||
| ||
| 8. CHECK HARNESS AND CONNECTOR (DISPLAY AND NAVIGATION MODULE DISPLAY - RADIO RECEIVER ASSEMBLY) |
Disconnect the F65 display and navigation module display connector.
Disconnect the F56 radio receiver assembly connector.
Measure the resistance according to the value(s) in the table below.
- Standard Resistance:
Tester Connection
Condition
Specified Condition
F65-3 (MO+) - F56-9 (MI+)
Always
Below 1 Ω
F65-7 (MO-) - F56-23 (MI-)
Always
Below 1 Ω
F65-6 (SLDO) - F56-10 (SLDI)
Always
Below 1 Ω
F65-3 (MO+) - Body ground
Always
10 kΩ or higher
F65-7 (MO-) - Body ground
Always
10 kΩ or higher
F65-6 (SLDO) - Body ground
Always
10 kΩ or higher
|
|
||||
| OK | |
|
| 9. CHECK HARNESS AND CONNECTOR (RADIO RECEIVER ASSEMBLY - STEREO COMPONENT AMPLIFIER ASSEMBLY) |
Disconnect the F56 radio receiver assembly connector.
Disconnect the F59 stereo component amplifier assembly connector.
Measure the resistance according to the value(s) in the table below.
- Standard Resistance:
Tester Connection
Condition
Specified Condition
F56-11 (MO+) - F59-4 (MI+)
Always
Below 1 Ω
F56-25 (MO-) - F59-10 (MI-)
Always
Below 1 Ω
F56-24 (SLDI) - F59-5 (SLDI)
Always
Below 1 Ω
F56-11 (MO+) - Body ground
Always
10 kΩ or higher
F56-25 (MO-) - Body ground
Always
10 kΩ or higher
F56-24 (SLDI) - Body ground
Always
10 kΩ or higher
|
|
||||
| OK | |
|
| 10. CHECK HARNESS AND CONNECTOR (STEREO COMPONENT AMPLIFIER ASSEMBLY - DISPLAY AND NAVIGATION MODULE DISPLAY) |
Disconnect the F59 stereo component amplifier assembly connector.
Disconnect the F65 display and navigation module display connector.
Measure the resistance according to the value(s) in the table below.
- Standard Resistance:
Tester Connection
Condition
Specified Condition
F59-6 (MO+) - F65-1 (MI+)
Always
Below 1 Ω
F59-12 (MO-) - F65-5 (MI-)
Always
Below 1 Ω
F59-11 (SLDO) - F65-2 (SLDI)
Always
Below 1 Ω
F59-6 (MO+) - Body ground
Always
10 kΩ or higher
F59-12 (MO-) - Body ground
Always
10 kΩ or higher
F59-11 (SLDO) - Body ground
Always
10 kΩ or higher
|
|
||||
| OK | |
|
| 11. CHECK DTC |
Clear the DTCs (Click here).
Recheck for DTCs and check if the same DTC is output again.
- OK:
- No DTCs are output.
|
|
||||
| OK | ||
|
||
| ||