Engine does not Start because No Initial Combustion
Circuit diagnosis · Vehicles built from Jan 2012
Versions by build date: Sep 2011 – Dec 2011 from Jan 2012
DESCRIPTION
- When the key is inserted into the ignition key cylinder, the antenna coil receives the key code. Then the amplifier amplifies the ID code and outputs it to the transponder key ECU assembly.
- If this symptom occurs, there may be a communication problem between the transponder key amplifier and the transponder key ECU assembly.
WIRING DIAGRAM
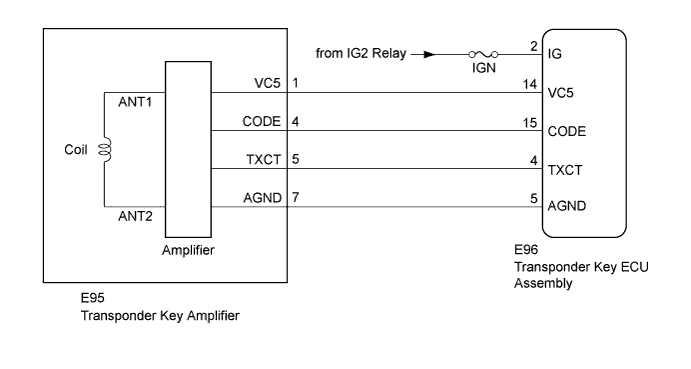

INSPECTION PROCEDURE
- NOTICE:
- When replacing the key and transponder key ECU assembly, refer to the Service Bulletin.
- Inspect the fuses for circuits related to this system before performing the following inspection procedure.
- When replacing the key and transponder key ECU assembly, refer to the Service Bulletin.
| 1. CLEAR DTC |

Clear the DTCs (Click here).
| NEXT | |
 |
| 2. CHECK FOR DTC |
Check for DTCs (Click here).
- HINT:
- Before checking for DTCs, perform the "DTC Output Confirmation Operation" procedure.
Result Result
Proceed to
No DTC output
A
DTC output
B
|
|
||||

| A | |
|
| 3. CONFIRM ENGINE MODELS |
Check the vehicle specifications.
Result Result
Proceed to
for 1GR-FE
A
for 1VD-FTV
B
|
|
||||

| A | |
|
| 4. READ VALUE USING INTELLIGENT TESTER (IMMOBILISER FUEL CUT) |
Turn the ignition switch off.
Connect the intelligent tester to the DLC3.
Turn the ignition switch to ON.
Turn the intelligent tester on.
Enter the following menus: Powertrain / Engine and ECT / Data List.
Engine and ECT Tester Display
Measurement Item/Range
Normal Condition
Stored as Freeze Frame Data
Immobiliser Fuel Cut
Status of immobiliser fuel cut/
ON or OFF
-
Yes
- OK:
- The item in the Data List indicates "OFF".
|
|
||||
| OK | ||
 |
||
| ||
| 5. READ VALUE USING INTELLIGENT TESTER (IMMOBILISER) |
Turn the ignition switch off.
Connect the intelligent tester to the DLC3.
Turn the ignition switch to ON.
Turn the intelligent tester on.
Enter the following menus: Body / Immobiliser / Data List.
Immobiliser Tester Display
Measurement Item/Range
Normal Condition
Diagnostic Note
Immobiliser
Engine immobiliser system status determined by transponder key ECU assembly /
Set or Unset
Set: Engine immobiliser set (engine start prohibited (no key in ignition key cylinder))
Unset: Engine immobiliser unset (engine start permitted (key inserted in ignition key cylinder))
When the engine immobiliser system does not change to the unset state, this item can be used to determine if the cause is the transponder key ECU assembly.
- OK:
- On the intelligent tester screen, the display changes between Set and Unset as shown in the table above.
|
|
||||
| OK | ||
|
||
| ||
| 6. READ VALUE USING INTELLIGENT TESTER (IMMOBILISER) |
Perform inspection using a different key that has been registered to the vehicle.
Turn the ignition switch off.
Connect the intelligent tester to the DLC3.
Turn the ignition switch to ON.
Turn the intelligent tester on.
Enter the following menus: Body / Immobiliser / Data List.
Immobiliser Tester Display
Measurement Item/Range
Normal Condition
Diagnostic Note
Immobiliser
Engine immobiliser system status determined by transponder key ECU assembly /
Set or Unset
Set: Engine immobiliser set (engine start prohibited (no key in ignition key cylinder))
Unset: Engine immobiliser unset (engine start permitted (key inserted in ignition key cylinder))
When the engine immobiliser system does not change to the unset state, this item can be used to determine if the cause is the transponder key ECU assembly.
- OK:
- On the intelligent tester screen, the display changes between Set and Unset as shown in the table above.
|
|
||||
| OK | |
|
| 7. CHECK WHETHER ENGINE STARTS WITH OTHER KEYS |
Perform inspection using a different key that has been registered to the vehicle.
Turn the ignition switch to ON, wait for 5 seconds, and then attempt to start the engine.
Result Result
Proceed to
Engine cannot be started
A
Engine can be started
B
|
|
||||
| A | ||
|
||
| ||
| 8. CHECK TRANSPONDER KEY AMPLIFIER (VC5 SIGNAL) |
Disconnect the E95 transponder key amplifier connector.
Using an oscilloscope, check the waveform.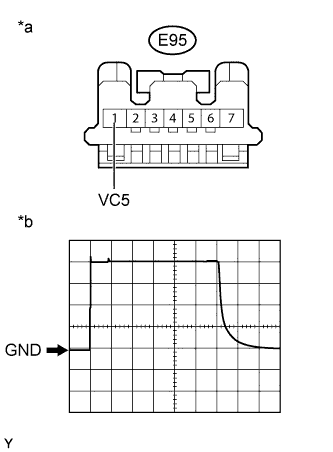
Waveform (Reference)
Measurement Condition Item
Content
Tester Connection
E95-1 (VC5) - Body ground
Tool Setting
1 V/DIV., 20 ms./DIV.
Condition
Key inserted in ignition key cylinder
- OK:
- Waveform is output normally (refer to illustration).
Text in Illustration *a
Front view of wire harness connector
(to Transponder Key Amplifier)
*b
Waveform
|
|
||||
| OK | ||
|
||
| ||
| 9. CHECK HARNESS AND CONNECTOR (TRANSPONDER KEY AMPLIFIER - TRANSPONDER KEY ECU ASSEMBLY, IG TERMINAL VOLTAGE) |
Disconnect the E95 transponder key amplifier connector.
Disconnect the E96 transponder key ECU assembly connector.
Measure the resistance according to the value(s) in the table below.
- Standard Resistance:
Tester Connection
Condition
Specified Condition
E95-1 (VC5) - E96-14 (VC5)
Always
Below 1 Ω
E95-7 (AGND) - E96-5 (AGND)
Always
Below 1 Ω
E95-1 (VC5) - Body ground
Always
10 kΩ or higher
Reconnect the transponder key amplifier connector.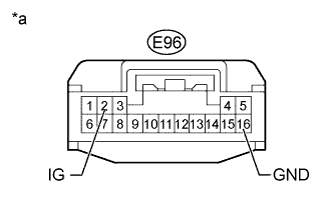
Measure the voltage according to the value(s) in the table below.
- Standard Voltage:
Tester Connection
Switch Condition
Specified Condition
E96-2 (IG) - E96-16 (GND)
Ignition switch ON
11 to 14 V
Text in Illustration *a
Front view of wire harness connector
(to Transponder Key ECU Assembly)
|
|
||||
| OK | |
|
| 10. CHECK TRANSPONDER KEY AMPLIFIER (TXCT SIGNAL) |
Disconnect the E95 transponder key amplifier connector.
Using an oscilloscope, check the waveform.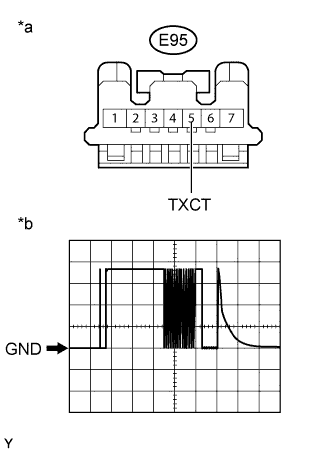
Waveform (Reference)
Measurement Condition Item
Content
Tester Connection
E95-5 (TXCT) - Body ground
Tool Setting
1 V/DIV., 20 ms./DIV.
Condition
Key inserted in ignition key cylinder
- OK:
- Waveform is output normally (refer to illustration).
Text in Illustration *a
Front view of wire harness connector
(to Transponder Key Amplifier)
*b
Waveform
|
|
||||
| OK | ||
|
||
| ||
| 11. CHECK HARNESS AND CONNECTOR (TRANSPONDER KEY AMPLIFIER - TRANSPONDER KEY ECU ASSEMBLY) |
Disconnect the E95 transponder key amplifier connector.
Disconnect the E96 transponder key ECU assembly connector.
Measure the resistance according to the value(s) in the table below.
- Standard Resistance:
Tester Connection
Condition
Specified Condition
E95-5 (TXCT) - E96-4 (TXCT)
Always
Below 1 Ω
E95-5 (TXCT) - Body ground
Always
10 kΩ or higher
|
|
||||
| OK | |
|
| 12. CHECK TRANSPONDER KEY AMPLIFIER (CODE SIGNAL) |
Disconnect the E95 transponder key amplifier connector.
Using an oscilloscope, check the waveform.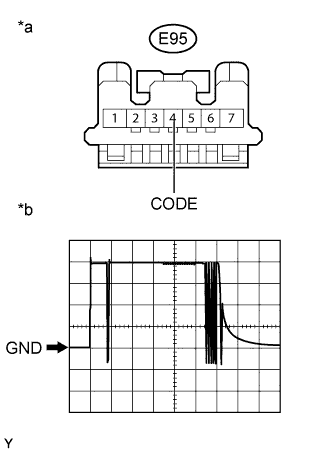
Waveform (Reference)
Measurement Condition Item
Content
Tester Connection
E95-4 (CODE) - Body ground
Tool Setting
1 V/DIV., 20 ms./DIV.
Condition
Key inserted in ignition key cylinder
- OK:
- Waveform is output normally (refer to illustration).
Text in Illustration *a
Front view of wire harness connector
(to Transponder Key Amplifier)
*b
Waveform
|
|
||||
| OK | ||
|
||
| ||
| 13. CHECK HARNESS AND CONNECTOR (TRANSPONDER KEY AMPLIFIER - TRANSPONDER KEY ECU ASSEMBLY) |
Disconnect the E95 transponder key amplifier connector.
Disconnect the E96 transponder key ECU assembly connector.
Measure the resistance according to the value(s) in the table below.
- Standard Resistance:
Tester Connection
Condition
Specified Condition
E95-4 (CODE) - E96-15 (CODE)
Always
Below 1 Ω
E95-4 (CODE) - Body ground
Always
10 kΩ or higher
Reconnect the transponder key ECU assembly connector.
Reconnect the transponder key amplifier connector.
Using an oscilloscope, check the waveform.
Waveform (Reference)
Measurement Condition Item
Content
Tester Connection
E95-4 (CODE) - Body ground
Tool Setting
1 V/DIV., 20 ms./DIV.
Condition
Key inserted in ignition key cylinder
- OK:
- Waveform is output normally (refer to illustration).
Text in Illustration *a
Front view of wire harness connector
(to Transponder Key Amplifier)
*b
Waveform
Result Result
Proceed to
Terminal CODE stuck high (5 V)
A
Terminal CODE stuck low (1 V or less)
B
Problem in wire harness or connector
C
|
|
||||
|
|
||||
| A | |
|
| 14. REPLACE TRANSPONDER KEY AMPLIFIER |
Replace the transponder key amplifier (Click here).
| NEXT | |
|
| 15. CHECK WHETHER ENGINE STARTS |
Check that the engine starts with an already registered vehicle key.
- OK:
- Engine starts normally.
|
|
||||
| OK | ||
|
||
| ||
| 16. REPLACE TRANSPONDER KEY ECU ASSEMBLY |
Replace the transponder key ECU assembly.
| NEXT | |
|
| 17. REGISTER KEY |
Reregister the key (refer to the Service Bulletin).
| NEXT | |
|
| 18. REGISTER ECU COMMUNICATION ID |
Register the ECU communication ID (refer to the Service Bulletin).
| NEXT | |
|
| 19. CHECK WHETHER ENGINE STARTS |
Check that the engine starts with an already registered vehicle key.
- OK:
- Engine starts normally.
|
|
||||
| OK | ||
|
||
| ||
| 20. REPLACE KEY |
Replace the transponder key master transmitter with a new one (refer to the Service Bulletin).
| NEXT | |
|
| 21. REREGISTER KEY |
Reregister the key (refer to the Service Bulletin).
| NEXT | |
|
| 22. CHECK WHETHER ENGINE STARTS |
Check that the engine starts with an already registered vehicle key.
- OK:
- Engine starts normally.
Result Result
Proceed to
OK
A
NG (for 1GR-FE)
B
NG (for 1VD-FTV)
C
|
|
||||
|
|
||||
| A | ||
|
||
| ||