1UR-FE FUEL FUEL SENDER GAUGE ASSEMBLY(for Fuel Sub Tank) INSTALLATION
PROCEDURE

 83320
1.INSTALL FUEL SENDER GAUGE ASSEMBLY
Install a new gasket to the fuel sender gauge assembly.
Install the fuel sender gauge assembly with the 5 screws.
- Torque:
- 1.5 N*m (15 kgf*cm, 13 in.*lbf)
- NOTICE:
-
Be careful not to bend the arm of the fuel sender gauge assembly.
Connect the fuel sender gauge connector.
58325E
2.INSTALL REAR FLOOR SERVICE HOLE COVER
Install the rear floor service hole cover with new butyl tape.
87212L
3.INSTALL REAR NO. 7 AIR DUCT (w/ Rear Air Conditioning System)
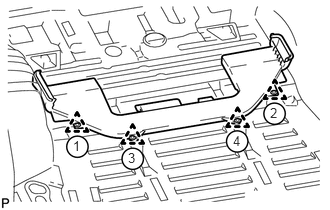
Attach the 4 clips to install the rear No. 7 air duct.
- HINT:
-
Attach the clips in the order shown in the illustration.
58570C
4.INSTALL REAR FLOOR MAT ASSEMBLY
Attach the 5 clips to install the floor mat assembly.
62520P
5.REMOVE FRONT QUARTER TRIM PANEL ASSEMBLY LH
w/ Sliding Roof (See page Vehicle Interior>INTERIOR PANELS / TRIM>ROOF HEADLINING (w/ Sliding Roof)>INSTALLATION)
w/o Sliding Roof (See page Vehicle Interior>INTERIOR PANELS / TRIM>ROOF HEADLINING (w/o Sliding Roof)>INSTALLATION)
62510P
6.REMOVE FRONT QUARTER TRIM PANEL ASSEMBLY RH
w/ Sliding Roof (See page Vehicle Interior>INTERIOR PANELS / TRIM>ROOF HEADLINING (w/ Sliding Roof)>INSTALLATION)
w/o Sliding Roof (See page Vehicle Interior>INTERIOR PANELS / TRIM>ROOF HEADLINING (w/o Sliding Roof)>INSTALLATION)
7.REMOVE REAR NO. 2 SEAT ASSEMBLY
for Face to Face Seat Type (See page Vehicle Interior>SEAT>REAR NO. 2 SEAT ASSEMBLY(for Face to Face Seat Type)>INSTALLATION)
except Face to Face Seat Type (See page Vehicle Interior>SEAT>REAR NO. 2 SEAT ASSEMBLY(except Face to Face Seat Type)>INSTALLATION)
71300S
8.REMOVE REAR NO. 1 SEAT ASSEMBLY RH (for 60/40 Split Seat Type 40 Side)
71400S
9.REMOVE REAR NO. 1 SEAT ASSEMBLY LH (for 60/40 Split Seat Type 60 Side)
10.CONNECT CABLE TO NEGATIVE BATTERY TERMINAL
- NOTICE:
-
When disconnecting the cable, some systems need to be initialized after the cable is reconnected (See page General>INTRODUCTION>REPAIR INSTRUCTION>INITIALIZATION).