3UR-FE COOLING WATER PUMP INSTALLATION
PROCEDURE

 16100
1.INSTALL WATER PUMP ASSEMBLY
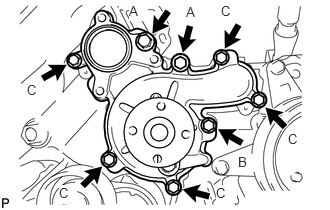
Install a new gasket and the water pump with the 8 bolts shown in the illustration.
- Torque:
- for bolt A : 47 N*m (479 kgf*cm, 35 ft.*lbf)
- for bolt B : 23 N*m (235 kgf*cm, 17 ft.*lbf)
- for bolt C : 20 N*m (204 kgf*cm, 15 ft.*lbf)
- Standard Bolt:
Item Length Thread Diameter Bolt A 80 mm (3.15 in.) 10 mm (0.394 in.) Bolt B 70 mm (2.76 in.) 8 mm (0.315 in.) Bolt C 25 mm (0.984 in.) 8 mm (0.315 in.)
16173
2.INSTALL WATER PUMP PULLEY
Temporarily install the water pump pulley with the 4 bolts.
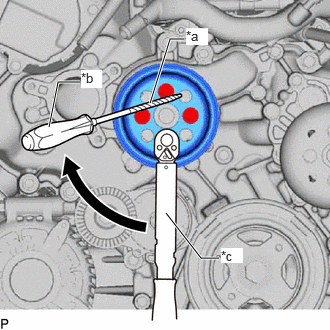
| *a | Protective Tape |
| *b | Hold |
| *c | Turn |
Using a screwdriver or equivalent with its tip wrapped in protective tape, hold the water pump pulley and tighten the 4 bolts.
- Torque:
- 21 N*m (214 kgf*cm, 15 ft.*lbf)
16323
3.INSTALL WATER INLET HOUSING
Install a new gasket to the water pump.
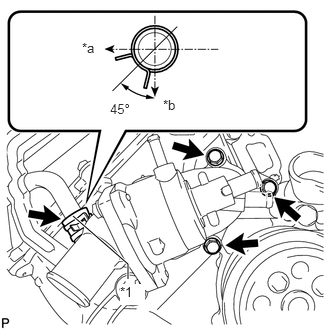
Install the water inlet housing with the 3 bolts and connect the No. 3 water by-pass hose.
- Torque:
- 21 N*m (214 kgf*cm, 15 ft.*lbf)
| *1 | No. 3 Water By-pass Hose |
| *a | RH Side |
| *b | Front |
- HINT:
-
Install the hose so that the direction of the hose clamp is as indicated in the illustration.
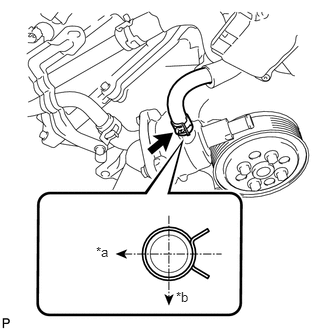
Connect the No. 5 water by-pass hose.
| *a | RH Side |
| *b | Front |
- HINT:
-
Install the hose so that the direction of the hose clamp is as indicated in the illustration.
16207
4.CONNECT NO. 2 WATER BY-PASS PIPE SUB-ASSEMBLY
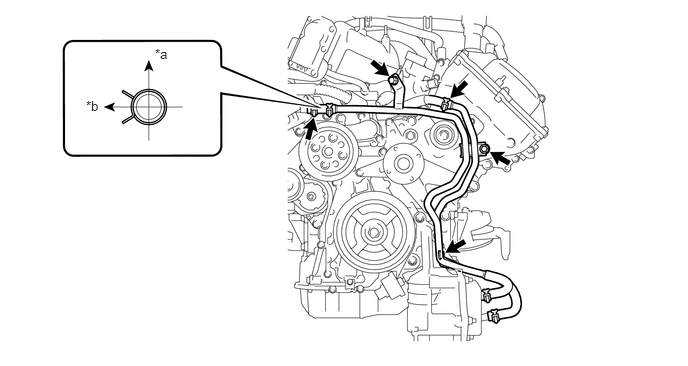
Connect the water by-pass pipe with water hose.
| *a | Upper |
| *b | Front |
- HINT:
-
Install the hose so that the direction of the hose clamp is as indicated in the illustration.
Install the 3 bolts.
- Torque:
- 10 N*m (102 kgf*cm, 7 ft.*lbf)
Connect the No. 6 water by-pass hose.
16261G
5.INSTALL NO. 1 WATER BY-PASS HOSE
16711
6.INSTALL FAN SHROUD
16571C
7.INSTALL NO. 1 RADIATOR HOSE
16572D
8.INSTALL NO. 2 RADIATOR HOSE
17700
9.INSTALL AIR CLEANER ASSEMBLY
17880
10.INSTALL AIR CLEANER HOSE ASSEMBLY
11.ADD ENGINE COOLANT
12.INSPECT FOR COOLANT LEAK
11209
13.INSTALL V-BANK COVER SUB-ASSEMBLY
51405A
14.INSTALL NO. 1 ENGINE UNDER COVER SUB-ASSEMBLY
53806
15.INSTALL FRONT FENDER SPLASH SHIELD SUB-ASSEMBLY LH
53805
16.INSTALL FRONT FENDER SPLASH SHIELD SUB-ASSEMBLY RH