THEFT DETERRENT / KEYLESS ENTRY THEFT DETERRENT SYSTEM(w/ Entry and Start System) Security Horn Circuit
DESCRIPTION
When the theft deterrent system is switched from the armed state to the alarm sounding state, the main body ECU (multiplex network body ECU) transmits a signal to cause the security horn to sound at intervals of 0.4 seconds.
WIRING DIAGRAM
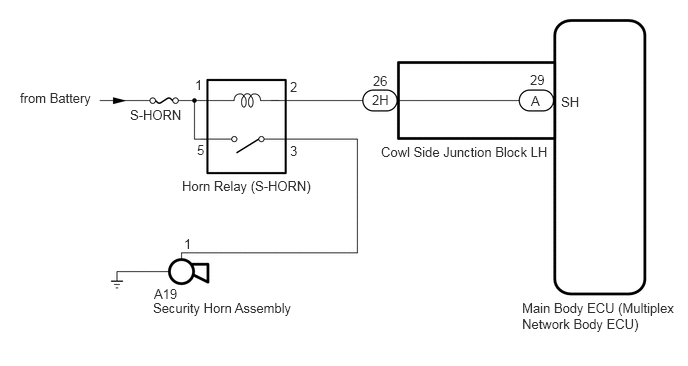
CAUTION / NOTICE / HINT
- NOTICE:
- ·
If the main body ECU (multiplex network body ECU) is replaced, refer to the Service Bulletin.
·Inspect the fuses for circuits related to this system before performing the following inspection procedure.
·w/ Door Control Battery:
As the door control battery is installed between the vehicle battery and main body ECU (multiplex network body ECU), first perform the inspections in On-Vehicle Inspection to confirm that there are no malfunctions in the power source circuit for the main body ECU (multiplex network body ECU) before performing this troubleshooting procedure (See page Vehicle Interior>DOOR LOCK>POWER DOOR LOCK CONTROL SYSTEM>PRECAUTION).
PROCEDURE
Connect the GTS to the DLC3.
Turn the engine switch on (IG).
Turn the GTS on.
Enter the following menus: Body Electrical / Main Body / Active Test.
According to the display on the GTS, perform the Active Test.
| Tester Display | Test Part | Control Range | Diagnostic Note |
|---|---|---|---|
| Security Horn | Security horn | OFF/ON | - |
- OK:
The security horn assembly sounds and stops correctly when operated through the GTS.
Result Result Proceed to OK (for LHD) A OK (for RHD) B NG C
A
B
C
Remove the security horn assembly (See page Vehicle Interior>THEFT DETERRENT / KEYLESS ENTRY>SECURITY HORN ASSEMBLY>REMOVAL).
Inspect the security horn assembly (See page Vehicle Interior>THEFT DETERRENT / KEYLESS ENTRY>SECURITY HORN ASSEMBLY>INSPECTION).
OK
NG
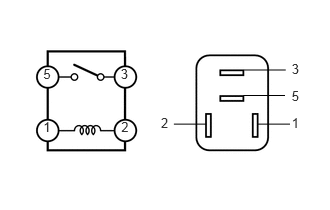
Remove the horn relay (S-HORN).
Measure the resistance according to the value(s) in the table below.
- Standard Resistance:
Tester Connection Condition Specified Condition 3-5 When battery voltage is applied between terminals 2-1 Below 1 Ω 3-5 When battery voltage is not applied between terminals 2-1 10 kΩ or higher
OK
NG
Remove the main body ECU (multiplex network body ECU) from the cowl side junction block LH.
Connect the cowl side junction block LH connectors.
Remove the horn relay (S-HORN).
Measure the resistance according to the value(s) in the table below.
- Standard Resistance:
Tester Connection Condition Specified Condition 2 - A-29 (SH) Always Below 1 Ω 2 - Body ground Always 10 kΩ or higher A-29 (SH) - Body ground Always 10 kΩ or higher
OK
NG
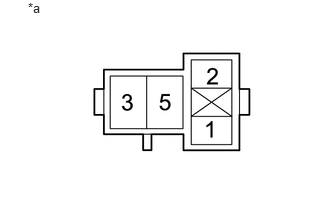
Remove the horn relay (S-HORN).
Measure the voltage according to the value(s) in the table below.
- Standard Voltage:
Tester Connection Condition Specified Condition 1 - Body ground Always 11 to 14 V 5 - Body ground Always 11 to 14 V
| *a | Front view of wire harness connector
(to Horn Relay [S-HORN]) |
OK
NG
Remove the horn relay (S-HORN).
Disconnect the A19 security horn assembly connector.
Measure the resistance according to the value(s) in the table below.
- Standard Resistance:
Tester Connection Condition Specified Condition 3 - A19-1 Always Below 1 Ω 3 - Body ground Always 10 kΩ or higher A19-1 - Body ground Always 10 kΩ or higher
| Result | Proceed to |
|---|---|
| OK (for LHD) | A |
| OK (for RHD) | B |
| NG | C |
A
B
C
Disconnect the 2H cowl side junction block LH connector.
Remove the horn relay (S-HORN).
Measure the resistance according to the value(s) in the table below.
- Standard Resistance:
Tester Connection Condition Specified Condition 2 - 2H-26 Always Below 1 Ω 2 - Body ground Always 10 kΩ or higher 2H-26 - Body ground Always 10 kΩ or higher
| Result | Proceed to |
|---|---|
| OK (for LHD) | A |
| OK (for RHD) | B |
| NG | C |
A
B
C