HEATING / AIR CONDITIONING AIR CONDITIONING SYSTEM(for Automatic Air Conditioning System) Heater Control Switch Circuit
DESCRIPTION
The temperature control switch assembly LH and RH sends the temperature up and down signal to the air conditioning amplifier assembly through the multi-display assembly*1 or the air conditioning control assembly*2.
*1: w/ Navigation System
*2: w/o Navigation System
WIRING DIAGRAM
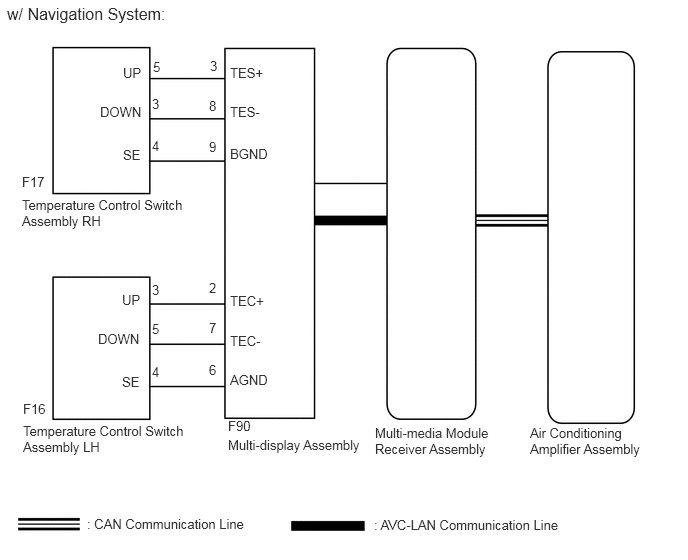
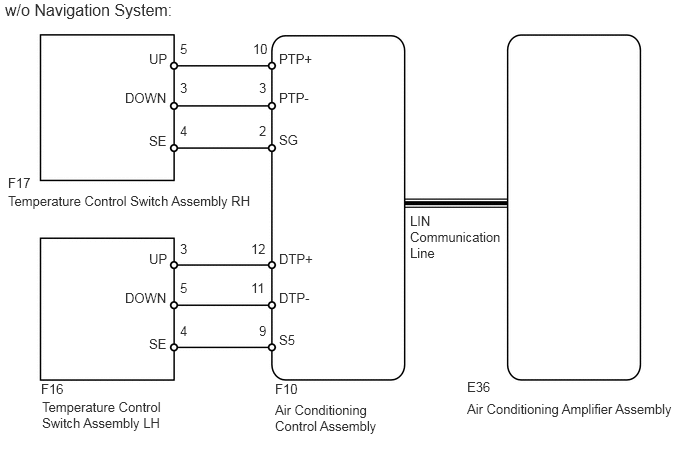
PROCEDURE
Check if the vehicle is equipped with the navigation system.
| Result | Proceed to |
|---|---|
| w/ Navigation System | A |
| w/o Navigation System | B |
A
B
Check the CAN communication system.
- OK:
CAN communication system has no problem.
| Result | Proceed to |
|---|---|
| OK | A |
| NG (for LHD) | B |
| NG (for RHD) | C |
A
B
C
Check that the temperature control switches operate.
| Result | Proceed to |
|---|---|
| Temperature control switch LH does not operate | A |
| Temperature control switch RH does not operate | B |
| Temperature control switch LH and RH do not operate | C |
A
B
C
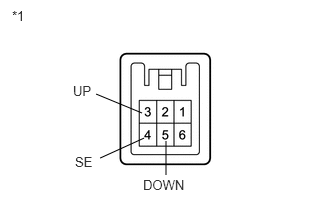
Remove the temperature control switch assembly LH (See page Vehicle Interior>HEATING / AIR CONDITIONING>AIR CONDITIONING PANEL(w/ Multi-display)>REMOVAL).
Measure the resistance according to the value(s) in the table below.
- Standard Resistance:
Tester Connection Switch Condition Specified Condition 3 (UP) - 4 (SE) UP switch pressed Below 1 Ω UP switch not pressed 10 kΩ or higher 5 (DOWN) - 4 (SE) DOWN switch pressed Below 1 Ω DOWN switch not pressed 10 kΩ or higher
| *1 | Component without harness connected
(Temperature Control Switch Assembly LH) |
OK
NG
(See pageVehicle Interior>HEATING / AIR CONDITIONING>AIR CONDITIONING PANEL(w/ Multi-display)>REMOVAL)
Disconnect the F16 temperature control switch assembly LH connector.
Disconnect the F90 multi-display assembly connector.
Measure the resistance according to the value(s) in the table below.
- Standard Resistance:
Tester Connection Condition Specified Condition F16-3 (UP) - F90-2 (TEC+) Always Below 1 Ω F16-5 (DOWN) - F90-7 (TEC-) Always Below 1 Ω F16-4 (SE) - F90-6 (AGND) Always Below 1 Ω F16-3 (UP) - Body ground Always 10 kΩ or higher F16-5 (DOWN) - Body ground Always 10 kΩ or higher F16-4 (SE) - Body ground Always 10 kΩ or higher
OK
(See pageVehicle Interior>HEATING / AIR CONDITIONING>AIR CONDITIONING PANEL(w/ Multi-display)>REMOVAL)
NG
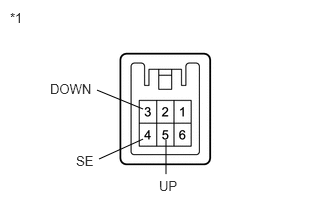
Remove the temperature control switch assembly RH (See page Vehicle Interior>HEATING / AIR CONDITIONING>AIR CONDITIONING PANEL(w/ Multi-display)>REMOVAL).
Measure the resistance according to the value(s) in the table below.
- Standard Resistance:
Tester Connection Switch Condition Specified Condition 5 (UP) - 4 (SE) UP switch pressed Below 1 Ω UP switch not pressed 10 kΩ or higher 3 (DOWN) - 4 (SE) DOWN switch pressed Below 1 Ω DOWN switch not pressed 10 kΩ or higher
| *1 | Component without harness connected
(Temperature Control Switch Assembly RH) |
OK
NG
(See pageVehicle Interior>HEATING / AIR CONDITIONING>AIR CONDITIONING PANEL(w/ Multi-display)>REMOVAL)
Disconnect the F17 temperature control switch assembly RH connector.
Disconnect the F90 multi-display assembly connector.
Measure the resistance according to the value(s) in the table below.
- Standard Resistance:
Tester Connection Condition Specified Condition F17-5 (UP) - F90-3 (TES+) Always Below 1 Ω F17-3 (DOWN) - F90-8 (TES-) Always Below 1 Ω F17-4 (SE) - F90-9 (BGND) Always Below 1 Ω F17-5 (UP) - Body ground Always 10 kΩ or higher F17-3 (DOWN) - Body ground Always 10 kΩ or higher F17-4 (SE) - Body ground Always 10 kΩ or higher
OK
(See pageVehicle Interior>HEATING / AIR CONDITIONING>AIR CONDITIONING PANEL(w/ Multi-display)>REMOVAL)
NG
Replace the multi-display assembly with a new or normally functioning one (See page Audio / Visual / Telematics>NAVIGATION / MULTI INFO DISPLAY>MULTI-DISPLAY (w/ Navigation System)>REMOVAL).
Check that the temperature control with temperature control switch LH and RH.
- OK:
Temperature control with temperature control switch LH and RH.
OK
NG
Check the LIN communication system.
- OK:
LIN communication system has no problem.
OK
NG
(See pagePower Source / Network>NETWORKING>LIN COMMUNICATION SYSTEM>HOW TO PROCEED WITH TROUBLESHOOTING)
Check that the temperature control switches operate.
| Result | Proceed to |
|---|---|
| Temperature control switch LH does not operate | A |
| Temperature control switch RH does not operate | B |
| Temperature control switch LH and RH do not operate | C |
A
B
C
Remove the temperature control switch assembly LH (See page Vehicle Interior>HEATING / AIR CONDITIONING>AIR CONDITIONING PANEL(w/o Multi-display)>COMPONENTS).
Measure the resistance according to the value(s) in the table below.
- Standard Resistance:
Tester Connection Switch Condition Specified Condition 3 (UP) - 4 (SE) UP switch pressed Below 1 Ω UP switch not pressed 10 kΩ or higher 5 (DOWN) - 4 (SE) DOWN switch pressed Below 1 Ω DOWN switch not pressed 10 kΩ or higher
| *1 | Component without harness connected
(Temperature Control Switch Assembly LH) |
OK
NG
(See pageVehicle Interior>HEATING / AIR CONDITIONING>AIR CONDITIONING PANEL(w/ Multi-display)>REMOVAL)
Disconnect the F16 temperature control switch assembly LH connector.
Disconnect the F10 air conditioning control assembly connector.
Measure the resistance according to the value(s) in the table below.
- Standard Resistance:
Tester Connection Condition Specified Condition F16-3 (UP) - F10-12 (DTP+) Always Below 1 Ω F16-5 (DOWN) - F10-11 (DTP-) Always Below 1 Ω F16-4 (SE) - F10-9 (S5) Always Below 1 Ω F16-3 (UP) - Body ground Always 10 kΩ or higher F16-5 (DOWN) - Body ground Always 10 kΩ or higher F16-4 (SE) - Body ground Always 10 kΩ or higher
OK
(See pageVehicle Interior>HEATING / AIR CONDITIONING>AIR CONDITIONING PANEL(w/o Multi-display)>REMOVAL)
NG
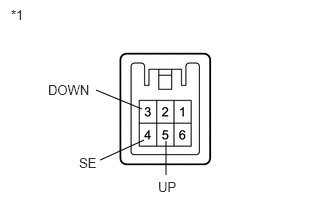
Remove the temperature control switch assembly RH (See page Vehicle Interior>HEATING / AIR CONDITIONING>AIR CONDITIONING PANEL(w/o Multi-display)>COMPONENTS).
Measure the resistance according to the value(s) in the table below.
- Standard Resistance:
Tester Connection Switch Condition Specified Condition 5 (UP) - 4 (SE) UP switch pressed Below 1 Ω UP switch not pressed 10 kΩ or higher 3 (DOWN) - 4 (SE) DOWN switch pressed Below 1 Ω DOWN switch not pressed 10 kΩ or higher
| *1 | Component without harness connected
(Temperature Control Switch Assembly RH) |
OK
NG
(See pageVehicle Interior>HEATING / AIR CONDITIONING>AIR CONDITIONING PANEL(w/ Multi-display)>REMOVAL)
Disconnect the F17 temperature control switch assembly RH connector.
Disconnect the F10 air conditioning control assembly connector.
Measure the resistance according to the value(s) in the table below.
- Standard Resistance:
Tester Connection Condition Specified Condition F17-5 (UP) - F10-10 (PTP+) Always Below 1 Ω F17-3 (DOWN) - F10-3 (PTP-) Always Below 1 Ω F17-4 (SE) - F10-2 (SG) Always Below 1 Ω F17-5 (UP) - Body ground Always 10 kΩ or higher F17-3 (DOWN) - Body ground Always 10 kΩ or higher F17-4 (SE) - Body ground Always 10 kΩ or higher
OK
(See pageVehicle Interior>HEATING / AIR CONDITIONING>AIR CONDITIONING PANEL(w/o Multi-display)>REMOVAL)
NG
Replace the air conditioning control assembly with a new or normally functioning one (See page Vehicle Interior>HEATING / AIR CONDITIONING>AIR CONDITIONING PANEL(w/o Multi-display)>REMOVAL).
Check that the temperature control with temperature control switch LH and RH.
- OK:
Temperature control with temperature control switch LH and RH.
OK
NG