Home › Vehicle Exterior › LIGHTING (EXT) › LIGHTING SYSTEM › from 2015.08
RM2660E _59 Vehicle Exterior _052855 LIGHTING (EXT) _0255811 LIGHTING SYSTEM J

LIGHTING (EXT)  LIGHTING SYSTEM  DRL Relay Circuit  


DESCRIPTION

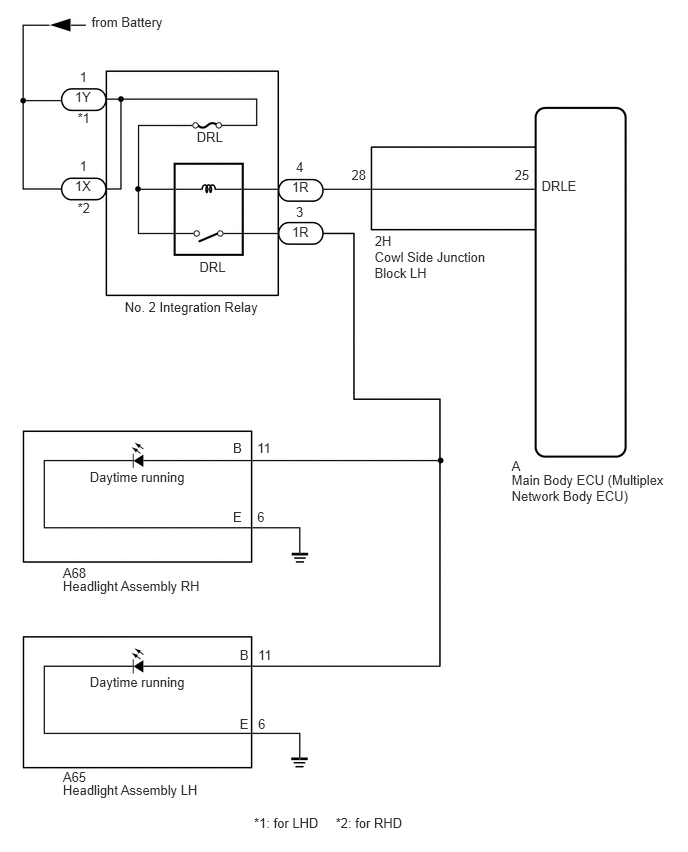
The LED daylight system illuminates the lights when the light control switch position signal, engine speed signal and surrounding brightness signal are input to the main body ECU (multiplex network body ECU) and the LED daylight system operation conditions are met.

WIRING DIAGRAM
E339960E02
1.299,3.118 2.848,3.344 1.549,0.226 10 No. 2 Integration Relay 0.655,5.883 2.203,6.109 1.549,0.226 10 A68 2.427,5.302 2.642,5.528 0.215,0.226 10 E 2.427,4.58 2.642,4.806 0.215,0.226 10 B 2.679,5.302 2.894,5.528 0.215,0.226 10 6 2.679,4.58 2.894,4.806 0.215,0.226 10 11 2.688,7.459 2.903,7.685 0.215,0.226 10 6 2.688,6.738 2.903,6.964 0.215,0.226 10 11 3.496,8.491 4.237,8.654 0.742,0.162 10 *2: for RHD 2.497,7.459 2.712,7.685 0.215,0.226 10 E 2.497,6.738 2.712,6.964 0.215,0.226 10 B 0.935,4.888 2.053,5.114 1.118,0.226 10 Daytime running 0.935,7.018 2.053,7.244 1.118,0.226 10 Daytime running 0.655,6.018 2.203,6.244 1.549,0.226 10 Headlight Assembly RH 0.655,8.006 1.196,8.157 0.542,0.151 10 A65 0.655,8.141 2.203,8.367 1.549,0.226 10 Headlight Assembly LH 0.954,0.141 2.503,0.367 1.549,0.226 10 from Battery 0.78,0.926 1.146,1.117 0.367,0.191 10 1Y 2.049,1.346 2.818,1.537 0.769,0.191 10 DRL 2.077,2.698 2.846,2.889 0.769,0.191 10 DRL 0.83,0.723 1.197,0.914 0.367,0.191 10 1 0.808,1.143 1.175,1.334 0.367,0.191 10 *1 0.78,1.858 1.146,2.049 0.367,0.191 10 1X 0.83,1.641 1.197,1.831 0.367,0.191 10 1 0.808,2.081 1.175,2.272 0.367,0.191 10 *2 3.041,1.86 3.408,2.051 0.367,0.191 10 1R 3.083,1.657 3.450,1.848 0.367,0.191 10 4 3.661,1.744 4.028,1.935 0.367,0.191 10 28 5.361,1.744 5.728,1.935 0.367,0.191 10 25 5.641,1.856 6.369,2.047 0.728,0.191 10 DRLE 3.904,2.424 4.632,2.615 0.728,0.191 10 2H 5.329,4.771 6.056,4.962 0.728,0.191 10 A 5.329,4.918 7.022,5.249 1.693,0.331 10 Main Body ECU (Multiplex Network Body ECU) 3.901,2.589 5.149,2.983 1.249,0.395 10 Cowl Side Junction Block LH 3.041,2.329 3.408,2.520 0.367,0.191 10 1R 3.083,2.126 3.450,2.317 0.367,0.191 10 3 2.646,8.491 3.387,8.661 0.742,0.169 10 *1: for LHD

CAUTION / NOTICE / HINT

NOTICE:
·

Inspect the fuses for circuits related to this system before performing the following inspection procedure.

·

Recognition code registration is necessary when replacing the main body ECU (multiplex network body ECU).

·

If the main body ECU (multiplex network body ECU) is replaced, refer to the Service Bulletin.


PROCEDURE

1.PERFORM ACTIVE TEST USING GTS (DAYTIME RUNNING LIGHT)
a.

Using the GTS, perform the Active Test (See page Vehicle Exterior>LIGHTING (EXT)>LIGHTING SYSTEM>DATA LIST / ACTIVE TEST).

Main Body
Tester Display Test Part Control Range Diagnostic Note
Daytime Running Light DRL light illumination operation ON or OFF Only when "Daytime Running Light" in the GTS customization settings is set to "ON".

OK:

Daytime running lights come on.


OK

PROCEED TO NEXT SUSPECTED AREA SHOWN IN PROBLEM SYMPTOMS TABLE

NG

2.CHECK HARNESS AND CONNECTOR (NO. 2 INTEGRATION RELAY - BATTERY)
a.
U163775E02
0.104,0 0.375,0.219 0.271,0.219 10 false *a 0.49,1.677 0.76,1.896 0.271,0.219 10 false 1Y 0.49,2.083 0.76,2.302 0.271,0.219 10 false 1X 0.938,1.667 1.208,1.896 0.271,0.229 12 false *A 0.948,2.083 1.219,2.313 0.271,0.229 12 false *B

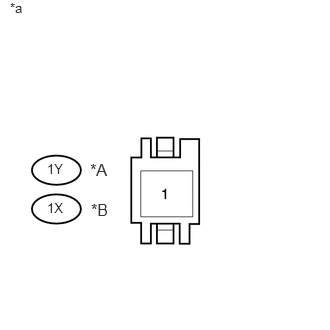
Disconnect the No. 2 integration relay connectors.


b.

Measure the voltage according to the value(s) in the table below.

Standard Voltage:
for LHD
Tester Connection Condition Specified Condition
1Y-1 - Body ground Always 11 to 14 V

for RHD
Tester Connection Condition Specified Condition
1X-1 - Body ground Always 11 to 14 V


Text in Illustration
*A for LHD
*B for RHD
*a Front view of wire harness connector
(to No. 2 Integration Relay)


OK

3.CHECK HARNESS AND CONNECTOR (NO. 2 INTEGRATION RELAY - COWL SIDE JUNCTION BLOCK LH)

NG

REPAIR OR REPLACE HARNESS OR CONNECTOR

3.CHECK HARNESS AND CONNECTOR (NO. 2 INTEGRATION RELAY - COWL SIDE JUNCTION BLOCK LH)
a.

Disconnect the 1R No. 2 integration relay connector.


b.

Disconnect the 2H cowl side junction block LH connector.


c.

Measure the resistance according to the value(s) in the table below.

Standard Resistance:
Tester Connection Condition Specified Condition
1R-4 - 2H-28 Always Below 1 Ω
1R-4 - Body ground Always 10 kΩ or higher


OK

4.INSPECT COWL SIDE JUNCTION BLOCK LH

NG

REPAIR OR REPLACE HARNESS OR CONNECTOR

4.INSPECT COWL SIDE JUNCTION BLOCK LH
U166283E02
2.406,2.813 2.552,3.198 2.552,3.198 2.365,3.198 false 1.75,2.323 2.031,2.51 0.281,0.188 10 false A 0.49,0.781 0.771,0.969 0.281,0.188 10 false 2H 1.958,3.125 2.396,3.313 0.438,0.188 10 false DRLE

a.

for LHD:

1.

Remove the cowl side junction block LH (See page Power Source / Network>POWER DISTRIBUTION>MAIN BODY ECU (for LHD)>REMOVAL).

2.

Remove the main body ECU from the cowl side junction block LH (See page Power Source / Network>POWER DISTRIBUTION>MAIN BODY ECU (for LHD)>REMOVAL).


b.

for RHD:

1.

Remove the cowl side junction block LH (See page Power Source / Network>POWER DISTRIBUTION>MAIN BODY ECU (for RHD)>REMOVAL ).

2.

Remove the main body ECU from the cowl side junction block LH (See page Power Source / Network>POWER DISTRIBUTION>MAIN BODY ECU (for RHD)>REMOVAL).


c.

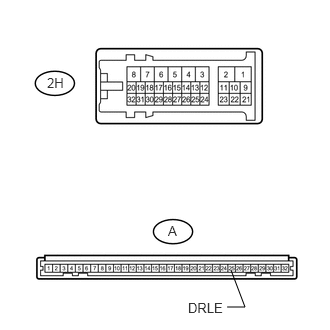
Measure the resistance according to the value(s) in the table below.

Standard Resistance:
Tester Connection Condition Specified Condition
A-25 (DRLE) - 2H-28 Always Below 1 Ω


Result
Result Proceed to
OK A
NG (for LHD) B
NG (for RHD) C


A

5.INSPECT NO.2 INTEGRATION RELAY (DRL RELAY)

B

C

5.INSPECT NO.2 INTEGRATION RELAY (DRL RELAY)
a.

Inspect the No. 2 integration relay (See page Vehicle Exterior>LIGHTING (EXT)>RELAY>ON-VEHICLE INSPECTION).


OK

6.CHECK HARNESS AND CONNECTOR (NO. 2 INTEGRATION RELAY - HEADLIGHT ASSEMBLY)

NG

REPLACE NO.2 INTEGRATION RELAY

6.CHECK HARNESS AND CONNECTOR (NO. 2 INTEGRATION RELAY - HEADLIGHT ASSEMBLY)
a.

Disconnect the 1R No. 2 integration relay connector.


b.

Disconnect the A68 headlight assembly LH connector.


c.

Disconnect the A65 headlight assembly RH connector.


d.

Measure the resistance according to the value(s) in the table below.

Standard Resistance:
Tester Connection Condition Specified Condition
1R-3 - A65-11(B) Always Below 1 Ω
1R-3 - A68-11(B) Always Below 1 Ω
1R-3 - Body ground Always 10 kΩ or higher


Result
Result Proceed to
OK (for LHD) A
NG B
OK (for RHD) C


A

REPLACE MAIN BODY ECU (MULTIPLEX NETWORK BODY ECU)

B

REPAIR OR REPLACE HARNESS OR CONNECTOR

C

REPLACE MAIN BODY ECU (MULTIPLEX NETWORK BODY ECU)