3UR-FE EMISSION CONTROL AIR PUMP(w/ Secondary Air Injection System) INSTALLATION
PROCEDURE

 17610C
1.INSTALL AIR PUMP ASSEMBLY
Connect the 6 air pump insulators to the 2 air pump assemblies and install the 2 air pump assemblies to the air pump bracket.
Attach the 2 wire harness clamps to the bracket.
17341
2.INSTALL NO. 1 AIR INJECTION SYSTEM HOSE
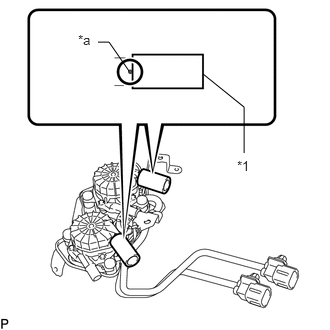
Install the 2 No. 1 air injection system hoses to the air pump assembly.
| *1 | No. 1 Air Injection System Hose |
| *a | Stopper |
- HINT:
-
Insert the hoses until the hose ends contact the stoppers as shown in the illustration.
17621A
3.INSTALL AIR PUMP INLET
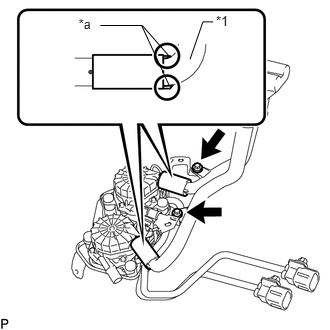
Connect the air pump inlet to the 2 No. 1 air injection system hoses.
| *1 | Air Pump Inlet |
| *a | Stopper |
- HINT:
-
Insert the inlet until the inlet stoppers contact the No.1 air injection system hoses as shown in the illustration.
Install the air pump inlet with the 2 bolts.
- Torque:
- 8.0 N*m (82 kgf*cm, 71 in.*lbf)
4.INSTALL AIR PUMP ASSEMBLY WITH BRACKET
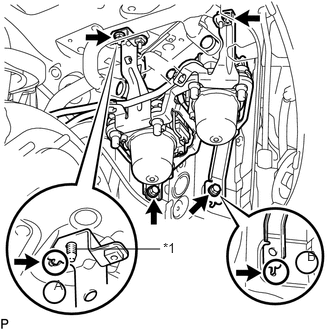
Install the air pump assembly with bracket to the vehicle.
| *1 | Stud Bolt |
Insert the bracket tab into the slot and insert the stud bolt into the bracket hole as shown in illustration A. Then slide the bracket.
Insert the bracket tab into the slot shown in illustration B.
Install the 2 bolts and 2 nuts.
- Torque:
- 18 N*m (184 kgf*cm, 13 ft.*lbf)
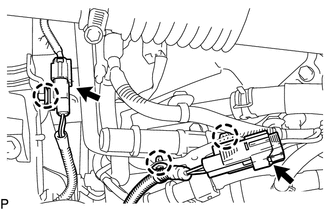
Connect the 2 air pump assembly connectors and attach the 3 wire harness clamps.
17343
5.INSTALL NO. 3 AIR INJECTION SYSTEM HOSE
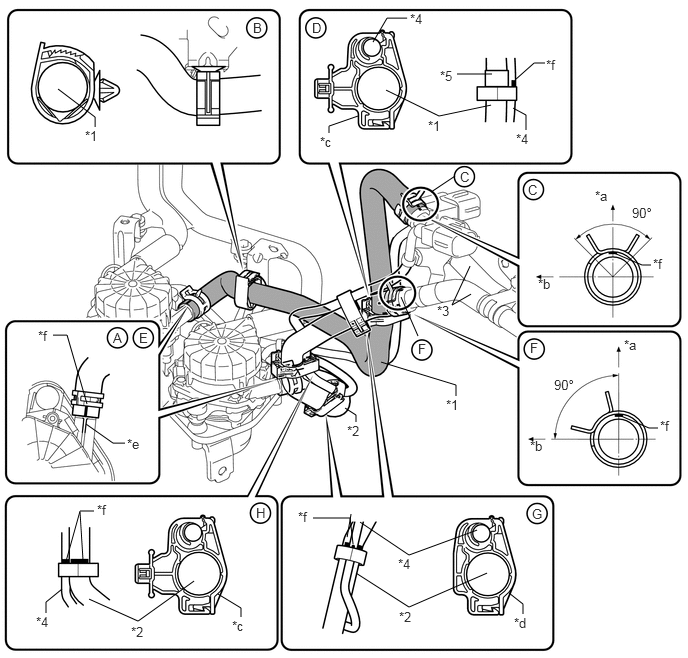
| *1 | No. 3 Air Injection System Hose | *2 | No. 2 Air Injection System Hose |
| *3 | Air Tube | *4 | Wire Harness |
| *5 | Protector | - | - |
| *a | Upper | *b | Front |
| *c | Black Colored Clamp | *d | White Colored Clamp |
| *e | Rib | *f | Paint Mark |
Connect the No. 3 air injection system hose so that its paint mark aligns with the rib of the air pump assembly, and slide the clamp to secure it as shown in the illustration labeled A.
- HINT:
-
Make sure the direction of the hose clamp is as shown in the illustration.
Attach the clamp to the No. 3 air injection system hose shown in the illustration labeled B.
Connect the No. 3 air injection system hose to the air tube sub-assembly, and slide the clamp to secure it shown in the illustration labeled C.
- HINT:
- ·
Make sure the paint mark of the No. 3 air injection system hose is facing upward.
·Make sure the direction of the hose clamp is as shown in the illustration.
Attach the clamp to the No. 3 air injection system hose and wire harness shown in the illustration labeled D.
- HINT:
-
Align the protector of the No. 3 air injection system hose and paint mark of the wire harness with the edge of the clamp.
17342
6.INSTALL NO. 2 AIR INJECTION SYSTEM HOSE
Connect the No. 2 air injection system hose so that its paint mark aligns with the rib of the air pump assembly, and slide the clamp to secure it as shown in the illustration labeled E.
- HINT:
-
Make sure the direction of the hose clamp is as shown in the illustration.
Connect the No. 2 air injection system hose to the air tube sub-assembly, and slide the clamp to secure it shown in the illustration labeled F.
- HINT:
- ·
Make sure the paint mark of the No. 2 air injection system hose is facing upward.
·Make sure the direction of the hose clamp is as shown in the illustration.
Attach the 2 white colored clamps to the No. 2 air injection system hose and wire harness shown in the illustration labeled G.
- HINT:
- ·
Make sure the paint mark on the wire harness is aligned with the mark on the No. 2 air injection system hose.
·Make sure the mark on the wire harness is aligned with the edge of the clamp.
Attach the black colored clamp to the No. 2 air injection system hose and wire harness shown in the illustration labeled H.
- HINT:
-
Align the paint mark of the No. 2 air injection system hose and paint mark of the wire harness with the edge of the clamp.
17700
7.INSTALL AIR CLEANER ASSEMBLY
17880
8.INSTALL AIR CLEANER HOSE ASSEMBLY
11209
9.INSTALL V-BANK COVER SUB-ASSEMBLY
53736G
10.INSTALL FRONT FENDER APRON SEAL FRONT RH
53875A
11.INSTALL FRONT FENDER LINER RH
Install the front fender liner RH to the body panel with the 5 clips.
Using a T30 "TORX" socket, install the 3 screws.
Connect the liner to the front bumper cover with the screw.
53805
12.INSTALL FRONT FENDER SPLASH SHIELD SUB-ASSEMBLY RH
13.CONNECT CABLE TO NEGATIVE BATTERY TERMINAL
- NOTICE:
-
When disconnecting the cable, some systems need to be initialized after the cable is reconnected (See page General>INTRODUCTION>REPAIR INSTRUCTION>INITIALIZATION).