3UR-FE INTAKE / EXHAUST INTAKE MANIFOLD INSTALLATION
PROCEDURE

 1.INSTALL WIRE HARNESS CLAMP BRACKET
Install the 2 wire harness clamp brackets with the 2 bolts.
- Torque:
- 8.0 N*m (82 kgf*cm, 71 in.*lbf)
25860
2.INSTALL PURGE VSV
Connect the purge line hose to the intake manifold.
Install the purge VSV to the intake manifold with the bolt.
- Torque:
- 21 N*m (214 kgf*cm, 15 ft.*lbf)
17650
3.INSTALL VACUUM SWITCHING VALVE ASSEMBLY (for ACIS)
Install the vacuum switching valve to the intake manifold with the bolt.
- Torque:
- 9.0 N*m (92 kgf*cm, 80 in.*lbf)
Connect the 2 vacuum hoses to the vacuum switching valve.
22030
4.INSTALL THROTTLE BODY ASSEMBLY
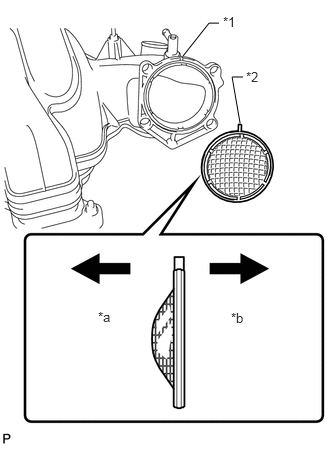
Align the protrusion of a new gasket with the groove of the intake manifold, and install the gasket.
| *1 | Groove |
| *2 | Protrusion |
| *a | Surge Tank Side |
| *b | Throttle Body Side |
Install the throttle body with the 4 bolts.
- Torque:
- 10 N*m (102 kgf*cm, 7 ft.*lbf)
11028
5.INSTALL NO. 2 V-BANK COVER BRACKET SUB-ASSEMBLY
Install the bracket with the bolt.
- Torque:
- 10 N*m (102 kgf*cm, 7 ft.*lbf)
11254B
6.INSTALL V-BANK COVER BOLT
Install the cover bolt to the intake manifold.
- Torque:
- 10 N*m (102 kgf*cm, 7 ft.*lbf)
11254
7.INSTALL NO. 1 V-BANK COVER BRACKET
Install the bracket with the 2 bolts.
- Torque:
- 10 N*m (102 kgf*cm, 7 ft.*lbf)
8.INSTALL VENTILATION HOSE ASSEMBLY
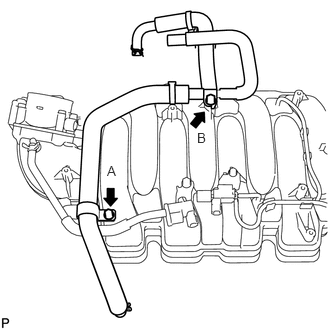
Install the ventilation hose to the intake manifold with the 2 bolts.
- Torque:
- for bolt A : 21 N*m (214 kgf*cm, 15 ft.*lbf)
- for bolt B : 10 N*m (102 kgf*cm, 7 ft.*lbf)
17111
9.INSTALL INTAKE MANIFOLD
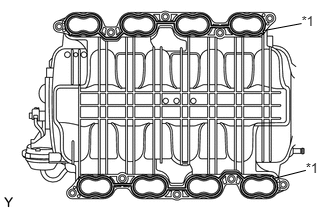
Place 2 new gaskets on the intake manifold.
| *1 | Gasket |
Place the intake manifold on the cylinder head.
Install and uniformly tighten the 8 bolts and 2 nuts in several steps.
- Torque:
- 21 N*m (214 kgf*cm, 15 ft.*lbf)
Install the wire bracket to the intake manifold with the bolt.
- Torque:
- 8.0 N*m (82 kgf*cm, 71 in.*lbf)
Connect the 3 wire clamps to the 3 wire brackets.
Install the No. 3 engine cover.
Install the No. 1 engine cover sub-assembly.
Connect the purge VSV connector.
Connect the purge line hose to the purge VSV.
Connect the vacuum switching valve connector (for ACIS).
Connect the No. 1 ventilation hose.
Connect the 2 water by-pass hoses.
Connect the throttle body connector.
Connect the ventilation hose to the ventilation pipe of the cylinder head cover LH and RH.
17880
10.INSTALL AIR CLEANER HOSE ASSEMBLY
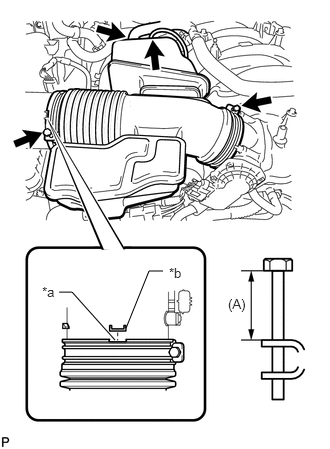
| *a | Groove |
| *b | Protrusion |
Install the air cleaner hose so that the protrusion of the air cleaner cap aligns with the groove of the hose as shown in the illustration.
Tighten the 2 clamps.
- (A):
15 mm or less
Connect the vacuum hose.
Connect the No. 2 ventilation hose.
11.ADD ENGINE COOLANT
12.INSPECT FOR COOLANT LEAK
11209
13.INSTALL V-BANK COVER SUB-ASSEMBLY
51405A
14.INSTALL NO. 1 ENGINE UNDER COVER SUB-ASSEMBLY
53806
15.INSTALL FRONT FENDER SPLASH SHIELD SUB-ASSEMBLY LH
53805
16.INSTALL FRONT FENDER SPLASH SHIELD SUB-ASSEMBLY RH
55781E
17.INSTALL COWL TOP VENTILATOR LOUVER SUB-ASSEMBLY
18.CONNECT CABLE TO NEGATIVE BATTERY TERMINAL
- NOTICE:
-
When disconnecting the cable, some systems need to be initialized after the cable is reconnected (See page General>INTRODUCTION>REPAIR INSTRUCTION>INITIALIZATION).
19.CHECK THROTTLE BODY ASSEMBLY