AJA0F AUTOMATIC TRANSMISSION / TRANSAXLE AUTOMATIC TRANSMISSION UNIT(for V35A-FTS) DISASSEMBLY
CAUTION / NOTICE / HINT
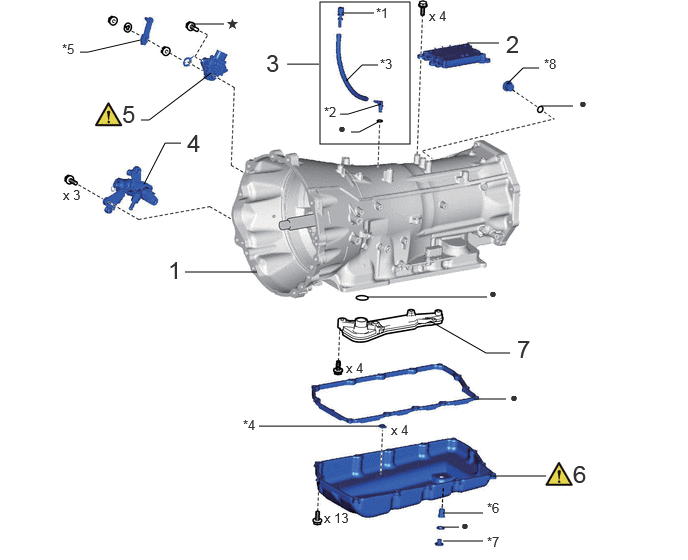
| Procedure | Part Name Code |

|

|

|
|
|---|---|---|---|---|---|
| 1 | SECURE AUTOMATIC TRANSMISSION ASSEMBLY | - | - | - | - |
| 2 | TCM | 89530C | - | - | - |
| 3 | BREATHER PLUG SUB-ASSEMBLY | - | - | - | - |
| 4 | TRANSMISSION OIL THERMOSTAT | 32971 | - | - | - |
| 5 | PARK/NEUTRAL POSITION SWITCH ASSEMBLY | 84540 | ( ) |
- | - |
| 6 | AUTOMATIC TRANSMISSION OIL PAN SUB-ASSEMBLY | 35106 | () |
- | - |
| 7 | VALVE BODY OIL STRAINER ASSEMBLY | 35330 | - | - | - |
| *1 | NO. 1 BREATHER PLUG (ATM) | *2 | NO. 2 BREATHER PLUG (ATM) |
| *3 | BREATHER PLUG HOSE | *4 | TRANSMISSION OIL CLEANER MAGNET |
| *5 | TRANSMISSION CONTROL SHAFT LEVER RH | *6 | NO. 1 TRANSMISSION OIL FILLER TUBE |
| *7 | OVERFLOW PLUG | *8 | REFILL PLUG |
| ● | Non-reusable part | ★ | Precoated part |
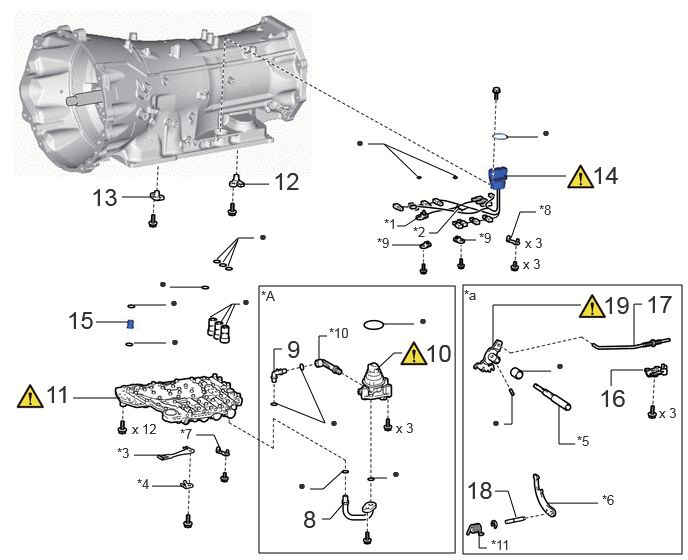
| Procedure | Part Name Code |
|
|
|
|
|---|---|---|---|---|---|
| 8 | NO. 2 TRANSMISSION OIL PIPE | 33129G | - | - | - |
| 9 | NO. 3 TRANSMISSION OIL PIPE | 33129H | - | - | - |
| 10 | OIL PUMP WITH MOTOR ASSEMBLY | 35300D | () |
- | - |
| 11 | TRANSMISSION VALVE BODY ASSEMBLY | 35400A | () |
- | - |
| 12 | TRANSMISSION REVOLUTION SENSOR (SP2) | 89413V | - | - | - |
| 13 | TRANSMISSION REVOLUTION SENSOR (NT) | 89413N | - | - | - |
| 14 | TRANSMISSION WIRE | 82125J | () |
- | - |
| 15 | TRANSMISSION OIL PIPE | 33129F | - | - | - |
| 16 | PARKING LOCK PAWL BRACKET | 35595 | - | - | - |
| 17 | PARKING LOCK ROD SUB-ASSEMBLY | 35501 | - | - | - |
| 18 | PARKING LOCK PAWL SHAFT | 35556 | - | - | - |
| 19 | MANUAL VALVE LEVER SUB-ASSEMBLY | 35505 | () |
- | - |
| *A | w/ Stop and Start System | - | - |
| *1 | NO. 1 ATF TEMPERATURE SENSOR | *2 | NO. 2 ATF TEMPERATURE SENSOR |
| *3 | MANUAL DETENT SPRING SUB-ASSEMBLY | *4 | MANUAL DETENT SPRING COVER |
| *5 | MANUAL VALVE LEVER SHAFT | *6 | PARKING LOCK PAWL |
| *7 | WIRE HARNESS CLAMP | *8 | TRANSMISSION WIRE CLAMP |
| *9 | LOCK PLATE | *10 | NO. 4 TRANSMISSION OIL PIPE |
| *11 | SPRING | - | - |
| *a | Parts related to the parking lock | - | - |
| ● | Non-reusable part | - | - |
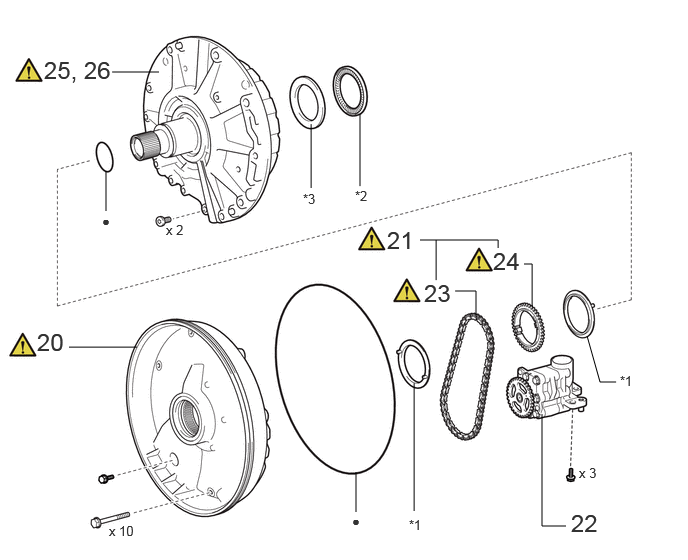
| Procedure | Part Name Code |
|
|
|
|
|---|---|---|---|---|---|
| 20 | NO. 2 FRONT OIL PUMP COVER SUB-ASSEMBLY | 35308K | () |
- | - |
| 21 | DRIVE SPROCKET AND TRANSMISSION DRIVE CHAIN | - | () |
- | - |
| 22 | OIL PUMP ASSEMBLY WITH DRIVEN SPROCKET | - | - | - | - |
| 23 | INSPECT TRANSMISSION DRIVE CHAIN | 35781C | () |
- | - |
| 24 | INSPECT DRIVE SPROCKET | 35782 | () |
- | - |
| 25 | REMOVE STATOR SHAFT ASSEMBLY | 35370 | () |
- | - |
| 26 | INSPECT STATOR SHAFT ASSEMBLY | 35370 | () |
- | - |
| *1 | GEAR THRUST WASHER | *2 | THRUST NEEDLE ROLLER BEARING |
| *3 | THRUST BEARING RACE | - | - |
| ● | Non-reusable part | - | - |
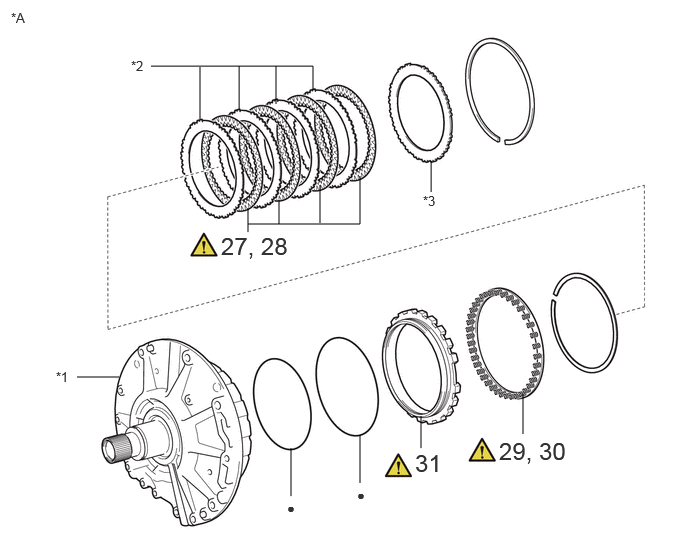
| Procedure | Part Name Code |
|
|
|
|
|---|---|---|---|---|---|
| 27 | REMOVE NO. 1 BRAKE DISC | 35681A | () |
- | - |
| 28 | INSPECT NO. 1 BRAKE DISC | 35681A | () |
- | - |
| 29 | REMOVE BRAKE PISTON RETURN SPRING SUB-ASSEMBLY (NO. 1 BRAKE) | 35608J | () |
- | - |
| 30 | INSPECT BRAKE PISTON RETURN SPRING SUB-ASSEMBLY (NO. 1 BRAKE) | 35608J | () |
- | - |
| 31 | NO. 1 BRAKE PISTON | 35621 | () |
- | - |
| *A | STATOR SHAFT ASSEMBLY | - | - |
| *1 | FRONT SUPPORT SUB-ASSEMBLY | *2 | NO. 1 BRAKE PLATE |
| *3 | NO. 1 BRAKE FLANGE | - | - |
| ● | Non-reusable part | - | - |
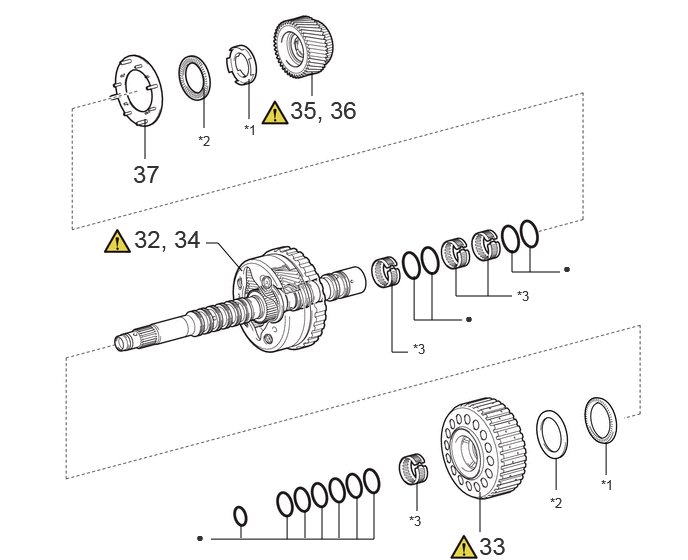
| Procedure | Part Name Code |
|
|
|
|
|---|---|---|---|---|---|
| 32 | REMOVE FRONT PLANETARY GEAR ASSEMBLY | 35720 | - | - | - |
| 33 | PLANETARY SUN GEAR ASSEMBLY | 35710G | () |
- | - |
| 34 | INSPECT FRONT PLANETARY GEAR ASSEMBLY | 35720 | () |
- | - |
| 35 | REMOVE FRONT PLANETARY SUN GEAR SUB-ASSEMBLY | 35706P | - | - | - |
| 36 | INSPECT FRONT PLANETARY SUN GEAR SUB-ASSEMBLY | 35706P | () |
- | - |
| 37 | FRONT PLANETARY OIL RECEIVER | 35753B | - | - | - |
| *1 | THRUST BEARING RACE | *2 | THRUST NEEDLE ROLLER BEARING |
| *3 | NEEDLE ROLLER BEARING | - | - |
| ● | Non-reusable part | - | - |
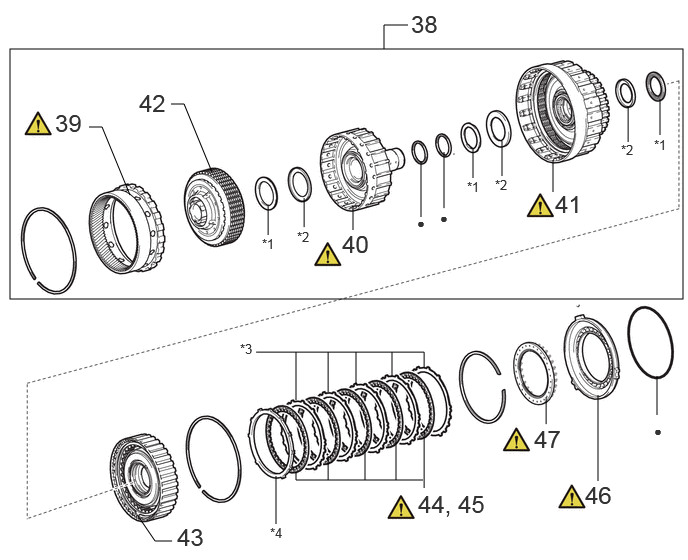
| Procedure | Part Name Code |
|
|
|
|
|---|---|---|---|---|---|
| 38 | FRONT PLANETARY RING GEAR WITH C-1 CLUTCH ASSEMBLY | 35743 | - | - | - |
| 39 | FRONT PLANETARY RING GEAR | 35743 | () |
- | - |
| 40 | C-2 DRUM SUB-ASSEMBLY | 3560B | () |
- | - |
| 41 | INSPECT C-1 CLUTCH ASSEMBLY | 35610 | () |
- | - |
| 42 | C-2 CLUTCH ASSEMBLY | 35650L | - | - | - |
| 43 | C-3 CLUTCH ASSEMBLY | 35640 | - | - | - |
| 44 | REMOVE NO. 2 BRAKE DISC | 35682A | () |
- | - |
| 45 | INSPECT NO. 2 BRAKE DISC | 35682A | () |
- | - |
| 46 | NO. 2 BRAKE PISTON | 35622G | () |
- | - |
| 47 | INSPECT BRAKE PISTON RETURN SPRING SUB-ASSEMBLY (NO. 2 BRAKE) | 35608J | () |
- | - |
| *1 | THRUST NEEDLE ROLLER BEARING | *2 | THRUST BEARING RACE |
| *3 | NO. 2 BRAKE PLATE | *4 | NO. 2 BRAKE FLANGE |
| ● | Non-reusable part | - | - |
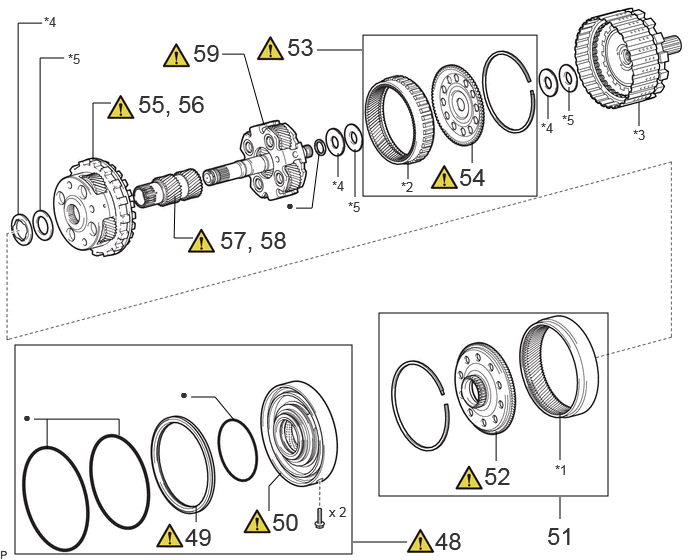
| Procedure | Part Name Code |
|
|
|
|
|---|---|---|---|---|---|
| 48 | CENTER SUPPORT ASSEMBLY WITH 1ST AND REVERSE BRAKE PISTON | 35620 | () |
- | - |
| 49 | 1ST AND REVERSE BRAKE PISTON | 35623S | () |
- | - |
| 50 | INSPECT CENTER SUPPORT ASSEMBLY | 35620 | () |
- | - |
| 51 | CENTER PLANETARY RING GEAR WITH CENTER PLANETARY RING GEAR FLANGE | 35763 | - | - | - |
| 52 | CENTER PLANETARY RING GEAR FLANGE | 35769 | () |
- | - |
| 53 | REAR PLANETARY RING GEAR WITH REAR PLANETARY RING GEAR FLANGE | 35761 | () |
- | - |
| 54 | REAR PLANETARY RING GEAR FLANGE | 35762 | () |
- | - |
| 55 | REMOVE CENTER PLANETARY GEAR ASSEMBLY | 35750 | - | - | - |
| 56 | INSPECT CENTER PLANETARY GEAR ASSEMBLY | 35750 | () |
- | - |
| 57 | REMOVE PLANETARY SUN GEAR SUB-ASSEMBLY | 35706H | - | - | - |
| 58 | INSPECT PLANETARY SUN GEAR SUB-ASSEMBLY | 35706H | () |
- | - |
| 59 | INSPECT REAR PLANETARY GEAR ASSEMBLY | 35760 | () |
- | - |
| *1 | CENTER PLANETARY RING GEAR | *2 | REAR PLANETARY RING GEAR |
| *3 | REAR MULTIPLE DISC CLUTCH ASSEMBLY | *4 | THRUST NEEDLE ROLLER BEARING |
| *5 | THRUST BEARING RACE | - | - |
| ● | Non-reusable part | - | - |
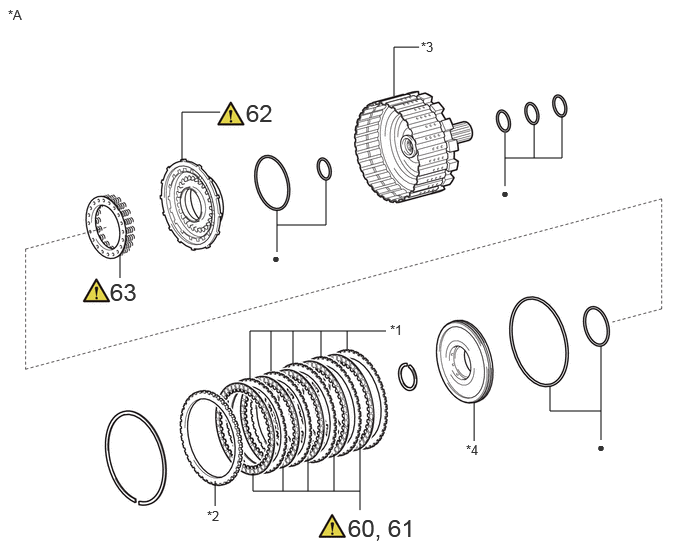
| Procedure | Part Name Code |
|
|
|
|
|---|---|---|---|---|---|
| 60 | REMOVE NO. 4 CLUTCH DISC | 35883C | () |
- | - |
| 61 | INSPECT NO. 4 CLUTCH DISC | 35883C | () |
- | - |
| 62 | C-4 CLUTCH PISTON | 34638 | () |
- | - |
| 63 | INSPECT FORWARD CLUTCH RETURN SPRING SUB-ASSEMBLY (C-4 CLUTCH) | 35603A | () |
- | - |
| *A | REAR MULTIPLE DISC CLUTCH ASSEMBLY | - | - |
| *1 | NO. 4 CLUTCH PLATE | *2 | CLUTCH FLANGE |
| *3 | OUTPUT SHAFT ASSEMBLY | *4 | C-4 CLUTCH BALANCER |
| ● | Non-reusable part | - | - |
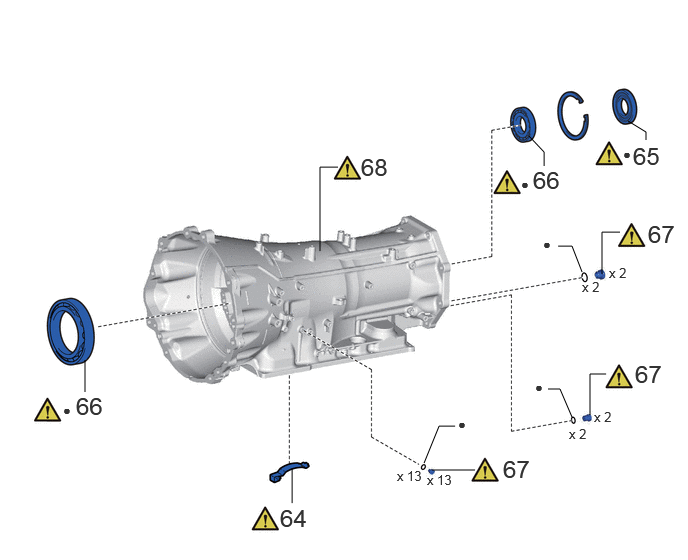
| Procedure | Part Name Code |
|
|
|
|
|---|---|---|---|---|---|
| 64 | BRAKE PLATE STOPPER SPRING | 35639B | () |
- | - |
| 65 | TRANSMISSION CASE OIL SEAL | 33111F | () |
- | - |
| 66 | BALL BEARING | 35701C | () |
- | - |
| 67 | AUTOMATIC TRANSMISSION CASE PLUG | 35141B | () |
- | - |
| 68 | INSPECT AUTOMATIC TRANSMISSION CASE SUB-ASSEMBLY | 35104 | () |
- | - |
| ● | Non-reusable part | - | - |
PROCEDURE

 1.SECURE AUTOMATIC TRANSMISSION ASSEMBLY

89530C 2.REMOVE TCM

3.REMOVE BREATHER PLUG SUB-ASSEMBLY
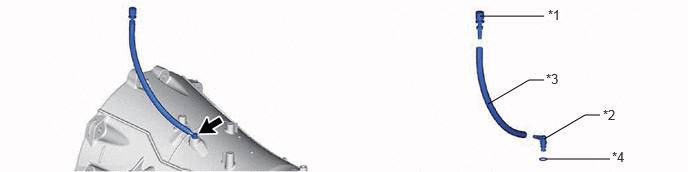
| *1 | No. 1 Breather Plug (ATM) | *2 | No. 2 Breather Plug (ATM) |
| *3 | Breather Plug Hose | *4 | O-ring |
32971 4.REMOVE TRANSMISSION OIL THERMOSTAT

84540 5.REMOVE PARK/NEUTRAL POSITION SWITCH ASSEMBLY
|
|
|
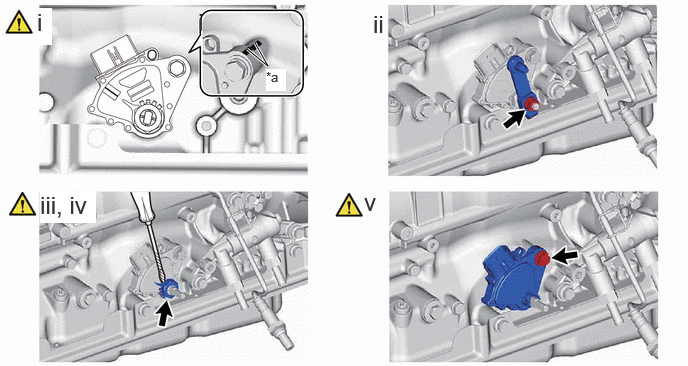
| *a | Matchmark | - | - |
When reusing the park/neutral position switch assembly, put matchmarks on the park/neutral position switch assembly and automatic transmission case sub-assembly.
Remove the nut, spring washer and transmission control shaft lever RH.
Using a screwdriver, pry out the lock washer.
- NOTICE:
-
Be careful not to damage the park/neutral position switch assembly.
- HINT:
-
Tape the screwdriver tip before use.
Remove the nut and lock washer.
Remove the bolt and park/neutral position switch assembly from the automatic transmission case sub-assembly.
- HINT:
-
Make sure that the manual valve lever shaft has not been rotated prior to installing the park/neutral position switch assembly as the detent spring may become detached from the manual valve lever shaft.
35106 6.REMOVE AUTOMATIC TRANSMISSION OIL PAN SUB-ASSEMBLY
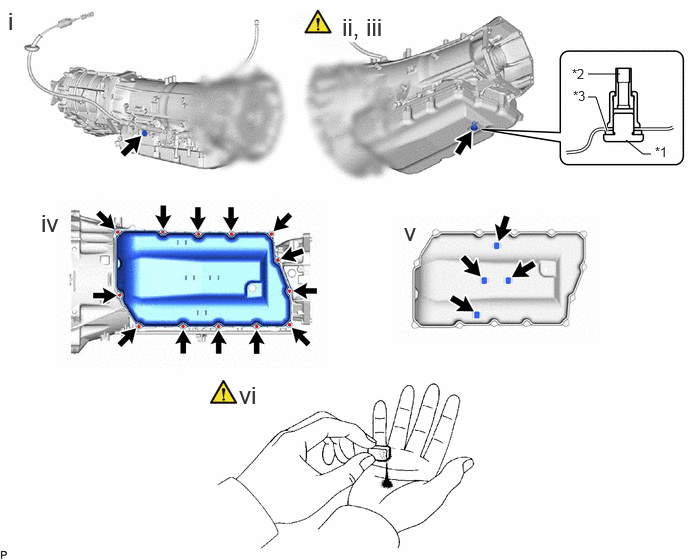
| *1 | Overflow Plug | *2 | No. 1 Transmission Oil Filler Tube |
| *3 | Gasket | - | - |
Remove the refill plug and gasket from the automatic transmission case sub-assembly.
Using a 6 mm hexagon socket wrench, remove the overflow plug and gasket from the automatic transmission assembly.
Using a 6 mm hexagon socket wrench, remove the No. 1 transmission oil filler tube from the automatic transmission assembly.
Remove the 13 bolts, automatic transmission oil pan sub-assembly and automatic transmission oil pan gasket from the automatic transmission case sub-assembly.
Remove the 4 transmission oil cleaner magnets from the automatic transmission oil pan sub-assembly.
Examine the particles in the automatic transmission oil pan sub-assembly.
Use the removed transmission oil cleaner magnets to collect any steel chips.
Examine the chips and particles in the automatic transmission oil pan sub-assembly and on the transmission oil cleaner magnets to determine what type of wear might be found in the automatic transmission assembly.
- Result:
- Steel (magnetic):
-
Bearing, gear and clutch plate wear
- Brass (non-magnetic):
-
Bushing wear
35330 7.REMOVE VALVE BODY OIL STRAINER ASSEMBLY
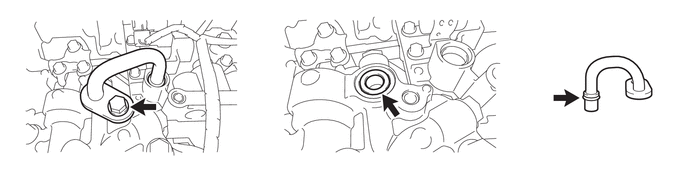
33129G 8.REMOVE NO. 2 TRANSMISSION OIL PIPE (w/ Stop And Start System)
33129H 9.REMOVE NO. 3 TRANSMISSION OIL PIPE (w/ Stop And Start System)
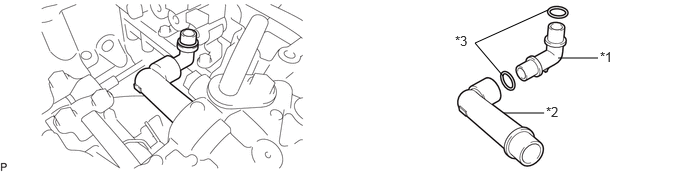
| *1 | No. 3 Transmission Oil Pipe | *2 | No. 4 Transmission Oil Pipe |
| *3 | O-ring | - | - |
35300D 10.REMOVE OIL PUMP WITH MOTOR ASSEMBLY (w/ Stop And Start System)
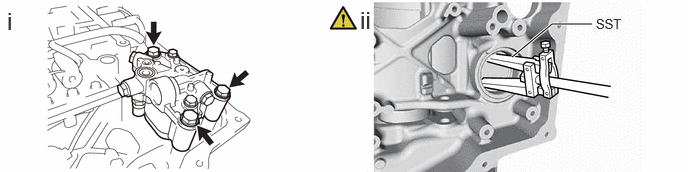
Remove the 3 bolts and oil pump with motor assembly from the automatic transmission case sub-assembly.
Using SST, remove the oil seal from the automatic transmission case sub-assembly.
- SST
-
09308-00010
35400A 11.REMOVE TRANSMISSION VALVE BODY ASSEMBLY
|
|
Click here() |
89413V 12.REMOVE TRANSMISSION REVOLUTION SENSOR (SP2)
89413N 13.REMOVE TRANSMISSION REVOLUTION SENSOR (NT)
82125J 14.REMOVE TRANSMISSION WIRE
|
|
() |
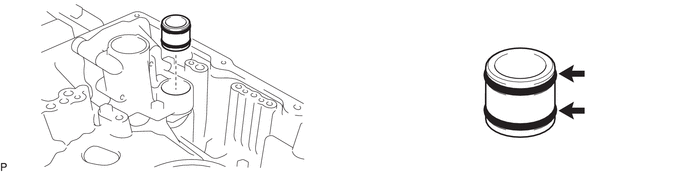
33129F 15.REMOVE TRANSMISSION OIL PIPE
35595 16.REMOVE PARKING LOCK PAWL BRACKET

35501 17.REMOVE PARKING LOCK ROD SUB-ASSEMBLY

| *1 | Manual Valve Lever Sub-assembly | *2 | Parking Lock Rod Sub-assembly |
35556 18.REMOVE PARKING LOCK PAWL SHAFT

| *1 | Parking Lock Pawl | *2 | Parking Lock Pawl Shaft |
| *3 | Spring | *4 | E-ring |
35505 19.REMOVE MANUAL VALVE LEVER SUB-ASSEMBLY
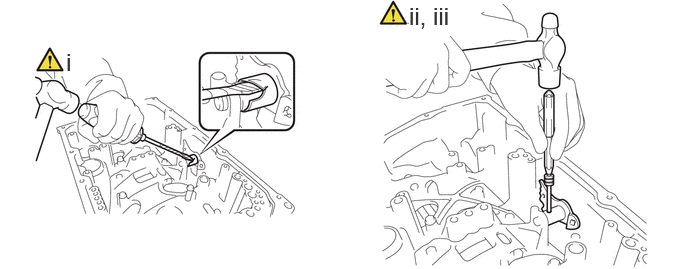
Using a screwdriver and a hammer, cut off the spacer and remove it from the manual valve lever shaft.
- NOTICE:
-
Be careful not to damage the manual valve lever shaft.
- HINT:
-
Tape the screwdriver tip before use.
Using a 3 mm pin punch and hammer, remove the spring pin from the manual valve lever shaft.
- HINT:
-
Slowly tap out the spring pin so that it does not fall into the automatic transmission case sub-assembly.
Remove the manual valve lever shaft and manual valve lever sub-assembly from the automatic transmission case sub-assembly.
35308K 20.REMOVE NO. 2 FRONT OIL PUMP COVER SUB-ASSEMBLY
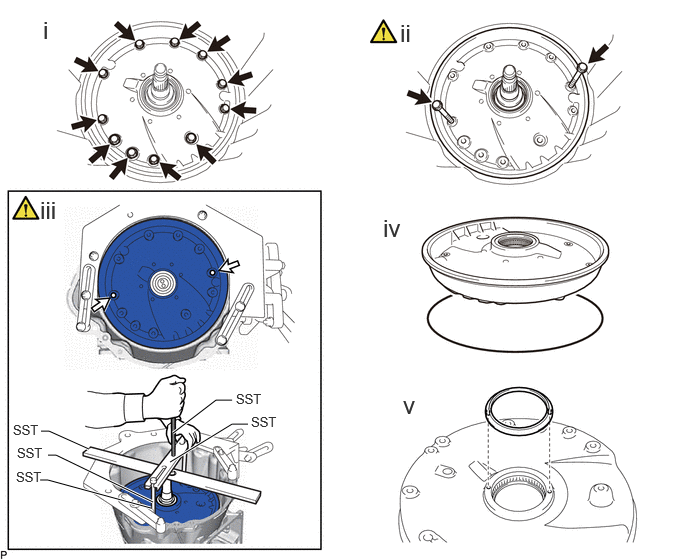

|
SST bolt installation position | - | - |
Remove the 11 bolts from the No. 2 front oil pump cover sub-assembly.
Temporarily install the 2 bolts to the position shown in the illustration and remove the No. 2 front oil pump cover sub-assembly.
- HINT:
-
Use an M10 x 1.25 bolt.
If the No. 2 front oil pump cover sub-assembly is stuck and cannot be detached:
Using SST, rotate and remove the No. 2 front oil pump cover sub-assembly by hand as shown in the illustration.
- SST
-
09380-60012 (09381-06010, 09381-06050, 09381-06120)
09950-50013 (09955-05010)
09322-35010 (09322-03030)
Remove the O-ring from the No. 2 front oil pump cover sub-assembly.
Remove the gear thrust washer from the No. 2 front oil pump cover sub-assembly.
21.REMOVE DRIVE SPROCKET AND TRANSMISSION DRIVE CHAIN
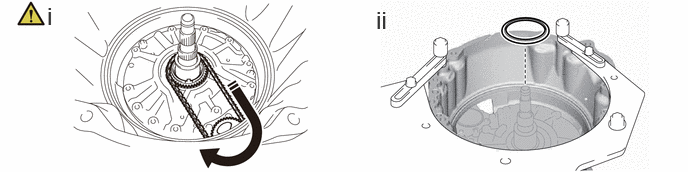

|
Remove While Rotating | - | - |
While rotating the transmission drive chain, remove the drive sprocket and transmission drive chain.
Remove the gear thrust washer from the stator shaft assembly.
22.REMOVE OIL PUMP ASSEMBLY WITH DRIVEN SPROCKET

35781C 23.INSPECT TRANSMISSION DRIVE CHAIN
|
|
() |
35782 24.INSPECT DRIVE SPROCKET
|
|
() |
35370 25.REMOVE STATOR SHAFT ASSEMBLY
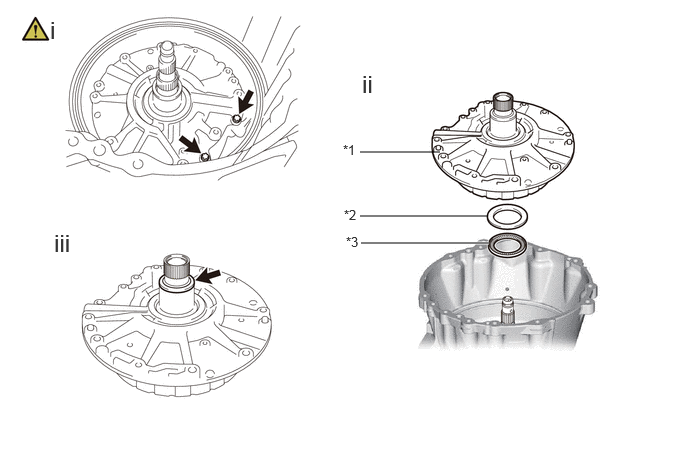
| *1 | Stator Shaft Assembly | *2 | Thrust Bearing Race |
| *3 | Thrust Needle Roller Bearing | - | - |
Using a T50 "TORX" socket wrench, remove the 2 screws.
Remove the stator shaft assembly, thrust bearing race and thrust needle roller bearing from the automatic transmission case sub-assembly.
Remove the oil seal ring from the stator shaft assembly.
35370 26.INSPECT STATOR SHAFT ASSEMBLY
|
|
Click here() |
35681A 27.REMOVE NO. 1 BRAKE DISC
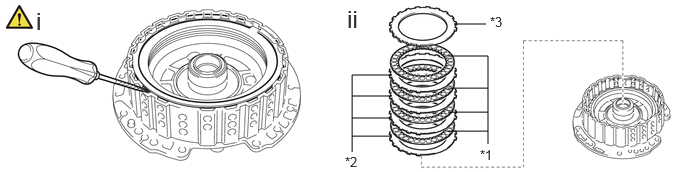
| *1 | No. 1 Brake Disc | *2 | No. 1 Brake Plate |
| *3 | No. 1 Brake Flange | - | - |
Using a screwdriver, remove the snap ring from the front support sub-assembly.
- NOTICE:
-
Be careful not to damage the front support sub-assembly.
- HINT:
-
Tape the screwdriver tip before use.
Remove the 4 No. 1 brake plates, 4 No. 1 brake discs and No. 1 brake flange from the front support sub-assembly.
35681A 28.INSPECT NO. 1 BRAKE DISC
|
|
() |
35608J 29.REMOVE BRAKE PISTON RETURN SPRING SUB-ASSEMBLY (NO. 1 BRAKE)
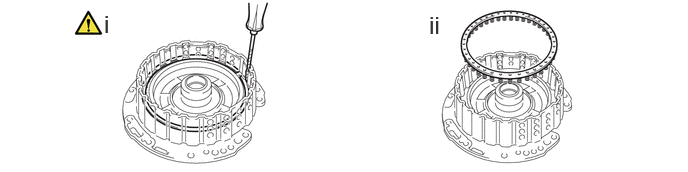
Using a screwdriver, remove the snap ring from the front support sub-assembly.
- NOTICE:
-
Be careful not to damage the front support sub-assembly.
- HINT:
-
Tape the screwdriver tip before use.
Remove the brake piston return spring sub-assembly (No. 1 brake) from the front support sub-assembly.
35608J 30.INSPECT BRAKE PISTON RETURN SPRING SUB-ASSEMBLY (NO. 1 BRAKE)
|
|
() |
35621 31.REMOVE NO. 1 BRAKE PISTON
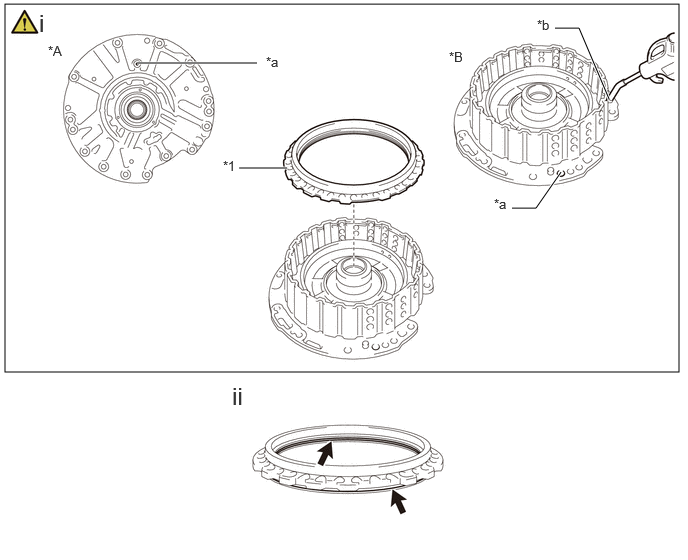
| *A | Front Side | *B | Rear Side |
| *1 | No. 1 Brake Piston | - | - |
| *a | Cover the oil hole | *b | Blow air into the oil hole |
While holding the No. 1 brake piston, apply compressed air to the oil hole of the front support sub-assembly to remove the No. 1 brake piston from the front support sub-assembly.
Remove the 2 O-rings from the front No. 1 brake piston.
35720 32.REMOVE FRONT PLANETARY GEAR ASSEMBLY
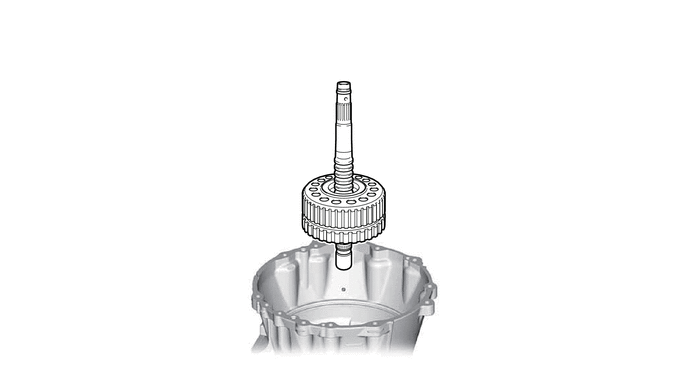
35710G 33.REMOVE PLANETARY SUN GEAR ASSEMBLY
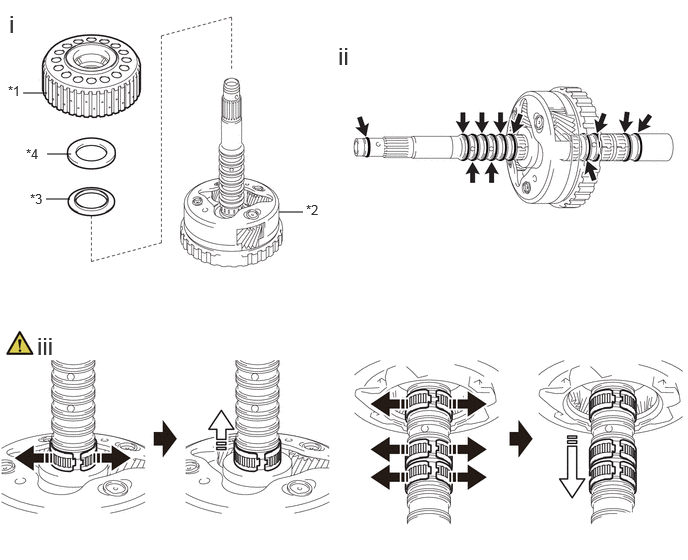
| *1 | Planetary Sun Gear Assembly | *2 | Front Planetary Gear Assembly |
| *3 | Thrust Bearing Race | *4 | Thrust Needle Roller Bearing |
|
|
Expand the opening of the bearing |

|
Remove in this direction |
Remove the planetary sun gear assembly, thrust bearing race and thrust needle roller bearing from the front planetary gear assembly.
Remove the 11 oil seal rings from the front planetary gear assembly.
Remove the 4 needle roller bearings from the front planetary gear assembly as shown in the illustration.
35720 34.INSPECT FRONT PLANETARY GEAR ASSEMBLY
|
|
() |
35706P 35.REMOVE FRONT PLANETARY SUN GEAR SUB-ASSEMBLY

| *1 | Front Planetary Sun Gear Sub-assembly | *2 | Thrust Bearing Race |
| *3 | Thrust Needle Roller Bearing | - | - |
35706P 36.INSPECT FRONT PLANETARY SUN GEAR SUB-ASSEMBLY
|
|
() |
35753B 37.REMOVE FRONT PLANETARY OIL RECEIVER

35743 38.REMOVE FRONT PLANETARY RING GEAR WITH C-1 CLUTCH ASSEMBLY
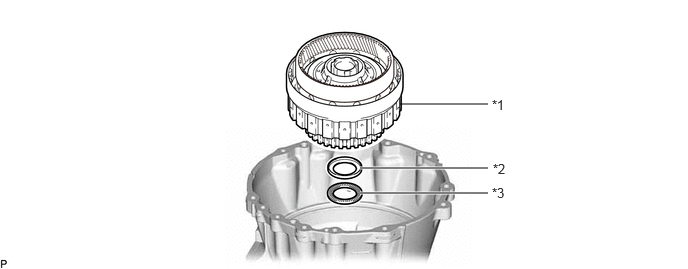
| *1 | Front Planetary Ring Gear with C-1 Clutch Assembly | *2 | Thrust Bearing Race |
| *3 | Thrust Needle Roller Bearing | - | - |
35743 39.REMOVE FRONT PLANETARY RING GEAR
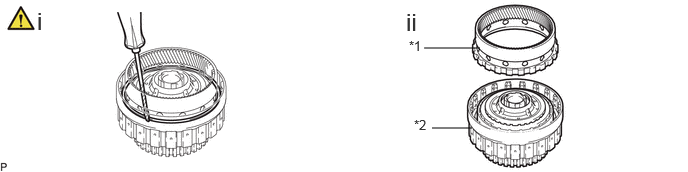
| *1 | Front Planetary Ring Gear | *2 | C-1 Clutch Assembly with C-2 Drum Sub-assembly |
Using a screwdriver, remove the snap ring from the front planetary ring gear with C-1 clutch assembly.
- NOTICE:
-
Be careful not to damage the front planetary ring gear with C-1 clutch assembly.
- HINT:
-
Tape the screwdriver tip before use.
Remove the front planetary ring gear from the C-1 clutch assembly with C-2 drum sub-assembly.
3560B 40.REMOVE C-2 DRUM SUB-ASSEMBLY
|
|
|
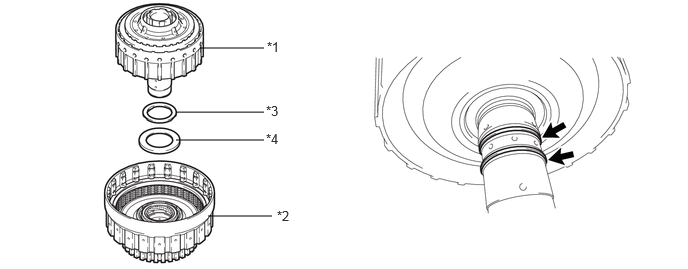
| *1 | C-2 Clutch Assembly with C-2 Drum Sub-assembly | *2 | C-1 Clutch Assembly |
| *3 | Thrust Needle Roller Bearing | *4 | Thrust Bearing Race |
35610 41.INSPECT C-1 CLUTCH ASSEMBLY
|
|
() |
35650L 42.REMOVE C-2 CLUTCH ASSEMBLY
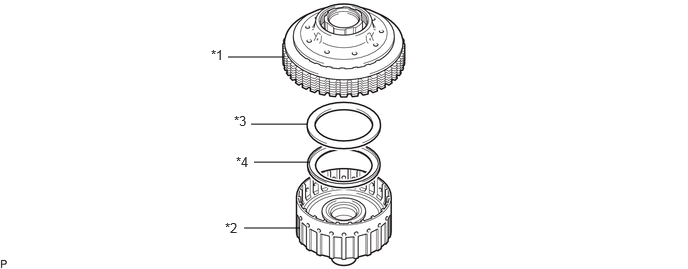
| *1 | C-2 Clutch Assembly | *2 | C-2 Drum Sub-assembly |
| *3 | Thrust Needle Roller Bearing | *4 | Thrust Bearing Race |
35640 43.REMOVE C-3 CLUTCH ASSEMBLY

35682A 44.REMOVE NO. 2 BRAKE DISC
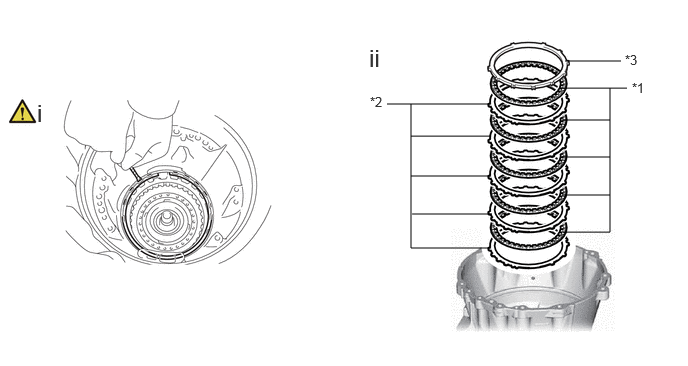
| *1 | No. 2 Brake Disc | *2 | No. 2 Brake Plate |
| *3 | No. 2 Brake Flange | - | - |
Using a screwdriver, remove the snap ring from the automatic transmission case sub-assembly.
- NOTICE:
-
Be careful not to damage the automatic transmission case sub-assembly.
- HINT:
-
Tape the screwdriver tip before use.
Remove the 5 No. 2 brake plates, 5 No. 2 brake discs and No. 2 brake flange from the automatic transmission case sub-assembly.
35682A 45.INSPECT NO. 2 BRAKE DISC
|
|
() |
35622G 46.REMOVE NO. 2 BRAKE PISTON
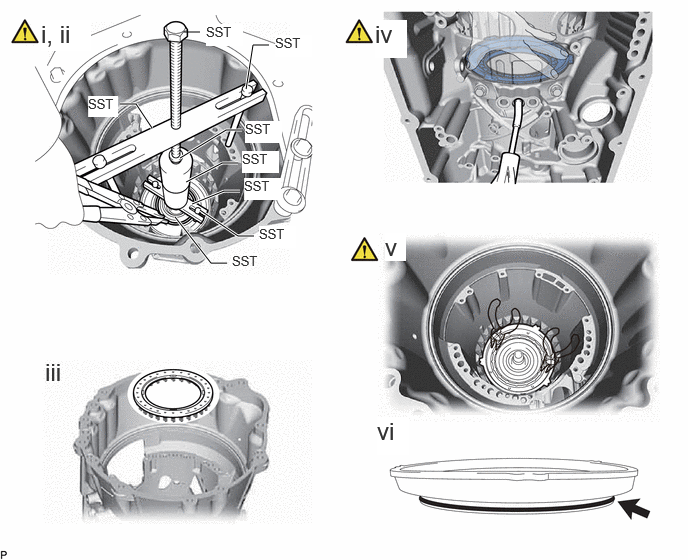
Set SST on the brake piston return spring sub-assembly (No. 2 brake), automatic transmission case sub-assembly and tighten SST to compress the brake piston return spring sub-assembly (No. 2 brake).
- SST
-
09308-14010
09380-60012 (09381-06010, 09381-06020, 09381-06040, 09381-06050, 09381-06090, 09381-06120, 09381-06140)
Using snap ring expander, remove the hole snap ring from the center support assembly.
Remove the brake piston return spring sub-assembly (No. 2 brake) from the No. 2 brake piston.
While holding the automatic transmission case sub-assembly, apply compressed air (400 kPa (4.1 kgf/cm2, 58 psi)) to the oil hole to the No. 2 brake piston to lift it from the center support assembly.
- HINT:
-
While evenly and lightly pressing on the No. 2 brake piston using your hand, blow in air a little at a time to remove the No. 2 brake piston smoothly.
Using 2 needle-nose pliers, remove the No. 2 brake piston from the center support assembly.
- NOTICE:
-
Be careful not to damage the No. 2 brake piston.
- HINT:
-
Tape the tip of needle-nose pliers before use.
Remove the O-ring from the No. 2 brake piston.
35608J 47.INSPECT BRAKE PISTON RETURN SPRING SUB-ASSEMBLY (NO. 2 BRAKE)
|
|
() |
35620 48.REMOVE CENTER SUPPORT ASSEMBLY WITH 1ST AND REVERSE BRAKE PISTON
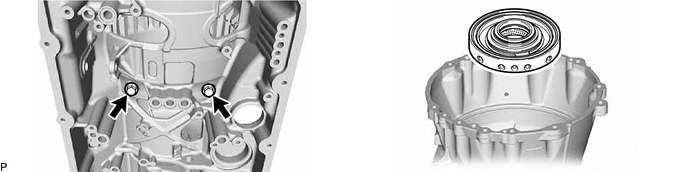
- HINT:
- If the center support assembly with 1st and reverse brake piston cannot be lifted up and removed by hand:
-
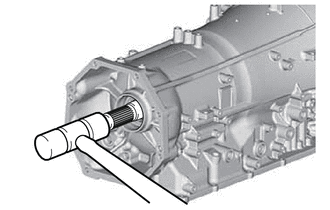
-
Lightly tap the output shaft using a plastic-faced hammer and remove the center support assembly with 1st and reverse brake piston.
35623S 49.REMOVE 1ST AND REVERSE BRAKE PISTON
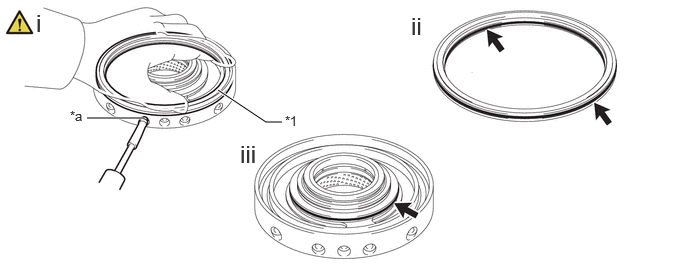
| *1 | 1st and Reverse Brake Piston | - | - |
| *a | Oil Hole | - | - |
While holding the center support assembly, apply compressed air (400 kPa (4.1 kgf/cm2, 58 psi) to the oil hole to remove the 1st and reverse brake piston from the center support assembly.
- HINT:
-
While evenly and lightly pressing on the 1st and reverse brake piston using your hand, blow in air a little at a time to remove the 1st and reverse brake piston.
Remove the 2 O-rings from the 1st and reverse brake piston.
Remove the O-ring from the center support assembly.
35620 50.INSPECT CENTER SUPPORT ASSEMBLY
|
|
() |
35763 51.REMOVE CENTER PLANETARY RING GEAR WITH CENTER PLANETARY RING GEAR FLANGE

35769 52.REMOVE CENTER PLANETARY RING GEAR FLANGE
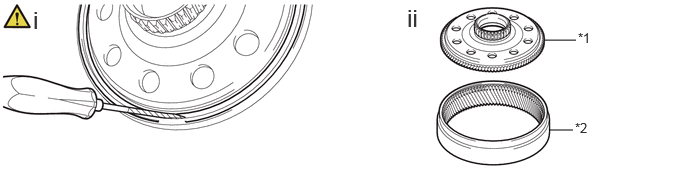
| *1 | Center Planetary Ring Gear Flange | *2 | Center Planetary Ring Gear |
Using a screwdriver, remove the snap ring from the center planetary ring gear.
- NOTICE:
-
Be careful not to damage the center planetary ring gear.
- HINT:
-
Tape the screwdriver tip before use.
Remove the center planetary ring gear flange from the center planetary ring gear.
35761 53.REMOVE REAR PLANETARY RING GEAR WITH REAR PLANETARY RING GEAR FLANGE
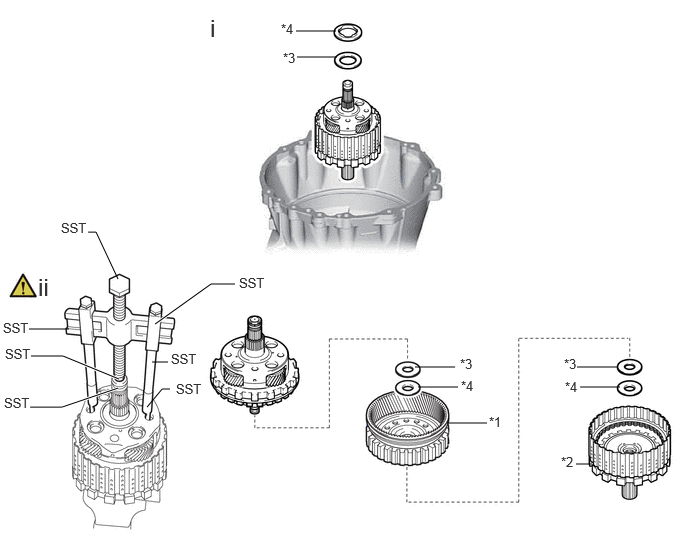
| *1 | Rear Planetary Ring Gear with Rear Planetary Ring Gear Flange | *2 | Rear Multiple Disc Clutch Assembly |
| *3 | Thrust Needle Roller Bearing | *4 | Thrust Bearing Race |
Remove the rear planetary gear assembly with planetary sun gear sub-assembly and center planetary gear assembly and rear multiple disc clutch assembly, thrust bearing race and thrust needle roller bearing from the automatic transmission case sub-assembly.
Using SST, remove the rear planetary ring gear with rear planetary ring gear flange, rear multiple disc clutch assembly, 2 thrust needle roller bearings and 2 thrust bearing races from the rear planetary gear assembly with planetary sun gear sub-assembly and center planetary gear assembly.
- SST
-
09950-40011 (09951-04010, 09954-04020, 09955-04041, 09957-04010, 09952-04010, 09953-04020)
09950-60011 (09951-00250)
35762 54.REMOVE REAR PLANETARY RING GEAR FLANGE
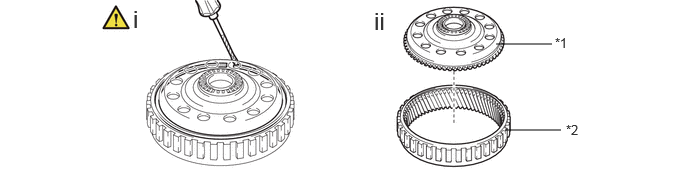
| *1 | Rear Planetary Ring Gear Flange | *2 | Rear Planetary Ring Gear |
Using a screwdriver, remove the snap ring from the rear planetary ring gear.
- NOTICE:
-
Be careful not to damage the rear planetary ring gear.
- HINT:
-
Tape the screwdriver tip before use.
Remove the rear planetary ring gear flange from the rear planetary ring gear.
35750 55.REMOVE CENTER PLANETARY GEAR ASSEMBLY

35750 56.INSPECT CENTER PLANETARY GEAR ASSEMBLY
|
|
Click here() |
35706H 57.REMOVE PLANETARY SUN GEAR SUB-ASSEMBLY
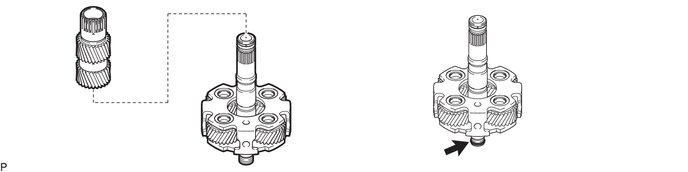
35706H 58.INSPECT PLANETARY SUN GEAR SUB-ASSEMBLY
|
|
Click here() |
35760 59.INSPECT REAR PLANETARY GEAR ASSEMBLY
|
|
Click here() |
35883C 60.REMOVE NO. 4 CLUTCH DISC
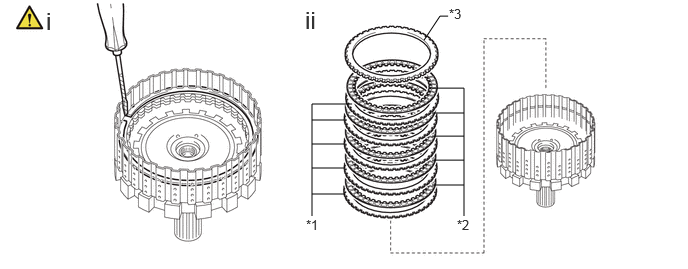
| *1 | No. 4 Clutch Plate | *2 | No. 4 Clutch Disc |
| *3 | Clutch Flange | - | - |
Using a screwdriver, remove the snap ring from the output shaft assembly.
- NOTICE:
-
Be careful not to damage the output shaft assembly.
- HINT:
-
Tape the screwdriver tip before use.
Remove the 5 No. 4 clutch plates, 5 No. 4 clutch discs and clutch flange from the output shaft assembly.
35883C 61.INSPECT NO. 4 CLUTCH DISC
|
|
Click here() |
34638 62.REMOVE C-4 CLUTCH PISTON
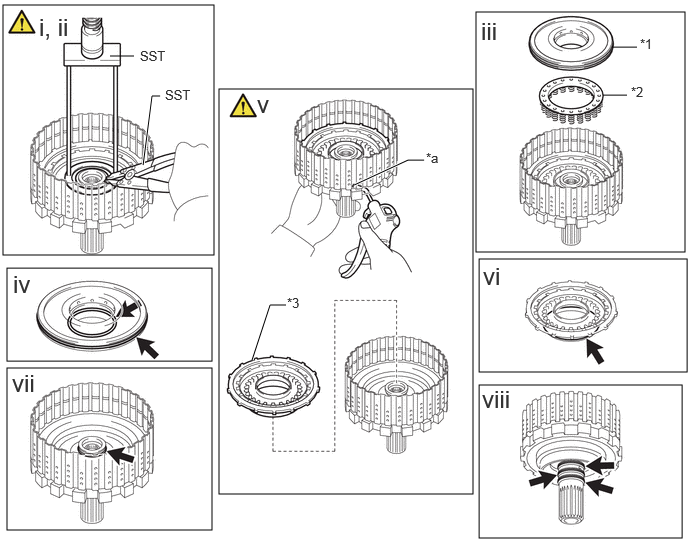
| *1 | C-4 Clutch Balancer | *2 | Forward Clutch Return Spring Sub-assembly (C-4 clutch) |
| *3 | C-4 Clutch Piston | - | - |
| *a | Oil Hole | - | - |
Set SST on the C-4 clutch balancer and compress the forward clutch return spring sub-assembly (C-4 clutch) using a press.
- SST
-
09387-00020
Using SST, remove the snap ring from the output shaft assembly.
- SST
-
09350-30020 (09350-07070)
Remove the C-4 clutch balancer and forward clutch return spring sub-assembly (C-4 clutch) from the output shaft assembly.
Remove the 2 O-rings from the C-4 clutch balancer.
While holding the output shaft assembly, apply compressed air (400 kPa (4.1 kgf/cm2, 58 psi)) to the oil hole to remove the C-4 clutch piston from the output shaft assembly.
Remove the O-ring from the C-4 clutch piston.
Remove the O-ring from the output shaft assembly.
Remove the 3 clutch drum oil seal rings from the output shaft assembly.
35603A 63.INSPECT FORWARD CLUTCH RETURN SPRING SUB-ASSEMBLY (C-4 CLUTCH)
|
|
Click here() |
35639B 64.REMOVE BRAKE PLATE STOPPER SPRING
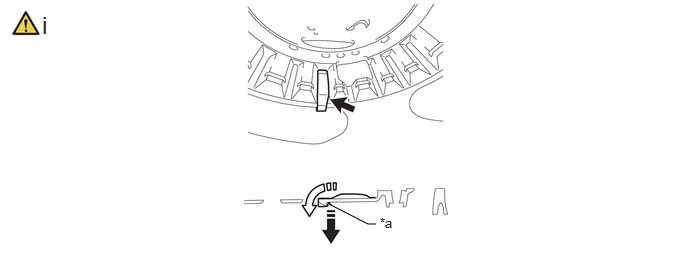
| *a | End of brake plate stopper spring | - | - |
|
|
Pull lightly on the end |
|
Remove in the direction of the arrow |
Remove the brake plate stopper spring.
Pull lightly on the end of the brake plate stopper spring.
Remove the brake plate stopper spring from the automatic transmission case sub-assembly in the direction indicated by the arrow.
33111F 65.REMOVE TRANSMISSION CASE OIL SEAL
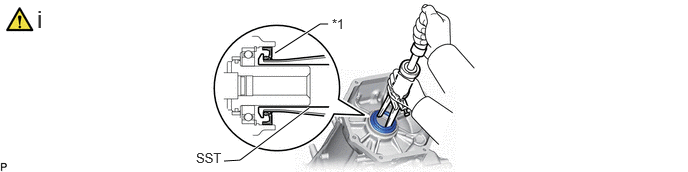
| *1 | Transmission Case Oil Seal | - | - |
Using SST, remove the transmission case oil seal from the automatic transmission case sub-assembly.
- SST
-
09308-36010
- NOTICE:
-
When removing the transmission case oil seal, make sure not to damage the automatic transmission case sub-assembly.
36701C 66.REMOVE BALL BEARING
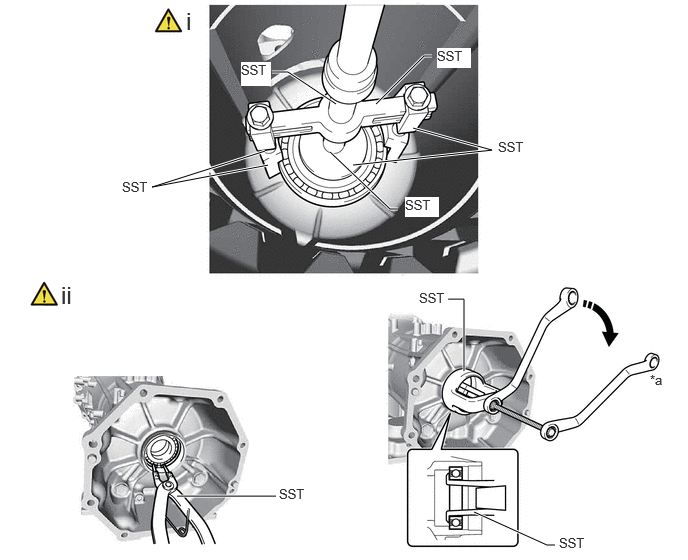
| *a | Hold | - | - |
|
|
Turn | - | - |
for Inside:
1. Using SST, remove the ball bearing from the automatic transmission case sub-assembly.
- SST
-
09950-40011 (09951-04020, 09952-04010, 09953-04030, 09955-04031, 09957-04010, 09954-04010)
09950-60011 (09951-00650)
for Outside:
1. Using SST, remove the snap ring from the automatic transmission case sub-assembly.
- SST
-
09350-30020 (09350-07060)
2. Using SST, remove the ball bearing from the automatic transmission case sub-assembly.
- SST
-
09612-65014 (09612-01060)
35141B 67.REMOVE AUTOMATIC TRANSMISSION CASE PLUG
- HINT:
-
If automatic transmission fluid leaks from an automatic transmission case plug or the plug is corroded, replace it.
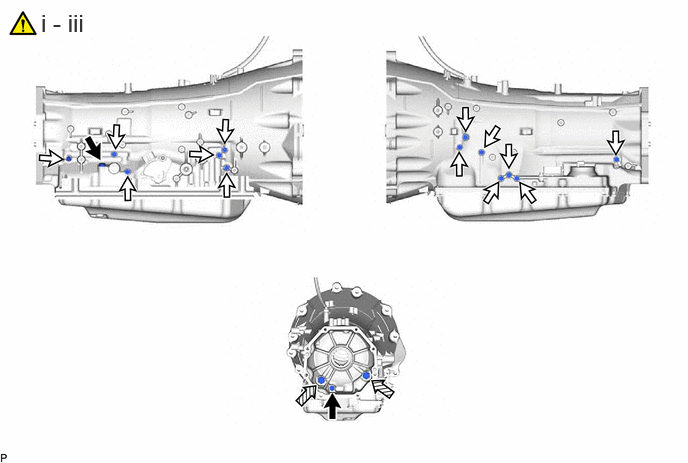

|
for T55 "TORX" |
|
for 12 mm head |

|
for 24 mm head | - | - |
for T55 "TORX":
1. Using a T55 "TORX" socket wrench, remove the 2 automatic transmission case plugs and 2 O-rings from the automatic transmission case sub-assembly.
for 12 mm head:
1. Remove the 13 automatic transmission case plugs and 13 O-rings from the automatic transmission case sub-assembly.
for 24 mm head:
1. Remove the 2 automatic transmission case plugs and 2 O-rings from the automatic transmission case sub-assembly.
35104 68.INSPECT AUTOMATIC TRANSMISSION CASE SUB-ASSEMBLY
|
|
() |