NETWORKING CXPI COMMUNICATION SYSTEM B235287 Power Integration No.1 System Missing Message B235587 Power Distribution Box Missing Message B235787 Wiper Module Missing Message B235887 Smart LDM Left Missing Message B235987 Smart LDM Right Missing Message
DESCRIPTION
This DTC is stored when CXPI communication between the power distribution box assembly or windshield wiper relay assembly and main body ECU (multiplex network body ECU) stops for 10 seconds or more.
| DTC No. | Detection Item | DTC Detection Condition | Trouble Area | DTC Output from | Priority |
|---|---|---|---|---|---|
| B235287 | Power Integration No.1 System Missing Message | No communication between semiconductor power integration ECU and main body ECU (multiplex network body ECU) for 10 seconds or more |
·
Main body ECU (multiplex network body ECU)
·
Semiconductor power integration ECU
·
Harness or connector |
Main Body | A |
| B235587 | Power Distribution Box Missing Message | No communication between power distribution box assembly and main body ECU (multiplex network body ECU) for 10 seconds or more |
·
Main body ECU (multiplex network body ECU)
·
Power distribution box assembly |
Main Body | A |
| B235787 | Wiper Module Missing Message | No communication between windshield wiper relay assembly and main body ECU (multiplex network body ECU) for 10 seconds or more |
·
Main body ECU (multiplex network body ECU)
·
Windshield wiper relay assembly
·
Harness or connector |
Main Body | A |
| B235887 | Smart LDM Left Missing Message | No communication between headlight housing LH and main body ECU (multiplex network body ECU) for 10 seconds or more |
·
Main body ECU (multiplex network body ECU)
·
Headlight housing LH
·
Harness or connector |
Main Body | A |
| B235987 | Smart LDM Right Missing Message | No communication between headlight housing RH and main body ECU (multiplex network body ECU) for 10 seconds or more |
·
Main body ECU (multiplex network body ECU)
·
Headlight housing RH
·
Harness or connector |
Main Body | A |
WIRING DIAGRAM
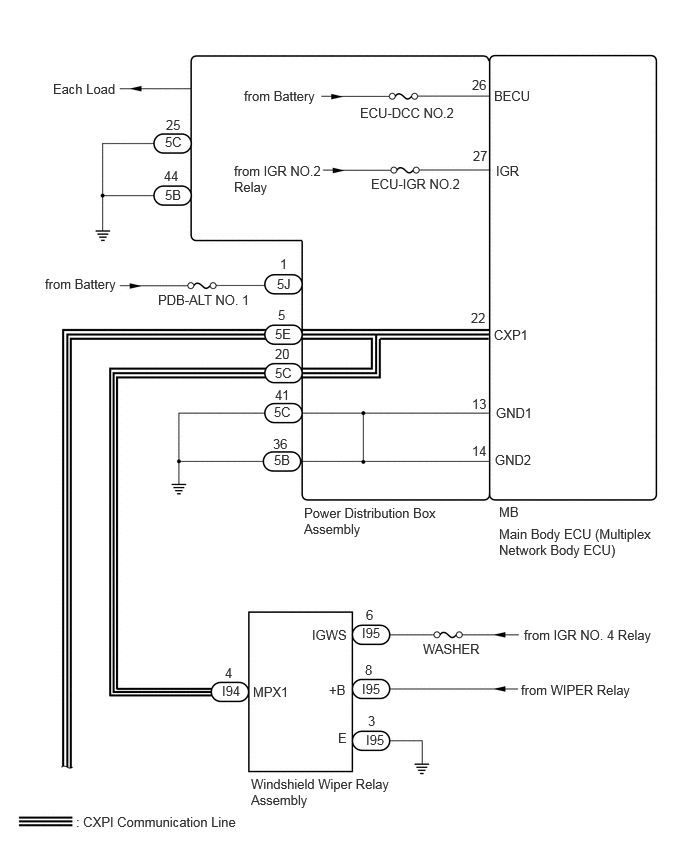
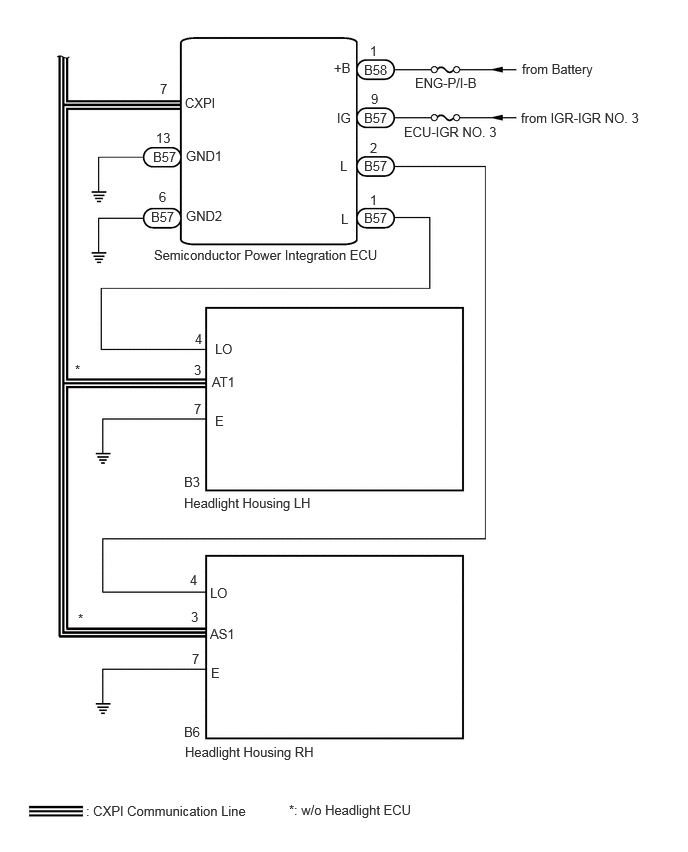
CAUTION / NOTICE / HINT
- NOTICE:
-
·
Inspect the fuses for circuits related to this system before performing the following procedure.
·When disconnecting and reconnecting the battery.
Click hereGeneral>SETUP>WHEN DISCONNECTING OR RECONNECTING BATTERY TERMINAL>WORK PROCEDURE
- HINT:
-
When disconnecting and reconnecting the battery, there is an automatic learning function that completes learning when the respective system is used.
-
Click hereGeneral>SETUP>WHEN DISCONNECTING OR RECONNECTING BATTERY TERMINAL>AUTOMATIC LEARNING CHART
·Some parts must be initialized and set when replacing or removing and installing parts.
Click hereGeneral>SETUP>WHEN REPLACING OR REMOVING/INSTALLING PARTS>WORK PROCEDURE
PROCEDURE
Clear the DTCs.
- Body Electrical > Main Body > Clear DTCs
- 50002 449
- Result:
-
Proceed to NEXT
NEXT
Check for DTCs.
- Body Electrical > Main Body > Trouble Codes
- 50001 449
- Result:
-
Result Proceed to *: w/o Headlight ECU
DTCs B235287, B235587, B235787, B235887* and B235987* are output A DTCs B235287, B235587, B235887* and B235987* are not output B DTC B235287 is output C DTC B235587 is output D DTC B235787 is output E DTC B235887 is output* F DTC B235987 is output* G DTC is not output H
A
B
C
D
E
F
G
H
Click hereGeneral>INTRODUCTION>HOW TO TROUBLESHOOT ECU CONTROLLED SYSTEMS>HOW TO PROCEED WITH TROUBLESHOOTING
Disconnect the I94 windshield wiper relay assembly connector.
Clear the DTCs.
- Body Electrical > Main Body > Clear DTCs
- 50002 449
Check for DTCs.
- Body Electrical > Main Body > Trouble Codes
- 50001 449
- Result:
-
Result Proceed to *: w/o Headlight ECU
DTCs B235287, B235587, B235787, B235887* and B235987* are not output A Only DTC B235787 is output B
A
B
for LHD: Click hereVehicle Exterior>WIPER / WASHER>WIPER ECU (for LHD)>REMOVAL
for RHD: Click hereVehicle Exterior>WIPER / WASHER>WIPER ECU (for RHD)>REMOVAL
Disconnect the B57 semiconductor power integration ECU connector.
Clear the DTCs.
- Body Electrical > Main Body > Clear DTCs
- 50002 449
Check for DTCs.
- Body Electrical > Main Body > Trouble Codes
- 50001 449
- Result:
-
Result Proceed to *: w/o Headlight ECU
DTCs B235287, B235587, B235787, B235887* and B235987* are not output A Only DTC B235287 is output B
A
B
Check the vehicle type.
- Result:
-
Result Proceed to w/o Headlight ECU A w/ Headlight ECU B
A
B
Disconnect the B3 headlight housing LH connector.
Clear the DTCs.
- Body Electrical > Main Body > Clear DTCs
- 50002 449
Check for DTCs.
- Body Electrical > Main Body > Trouble Codes
- 50001 449
- Result:
-
Result Proceed to DTCs B235287, B235587, B235787, B235887 and B235987 are not output A Only DTC B235887 is output B
A
B
Disconnect the B6 headlight housing RH connector.
Clear the DTCs.
- Body Electrical > Main Body > Clear DTCs
- 50002 449
Check for DTCs.
- Body Electrical > Main Body > Trouble Codes
- 50001 449
- Result:
-
Result Proceed to DTCs B235287, B235587, B235787, B235887 and B235987 are not output A Only DTC B235987 is output B
A
B
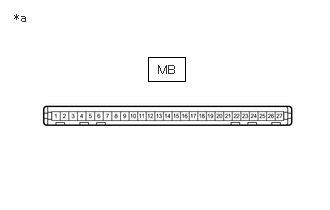
| *a | Component without harness connected (to Power Distribution Box Assembly) |
Remove the power distribution box assembly.
for LHD: Click herePower Source / Network>POWER DISTRIBUTION>MAIN BODY ECU (for LHD)>REMOVAL
for RHD: Click herePower Source / Network>POWER DISTRIBUTION>MAIN BODY ECU (for RHD)>REMOVAL
Remove the main body ECU (multiplex network body ECU) from the power distribution box assembly.
Measure the resistance according to the value(s) in the table below.
| Tester Connection | Condition | Specified Condition |
|---|---|---|
| MB-22 (CXP1) - 5E-5 | Always | Below 1 Ω |
- Result:
-
Proceed to OK NG
OK
NG
for LHD: Click herePower Source / Network>POWER DISTRIBUTION>MAIN BODY ECU (for LHD)>REMOVAL
for RHD: Click herePower Source / Network>POWER DISTRIBUTION>MAIN BODY ECU (for RHD)>REMOVAL
Replace the power distribution box assembly with a new or known good one.
for LHD: Click herePower Source / Network>POWER DISTRIBUTION>MAIN BODY ECU (for LHD)>REMOVAL
for RHD: Click herePower Source / Network>POWER DISTRIBUTION>MAIN BODY ECU (for RHD)>REMOVAL
Clear the DTCs.
- Body Electrical > Main Body > Clear DTCs
- 50002 449
Check for DTCs.
- Body Electrical > Main Body > Trouble Codes
- 50001 449
- Result:
-
Result Proceed to *: w/o Headlight ECU
DTCs B235287, B235587, B235787, B235887* and B235987* are not output A DTC is not output B
A
for LHD: Click herePower Source / Network>POWER DISTRIBUTION>MAIN BODY ECU (for LHD)>REMOVAL
for RHD: Click herePower Source / Network>POWER DISTRIBUTION>MAIN BODY ECU (for RHD)>REMOVAL
B
Turn the ignition switch off.
Disconnect the cable from the negative (-) battery terminal.
Disconnect the B57 semiconductor power integration ECU connector.
Disconnect the 5E power distribution box assembly connector.
Measure the resistance according to the value(s) in the table below.
- Standard Resistance:
-
Tester Connection Condition Specified Condition Click Location & Routing(B57)Location & Routingewd_type=routing;type=c;code=B57
B57-7 (CXPI) - 5E-5 Cable disconnected from negative (-) battery terminal Below 1 Ω
- Result:
-
Proceed to OK NG
OK
NG
| *a | Component without harness connected (to Power Distribution Box Assembly) |
Remove the power distribution box assembly.
for LHD: Click herePower Source / Network>POWER DISTRIBUTION>MAIN BODY ECU (for LHD)>REMOVAL
for RHD: Click herePower Source / Network>POWER DISTRIBUTION>MAIN BODY ECU (for RHD)>REMOVAL
Remove the main body ECU (multiplex network body ECU) from the power distribution box assembly.
Measure the resistance according to the value(s) in the table below.
| Tester Connection | Condition | Specified Condition |
|---|---|---|
| MB-22 (CXP1) - 5E-5 | Always | Below 1 Ω |
- Result:
-
Proceed to OK NG
OK
for LHD: Click herePower Source / Network>POWER DISTRIBUTION>MAIN BODY ECU (for LHD)>REMOVAL
for RHD: Click herePower Source / Network>POWER DISTRIBUTION>MAIN BODY ECU (for RHD)>REMOVAL
NG
for LHD: Click herePower Source / Network>POWER DISTRIBUTION>MAIN BODY ECU (for LHD)>REMOVAL
for RHD: Click herePower Source / Network>POWER DISTRIBUTION>MAIN BODY ECU (for RHD)>REMOVAL
Disconnect the B57 semiconductor power integration ECU connector.
Measure the resistance according to the value(s) in the table below.
- Standard Resistance:
-
Tester Connection Condition Specified Condition Click Location & Routing(B57)Location & Routingewd_type=routing;type=c;code=B57
B57-13 (GND1) - Body ground Always Below 1 Ω B57-6 (GND2) - Body ground Always Below 1 Ω
Measure the voltage according to the value(s) in the table below.
- Standard Voltage:
-
Tester Connection Condition Specified Condition Click Location & Routing(B58,B57)Location & Routingewd_type=routing;type=c,c;code=B58,B57
B58-1 (+B) - Body ground Always 11 to 14 V B57-9 (IG) - Body ground Ignition switch ON 11 to 14 V B57-9 (IG) - Body ground Ignition switch off Below 1 V
- Result:
-
Proceed to OK NG
OK
NG
Turn the ignition switch off.
Disconnect the cable from the negative (-) battery terminal.
Disconnect the B57 semiconductor power integration ECU connector.
Disconnect the 5E power distribution box assembly connector.
Measure the resistance according to the value(s) in the table below.
- Standard Resistance:
-
Tester Connection Condition Specified Condition Click Location & Routing(B57)Location & Routingewd_type=routing;type=c;code=B57
B57-7 (CXPI) - 5E-5 Cable disconnected from negative (-) battery terminal Below 1 Ω
- Result:
-
Proceed to OK NG
OK
NG
Turn the ignition switch off.
Disconnect the power distribution box assembly connectors.
Measure the voltage according to the value(s) in the table below.
- Standard Voltage:
-
Tester Connection Switch Condition Specified Condition 5J-1 - Body ground Ignition switch ON 11 to 14 V
- Result:
-
Proceed to OK NG
OK
NG
Disconnect the 5B and 5C power distribution box assembly connectors.
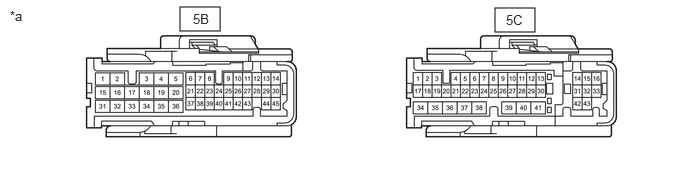
| *a | Front view of wire harness connector (to Power Distribution Box Assembly) |
- | - |
Measure the resistance according to the value(s) in the table below.
- Standard Resistance:
-
Tester Connection Condition Specified Condition 5B-44 - Body ground Always Below 1 Ω 5B-36 - Body ground Always Below 1 Ω 5C-25 - Body ground Always Below 1 Ω 5C-41 - Body ground Always Below 1 Ω
- Result:
-
Proceed to OK NG
OK
for LHD: Click herePower Source / Network>POWER DISTRIBUTION>MAIN BODY ECU (for LHD)>REMOVAL
for RHD: Click herePower Source / Network>POWER DISTRIBUTION>MAIN BODY ECU (for RHD)>REMOVAL
NG
Disconnect the I95 windshield wiper relay assembly connector.
Measure the resistance according to the value(s) in the table below.
- Standard Resistance:
-
Tester Connection Condition Specified Condition Click Location & Routing(I95)Location & Routingewd_type=routing;type=c;code=I95
I95-3 (E) - Body ground Always Below 1 Ω
Measure the voltage according to the value(s) in the table below.
- Standard Voltage:
-
Tester Connection Condition Specified Condition Click Location & Routing(I95)Location & Routingewd_type=routing;type=c;code=I95
I95-6 (IGWS) - Body ground Ignition switch ON 11 to 14 V I95-8 (+B) - Body ground Always 11 to 14 V
- Result:
-
Proceed to OK NG
OK
NG
Turn the ignition switch off.
Disconnect the cable from the negative (-) battery terminal.
Disconnect the I94 windshield wiper relay assembly connector.
Disconnect the 5C power distribution box assembly connector.
Measure the resistance according to the value(s) in the table below.
- Standard Resistance:
-
Tester Connection Condition Specified Condition Click Location & Routing(I94)Location & Routingewd_type=routing;type=c;code=I94
I94-4 (MPX1) - 5C-20 Cable disconnected from negative (-) battery terminal Below 1 Ω
- Result:
-
Proceed to OK NG
OK
NG
| *a | Component without harness connected (to Power Distribution Box Assembly) |
Remove the power distribution box assembly.
for LHD: Click herePower Source / Network>POWER DISTRIBUTION>MAIN BODY ECU (for LHD)>REMOVAL
for RHD: Click herePower Source / Network>POWER DISTRIBUTION>MAIN BODY ECU (for RHD)>REMOVAL
Remove the main body ECU (multiplex network body ECU) from the power distribution box assembly.
Measure the resistance according to the value(s) in the table below.
| Tester Connection | Condition | Specified Condition |
|---|---|---|
| MB-22 (CXP1) - 5C-20 | Always | Below 1 Ω |
- Result:
-
Proceed to OK NG
OK
for LHD: Click hereVehicle Exterior>WIPER / WASHER>WIPER ECU (for LHD)>REMOVAL
for RHD: Click hereVehicle Exterior>WIPER / WASHER>WIPER ECU (for RHD)>REMOVAL
NG
for LHD: Click herePower Source / Network>POWER DISTRIBUTION>MAIN BODY ECU (for LHD)>REMOVAL
for RHD: Click herePower Source / Network>POWER DISTRIBUTION>MAIN BODY ECU (for RHD)>REMOVAL
Disconnect the B3 headlight housing LH connector.
Measure the voltage according to the value(s) in the table below.
- Standard Voltage:
-
Tester Connection Condition Specified Condition Click Location & Routing(B3)Location & Routingewd_type=routing;type=c;code=B3
B3-4 (LO) - Body ground Taillights on 9.5 to 14 V B3-4 (LO) - Body ground Taillights off Below 1 V
- Result:
-
Proceed to OK NG
OK
NG
Disconnect the B3 headlight housing LH connector.
Measure the resistance according to the value(s) in the table below.
- Standard Resistance:
-
Tester Connection Condition Specified Condition Click Location & Routing(B3)Location & Routingewd_type=routing;type=c;code=B3
B3-7 (E) - Body ground Always Below 1 Ω
- Result:
-
Proceed to OK NG
OK
NG
Disconnect the B3 headlight housing LH connector.
Disconnect the 5E power distribution box assembly connector.
Measure the resistance according to the value(s) in the table below.
- Standard Resistance:
-
Tester Connection Condition Specified Condition Click Location & Routing(B3)Location & Routingewd_type=routing;type=c;code=B3
B3-3 (AT1) - 5E-5 Always Below 1 Ω
- Result:
-
Proceed to OK NG
OK
NG
Disconnect the B3 headlight housing LH connector.
Disconnect the B57 semiconductor power integration ECU connector.
Measure the resistance according to the value(s) in the table below.
- Standard Resistance:
-
Tester Connection Condition Specified Condition Click Location & Routing(B3,B57)Location & Routingewd_type=routing;type=c,c;code=B3,B57
B3-4 (LO) - B57-1 (L) Always Below 1 Ω
- Result:
-
Proceed to OK NG
OK
NG
Disconnect the B6 headlight housing RH connector.
Measure the voltage according to the value(s) in the table below.
- Standard Voltage:
-
Tester Connection Condition Specified Condition Click Location & Routing(B6)Location & Routingewd_type=routing;type=c;code=B6
B6-4 (LO) - Body ground Taillights on 9.5 to 14 V B6-4 (LO) - Body ground Taillights off Below 1 V
- Result:
-
Proceed to OK NG
OK
NG
Disconnect the B6 headlight housing RH connector.
Measure the resistance according to the value(s) in the table below.
- Standard Resistance:
-
Tester Connection Condition Specified Condition Click Location & Routing(B6)Location & Routingewd_type=routing;type=c;code=B6
B6-7 (E) - Body ground Always Below 1 Ω
- Result:
-
Proceed to OK NG
OK
NG
Disconnect the B6 headlight housing RH connector.
Disconnect the 5E power distribution box assembly connector.
Measure the resistance according to the value(s) in the table below.
- Standard Resistance:
-
Tester Connection Condition Specified Condition Click Location & Routing(B6)Location & Routingewd_type=routing;type=c;code=B6
B6-3 (AS1) - 5E-5 Always Below 1 Ω
- Result:
-
Proceed to OK NG
OK
NG
Disconnect the B6 headlight housing RH connector.
Disconnect the B57 semiconductor power integration ECU connector.
Measure the resistance according to the value(s) in the table below.
- Standard Resistance:
-
Tester Connection Condition Specified Condition Click Location & Routing(B6,B57)Location & Routingewd_type=routing;type=c,c;code=B6,B57
B6-4 (LO) - B57-2 (L) Always Below 1 Ω
- Result:
-
Proceed to OK NG
OK
NG