V35A-FTS ENGINE MECHANICAL CYLINDER HEAD GASKET INSTALLATION
CAUTION / NOTICE / HINT
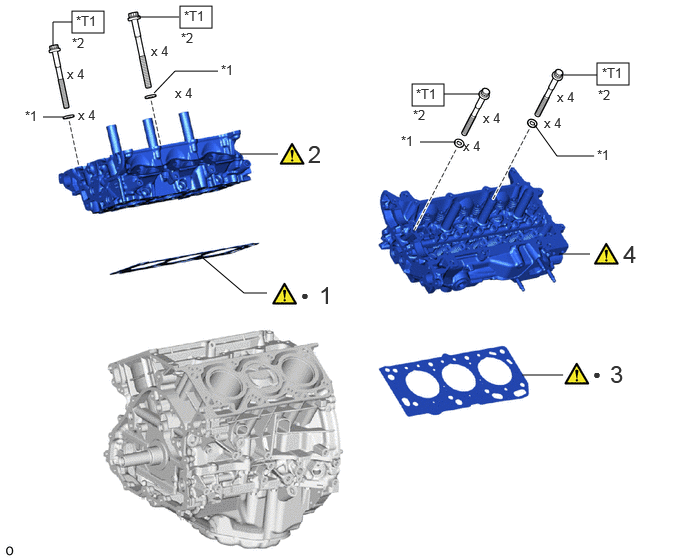
| Procedure | Part Name Code |

|

|

|
|
|---|---|---|---|---|---|
| 1 | CYLINDER HEAD GASKET RH | 11115B | ( ) |
- | - |
| 2 | CYLINDER HEAD SUB-ASSEMBLY RH | 1110A | () |
- | - |
| 3 | CYLINDER HEAD GASKET LH | 11116H | () |
- | - |
| 4 | CYLINDER HEAD SUB-ASSEMBLY LH | 11102C | () |
- | - |
| *1 | PLATE WASHER | *2 | CYLINDER HEAD SET BOLT |

|
N*m (kgf*cm, ft.*lbf): Specified torque | ● | Non-reusable part |
| *T1 | 1st: 90 (918, 66) 2nd: Turn 90° 3rd: Turn 90° |
- | - |
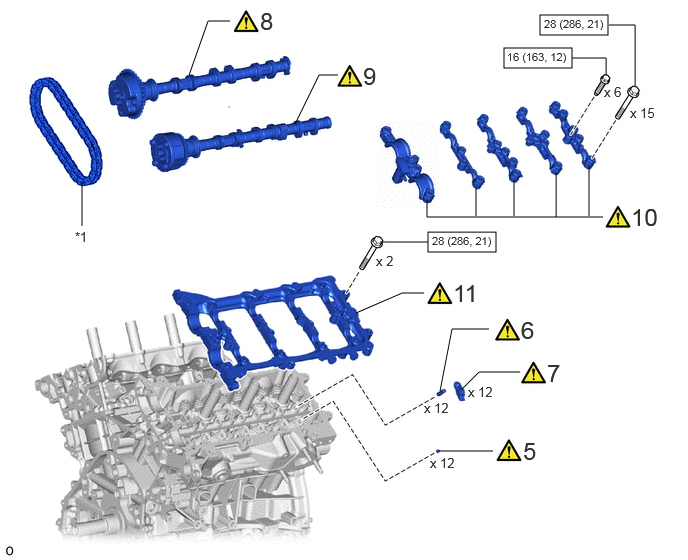
| Procedure | Part Name Code |
|
|
|
|
|---|---|---|---|---|---|
| 5 | VALVE STEM CAP (for Bank 2) | 13716 | () |
- | - |
| 6 | VALVE LASH ADJUSTER ASSEMBLY (for Bank 2) | 13750 | () |
- | - |
| 7 | VALVE ROCKER ARM SUB-ASSEMBLY LH | 13802B | () |
- | - |
| 8 | INTAKE CAMSHAFT SUB-ASSEMBLY LH | 13053B | () |
- | - |
| 9 | EXHAUST CAMSHAFT SUB-ASSEMBLY LH | 13054A | () |
- | - |
| 10 | CAMSHAFT BEARING CAP (for Bank 2) | - | () |
- | - |
| 11 | CAMSHAFT HOUSING SUB-ASSEMBLY LH | 11104A | () |
- | - |
| *1 | NO. 2 CHAIN SUB-ASSEMBLY | - | - |
|
|
N*m (kgf*cm, ft.*lbf): Specified torque | - | - |
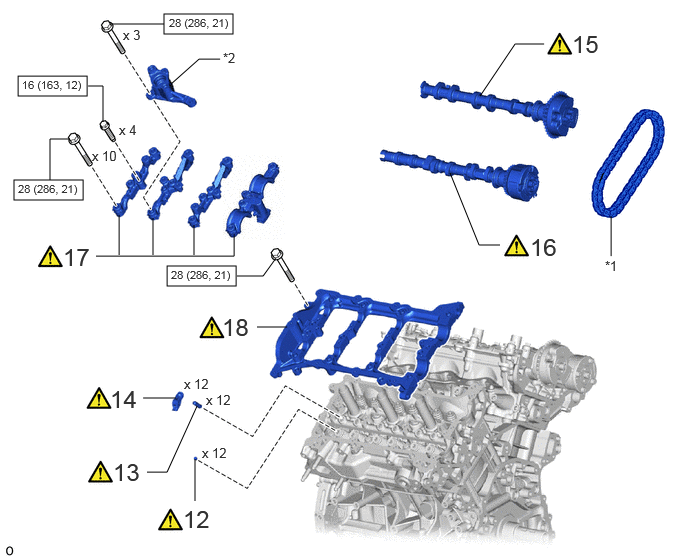
| Procedure | Part Name Code |
|
|
|
|
|---|---|---|---|---|---|
| 12 | VALVE STEM CAP (for Bank 1) | 13716 | () |
- | - |
| 13 | VALVE LASH ADJUSTER ASSEMBLY (for Bank 1) | 13750 | () |
- | - |
| 14 | VALVE ROCKER ARM SUB-ASSEMBLY RH | 13801L | () |
- | - |
| 15 | INTAKE CAMSHAFT SUB-ASSEMBLY RH | 13501B | () |
- | - |
| 16 | EXHAUST CAMSHAFT SUB-ASSEMBLY RH | 13502C | () |
- | - |
| 17 | CAMSHAFT BEARING CAP (for Bank 1) | - | () |
- | - |
| 18 | CAMSHAFT HOUSING SUB-ASSEMBLY RH | 11103C | () |
- | - |
| *1 | NO. 2 CHAIN SUB-ASSEMBLY | *2 | FUEL PUMP LIFTER HOUSING RH |
|
|
N*m (kgf*cm, ft.*lbf): Specified torque | - | - |
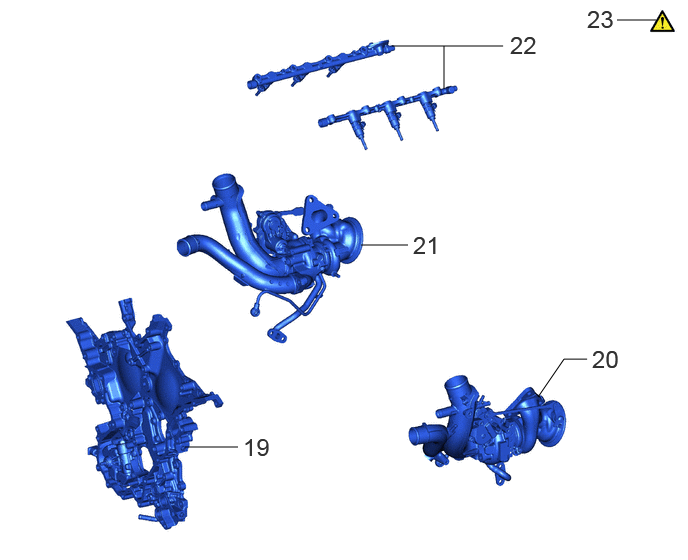
| Procedure | Part Name Code |
|
|
|
|
|---|---|---|---|---|---|
| 19 | TIMING CHAIN COVER ASSEMBLY | 11310 | - | - | - |
| 20 | NO. 2 TURBOCHARGER SUB-ASSEMBLY | 17208 | - | - | - |
| 21 | NO. 1 TURBOCHARGER SUB-ASSEMBLY | 17201A | - | - | - |
| 22 | DIRECT FUEL INJECTOR ASSEMBLY (for Direct Injection) | 23250E | - | - | - |
| 23 | REMOVE ENGINE STAND | () |
- | - | - |
CAUTION / NOTICE / HINT
- NOTICE:
-
This procedure includes the installation of small-head bolts. Refer to Small-Head Bolts of Basic Repair Hint to identify the small-head bolts.
-
Click hereGeneral>INTRODUCTION>REPAIR INSTRUCTION>PRECAUTION
- HINT:
-
Perform "Inspection After Repairs" after replacing the cylinder head sub-assembly RH or cylinder head sub-assembly LH.
-
Click hereEngine / Hybrid System>V35A-FTS (ENGINE CONTROL)>SFI SYSTEM>INITIALIZATION
PROCEDURE

 11115B 1.INSTALL CYLINDER HEAD GASKET RH
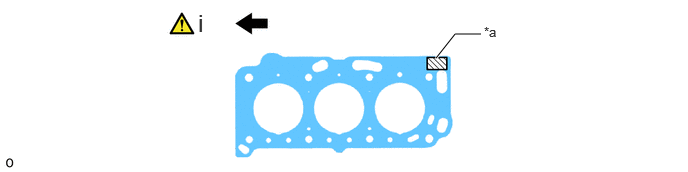
| *a | Lot No. | - | - |

|
Engine Front | - | - |
Place a new cylinder head gasket RH on the cylinder block sub-assembly RH surface with the Lot No. stamp upward.
- NOTICE:
-
·
Be careful of the installation direction.
·Gently place the cylinder head sub-assembly RH in order not to damage the cylinder gasket RH with the bottom part of the cylinder head sub-assembly RH.
1110A 2.INSTALL CYLINDER HEAD SUB-ASSEMBLY RH
- HINT:
-
Perform "Inspection After Repairs" after replacing the cylinder head sub-assembly RH.
-
Click hereEngine / Hybrid System>V35A-FTS (ENGINE CONTROL)>SFI SYSTEM>INITIALIZATION
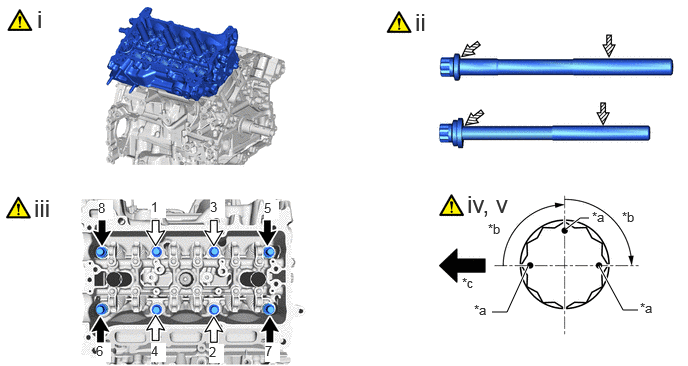
| *a | Paint Mark | *b | 90° |
| *c | Front of Engine | - | - |
|
|
Bolt Length 140 mm (5.51 in.) |

|
Bolt Length 150 mm (5.90 in.) |

|
Apply Engine Oil | - | - |
Place the cylinder head sub-assembly RH on the cylinder block sub-assembly.
- NOTICE:
-
Be careful not to allow oil to adhere to the bottom part of the cylinder head sub-assembly RH.
- HINT:
-
The cylinder head set bolts are tightened in 3 progressive steps.
Apply a light coat of engine oil to the threads and under the heads of the cylinder head set bolts.
Step 1:
Using a 12 mm socket wrench, install and uniformly tighten the 8 cylinder head set bolts with the plate washers in several steps and in the sequence shown in the illustration.
- Torque:
- 90 N*m (918 kgf*cm, 66 ft.*lbf)
Step 2:
Mark the front side of each cylinder head set bolt head with paint.
Tighten the cylinder head set bolts another 90°.
Step 3:
Tighten the cylinder head set bolts an additional 90°.
Check that the paint marks are now at a 180° angle to the front.
11116H 3.INSTALL CYLINDER HEAD GASKET LH
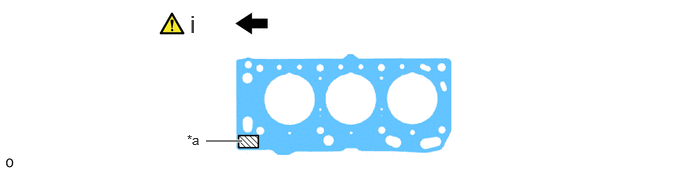
| *a | Lot No. | - | - |
|
|
Engine Front | - | - |
Place a new cylinder head gasket sub-assembly LH on the cylinder block sub-assembly surface with the Lot No. stamp upward.
- NOTICE:
-
·
Be careful of the installation direction.
·Gently place the cylinder head sub-assembly LH in order not to damage the cylinder gasket LH with the bottom part of the cylinder head sub-assembly LH.
11102C 4.INSTALL CYLINDER HEAD SUB-ASSEMBLY LH
- HINT:
-
Perform "Inspection After Repairs" after replacing the cylinder head sub-assembly LH.
-
Click hereEngine / Hybrid System>V35A-FTS (ENGINE CONTROL)>SFI SYSTEM>INITIALIZATION
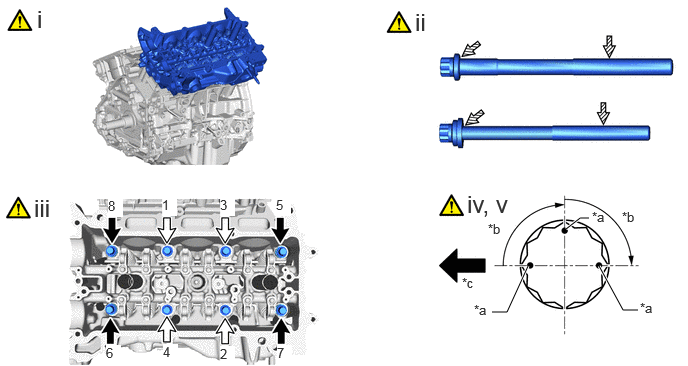
| *a | Paint Mark | *b | 90° |
| *c | Front of Engine | - | - |
|
|
Bolt Length 140 mm (5.51 in.) |
|
Bolt Length 150 mm (5.90 in.) |
|
|
Apply Engine Oil | - | - |
Place the cylinder head sub-assembly LH on the cylinder block sub-assembly.
- NOTICE:
-
Be careful not to allow oil to adhere to the bottom part of the cylinder head sub-assembly LH.
- HINT:
-
The cylinder head set bolts are tightened in 3 progressive steps.
Apply a light coat of engine oil to the threads and under the heads of the cylinder head set bolts.
Step 1:
Using a 12 mm socket wrench, install and uniformly tighten the 8 cylinder head set bolts with the plate washers in several steps in the sequence shown in the illustration.
- Torque:
- 90 N*m (918 kgf*cm, 66 ft.*lbf)
Step 2:
Mark the front side of each cylinder head set bolt head with paint.
Tighten the cylinder head set bolts another 90°.
Step 3:
Tighten the cylinder head set bolts an additional 90°.
Check that the paint marks are now at a 180° angle to the front.
13716 5.INSTALL VALVE STEM CAP (for Bank 2)
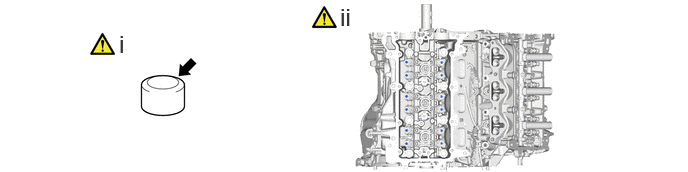
Apply a light coat of engine oil to the valve stem caps.
Install the 12 valve stem caps to the cylinder head sub-assembly.
- NOTICE:
-
Install the valve stem cap to the same place it was removed from.
13750 6.INSTALL VALVE LASH ADJUSTER ASSEMBLY (for Bank 2)
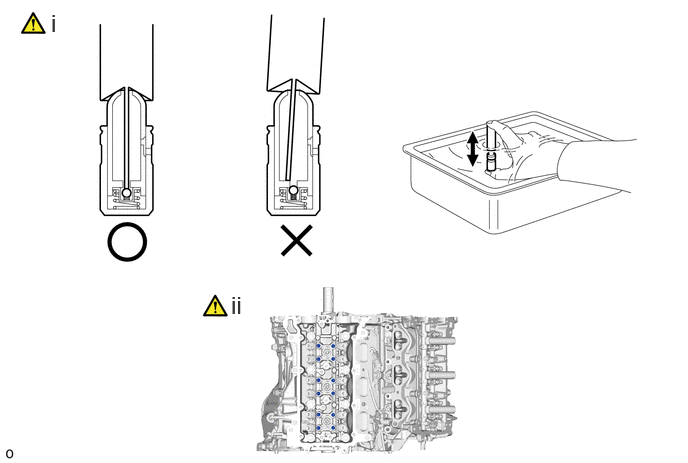
Inspect the valve lash adjuster assembly.
Click hereEngine / Hybrid System>V35A-FTS (ENGINE MECHANICAL)>ENGINE UNIT>INSPECTION
Install the 12 valve lash adjuster assemblies to the cylinder head sub-assembly.
- NOTICE:
-
Install the valve lash adjuster assembly to the same place it was removed from.
13802B 7.INSTALL VALVE ROCKER ARM SUB-ASSEMBLY LH
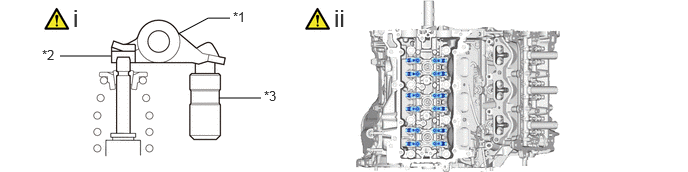
| *1 | Valve Rocker Arm Sub-assembly | *2 | Valve Stem Cap |
| *3 | Valve Lash Adjuster Assembly | - | - |
Apply engine oil to the valve lash adjuster assembly tips and valve stem cap ends.
Install the 12 valve rocker arm sub-assemblies as shown in the illustration.
- NOTICE:
-
Install the valve rocker arm sub-assembly to the same place it was removed from.
13053B 8.INSTALL INTAKE CAMSHAFT SUB-ASSEMBLY LH
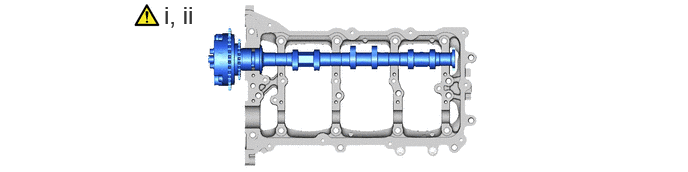
Apply a light coat of engine oil to the intake camshaft sub-assembly LH journals and camshaft housing sub-assembly LH.
Install the intake camshaft sub-assembly LH to the camshaft housing sub-assembly LH.
13054A 9.INSTALL EXHAUST CAMSHAFT SUB-ASSEMBLY LH
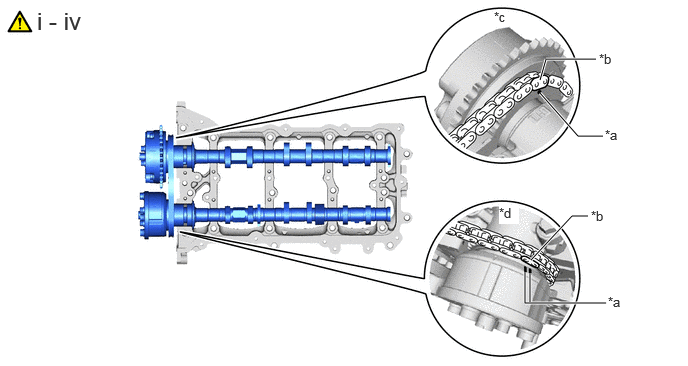
| *a | Timing Mark | *b | Mark Plate (Pink) |
| *c | Intake Side | *d | Exhaust Side |
Apply a light coat of engine oil to the exhaust camshaft sub-assembly LH journals and camshaft housing sub-assembly LH.
Install the No. 2 chain sub-assembly to the intake camshaft sub-assembly LH and exhaust camshaft sub-assembly LH.
Align the mark plates (pink) with the timing marks of the camshaft timing gear assemblies as shown in the illustration.
Install the exhaust camshaft sub-assembly LH to the camshaft housing sub-assembly LH.
10.INSTALL CAMSHAFT BEARING CAP (for Bank 2)
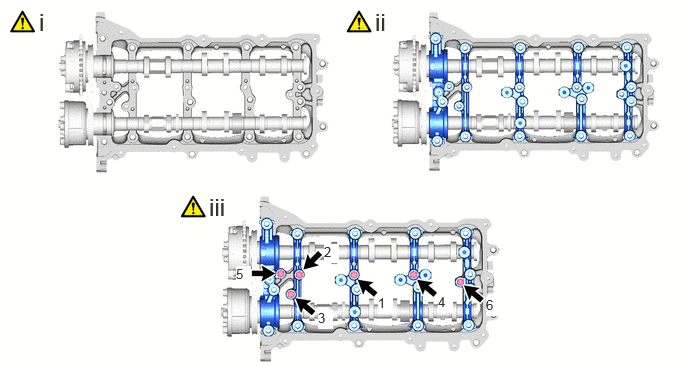
Apply engine oil to the camshaft bearing caps.
Make sure on the camshaft bearing caps and place each in the proper position and direction.
Install and tighten the 6 bolts in the order shown in the illustration.
- Torque:
- 16 N*m (163 kgf*cm, 12 ft.*lbf)
- HINT:
-
Bolt Length 40 mm (1.57 in.)
11104A 11.INSTALL CAMSHAFT HOUSING SUB-ASSEMBLY LH
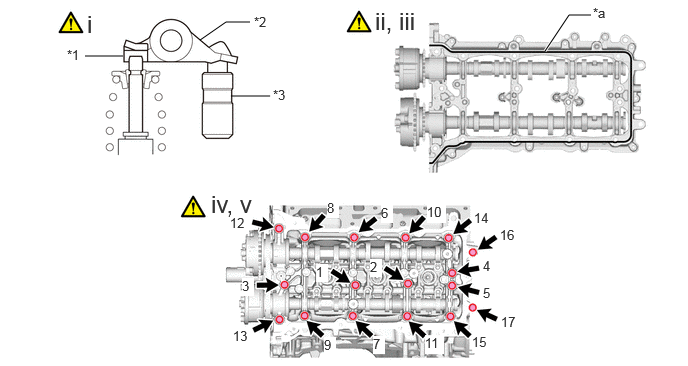
| *1 | Valve Stem Cap | *2 | Valve Rocker Arm Sub-assembly |
| *3 | Valve Lash Adjuster Assembly | - | - |
| *a | Seal Packing | - | - |
Make sure that the valve rocker arm sub-assembly is installed as shown in the illustration.
Apply seal packing in a continuous line as shown in the illustration.
- Seal packing:
-
Toyota Genuine Seal Packing Black, Three Bond 1207B or equivalent
- Seal diameter:
-
3.0 to 4.0 mm (0.118 to 0.158 in.)
- NOTICE:
-
·
Remove any oil from the contact surface.
·Install the camshaft housing sub-assembly LH within 3 minutes.
·Do not start the engine for at least 2 hours after installation.
Set the camshaft housing sub-assembly LH to the cylinder head sub-assembly LH.
Install the camshaft housing sub-assembly LH and tighten the 17 bolts in the order shown in the illustration.
- Torque:
- 28 N*m (286 kgf*cm, 21 ft.*lbf)
| Item | Length |
|---|---|
| Camshaft housing sub-assembly LH installation bolt | 40 mm (1.57 in.) |
| Bearing cap bolt | 65 mm (2.56 in.) |
- NOTICE:
-
·
If any of the bolts are loosened during installation, remove the camshaft housing sub-assembly LH, clean the installation surfaces, and reapply seal packing.
·If the camshaft housing sub-assembly LH is removed because any of the bolts are loosened during installation, make sure that the previously applied seal packing does not enter any oil passages.
Remove any protruding seal packing black.
13716 12.INSTALL VALVE STEM CAP (for Bank 1)
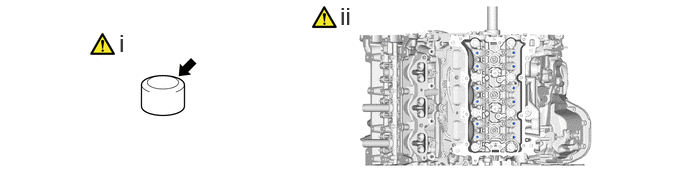
Apply a light coat of engine oil to the valve stem caps.
Install the 12 valve stem caps to the cylinder head sub-assembly.
- NOTICE:
-
Install the valve stem cap to the same place it was removed from.
13750 13.INSTALL VALVE LASH ADJUSTER ASSEMBLY (for Bank 1)
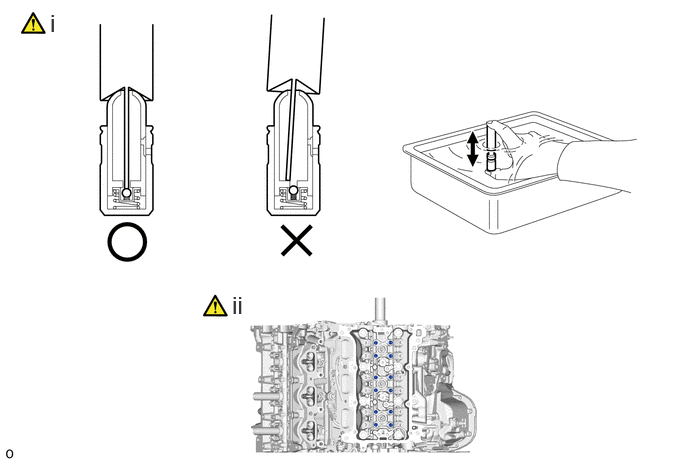
Inspect the valve lash adjuster assembly.
Click hereEngine / Hybrid System>V35A-FTS (ENGINE MECHANICAL)>ENGINE UNIT>INSPECTION
Install the 12 valve lash adjuster assemblies to the cylinder head sub-assembly.
- NOTICE:
-
Install the valve lash adjuster assembly to the same place it was removed from.
13801L 14.INSTALL VALVE ROCKER ARM SUB-ASSEMBLY RH
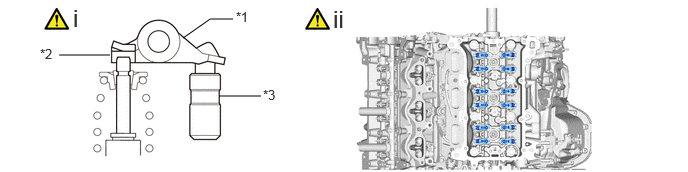
| *1 | Valve Rocker Arm Sub-assembly | *2 | Valve Stem Cap |
| *3 | Valve Lash Adjuster Assembly | - | - |
Apply engine oil to the valve lash adjuster assembly tips and valve stem cap ends.
Install the 12 valve rocker arm sub-assemblies as shown in the illustration.
- NOTICE:
-
Install the valve rocker arm sub-assembly to the same place it was removed from.
13501B 15.INSTALL INTAKE CAMSHAFT SUB-ASSEMBLY RH

Apply a light coat of engine oil to the intake camshaft sub-assembly RH journals and camshaft housing sub-assembly RH.
Install the intake camshaft sub-assembly RH to the camshaft housing sub-assembly RH.
13502C 16.INSTALL EXHAUST CAMSHAFT SUB-ASSEMBLY RH
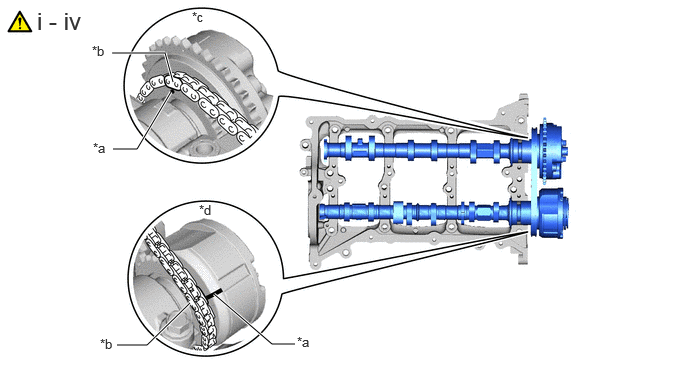
| *a | Timing Mark | *b | Mark Plate (Pink) |
| *c | Intake Side | *d | Exhaust Side |
Apply a light coat of engine oil to the exhaust camshaft sub-assembly RH journals and camshaft housing sub-assembly RH.
Install the No. 2 chain sub-assembly to the intake camshaft sub-assembly RH and exhaust camshaft sub-assembly RH.
Align the mark plates (pink) with the timing marks of the camshaft timing gear assemblies as shown in the illustration.
Install the exhaust camshaft sub-assembly RH to the camshaft housing sub-assembly RH.
17.INSTALL CAMSHAFT BEARING CAP (for Bank 1)
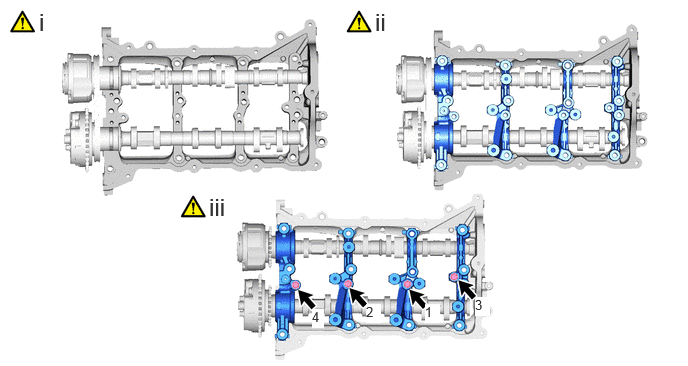
Apply engine oil to the camshaft bearing caps.
Make sure on the camshaft bearing caps and place each in the proper position and direction.
Install and tighten the 4 bolts in the order shown in the illustration.
- Torque:
- 16 N*m (163 kgf*cm, 12 ft.*lbf)
- HINT:
-
Bolt Length 40 mm (1.57 in.)
11103C 18.INSTALL CAMSHAFT HOUSING SUB-ASSEMBLY RH
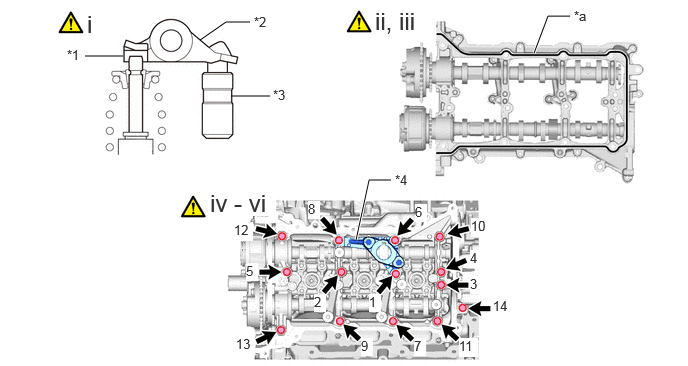
| *1 | Valve Stem Cap | *2 | Valve Rocker Arm Sub-assembly |
| *3 | Valve Lash Adjuster Assembly | *4 | Fuel Pump Lifter Housing Sub-assembly RH |
| *a | Seal Packing | - | - |
Make sure that the valve rocker arm sub-assembly is installed as shown in the illustration.
Apply seal packing in a continuous line as shown in the illustration.
- Seal packing:
-
Toyota Genuine Seal Packing Black, Three Bond 1207B or equivalent
- Seal diameter:
-
3.0 to 4.0 mm (0.118 to 0.158 in.)
- NOTICE:
-
·
Remove any oil from the contact surface.
·Install the camshaft housing sub-assembly RH within 3 minutes.
·Do not start the engine for at least 2 hours after installation.
Set the camshaft housing sub-assembly RH to the cylinder head sub-assembly RH.
Install the fuel pump lifter housing sub-assembly RH.
Install the camshaft housing sub-assembly RH and tighten the 14 bolts in the order shown in the illustration.
- Torque:
- 28 N*m (286 kgf*cm, 21 ft.*lbf)
| Item | Length |
|---|---|
| Camshaft housing sub-assembly RH installation bolt | 40 mm (1.57 in.) |
| Bearing cap bolt | 65 mm (2.56 in.) |
- NOTICE:
-
·
If any of the bolts are loosened during installation, remove the camshaft housing sub-assembly RH, clean the installation surfaces, and reapply seal packing.
·If the camshaft housing sub-assembly RH is removed because any of the bolts are loosened during installation, make sure that the previously applied seal packing does not enter any oil passages.
Remove any protruding seal packing black.
11310 19.INSTALL TIMING CHAIN COVER ASSEMBLY
17208 20.INSTALL NO. 2 TURBOCHARGER SUB-ASSEMBLY
17201A 21.INSTALL NO. 1 TURBOCHARGER SUB-ASSEMBLY
23250E 22.INSTALL DIRECT FUEL INJECTOR ASSEMBLY (for Direct Injection)
23.REMOVE ENGINE STAND