INTERIOR PANELS / TRIM INSTRUMENT PANEL SAFETY PAD DISASSEMBLY
CAUTION / NOTICE / HINT
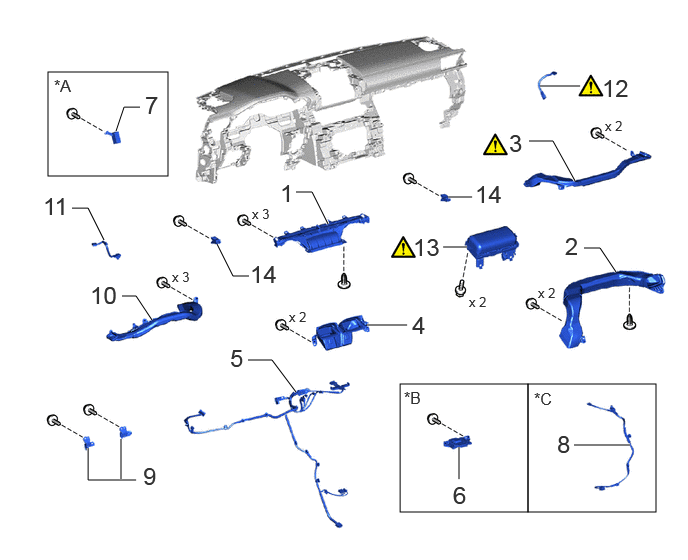
| Procedure | Part Name Code |

|

|

|
|
|---|---|---|---|---|---|
| 1 | DEFROSTER NOZZLE ASSEMBLY | 55950G | - | - | - |
| 2 | NO. 3 HEATER TO REGISTER DUCT SUB-ASSEMBLY | 55086 | - | - | - |
| 3 | NO. 2 SIDE DEFROSTER NOZZLE DUCT | 55972C | ( ) |
- | - |
| 4 | NO. 2 HEATER TO REGISTER DUCT | 55844 | - | - | - |
| 5 | ANTENNA CORD SUB-ASSEMBLY | 86101 | - | - | - |
| 6 | NAVIGATION ANTENNA ASSEMBLY WITH BRACKET | - | - | - | - |
| 7 | ANTENNA DIVIDER | 86681C | - | - | - |
| 8 | NO. 1 NAVIGATION WIRE | 86842 | - | - | - |
| 9 | NO. 1 METER HOOD RETAINER | 55416A | - | - | - |
| 10 | NO. 1 SIDE DEFROSTER NOZZLE DUCT | 55971C | - | - | - |
| 11 | NO. 2 INSTRUMENT PANEL WIRE | 82142 | - | - | - |
| 12 | NO. 4 INSTRUMENT PANEL WIRE | 82144 | () |
- | - |
| 13 | INSTRUMENT PANEL PASSENGER AIRBAG ASSEMBLY | 73960A | () |
- | - |
| 14 | NO. 1 INSTRUMENT PANEL PIN | 55328 | - | - | - |
| *A | w/ Divider | *B | w/ Navigation Antenna |
| *C | w/ Navigation Wire | - | - |
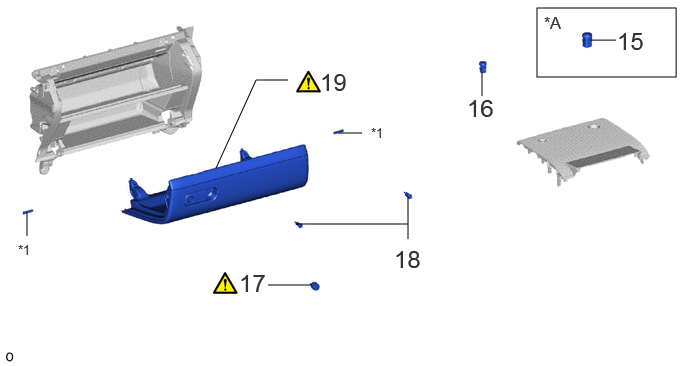
| Procedure | Part Name Code |
|
|
|
|
|---|---|---|---|---|---|
| 15 | INSTRUMENT PANEL HOLE COVER | - | - | - | - |
| 16 | AUTOMATIC LIGHT CONTROL SENSOR | 89120A | - | - | - |
| 17 | GLOVE COMPARTMENT DOOR LOCK CYLINDER ASSEMBLY | - | () |
- | - |
| 18 | GLOVE COMPARTMENT DOOR CHECK CUSHION | 55557A | - | - | - |
| 19 | GLOVE COMPARTMENT DOOR SUB-ASSEMBLY | 55501A | () |
- | - |
| *A | for 9 Inch Display | - | - |
| *1 | GLOVE COMPARTMENT DOOR HINGE SHAFT | - | - |
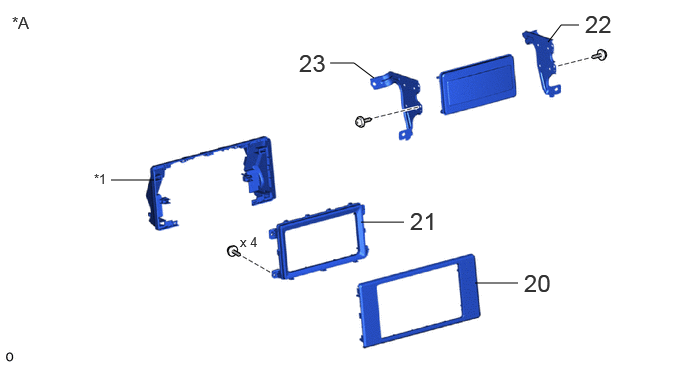
| Procedure | Part Name Code |
|
|
|
|
|---|---|---|---|---|---|
| 20 | CENTER INSTRUMENT CLUSTER FINISH PANEL | 55412D | - | - | - |
| 21 | CENTER LOWER INSTRUMENT CLUSTER FINISH PANEL | 55413D | - | - | - |
| 22 | NO. 2 RADIO RECEIVER BRACKET | 86212C | - | - | - |
| 23 | NO. 1 RADIO RECEIVER BRACKET | 86211J | - | - | - |
| *A | w/o Audio | - | - |
| *1 | CENTER UPPER INSTRUMENT CLUSTER FINISH PANEL | - | - |
- HINT:
-
·
Use the same procedure for RHD and LHD vehicles.
·The procedure listed below is for LHD vehicles.
PROCEDURE

 55950G 1.REMOVE DEFROSTER NOZZLE ASSEMBLY

55086 2.REMOVE NO. 3 HEATER TO REGISTER DUCT SUB-ASSEMBLY

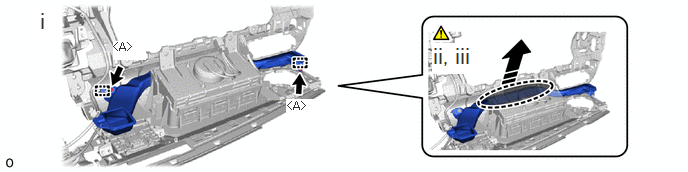
55972C 3.REMOVE NO. 2 SIDE DEFROSTER NOZZLE DUCT

|
Place Hand Here |

|
Remove in this Direction |
Remove the 2 screws <A> and detach the guide.
Place your hand at the position as shown in the illustration and widen the gap.
Pull in the removal direction and remove the No. 2 side defroster nozzle duct.
55844 4.REMOVE NO. 2 HEATER TO REGISTER DUCT

86101 5.REMOVE ANTENNA CORD SUB-ASSEMBLY
6.REMOVE NAVIGATION ANTENNA ASSEMBLY WITH BRACKET (w/ Navigation Antenna)
86681C 7.REMOVE ANTENNA DIVIDER (w/ Divider)
86842 8.REMOVE NO. 1 NAVIGATION WIRE (w/ Navigation Wire)
55416A 9.REMOVE NO. 1 METER HOOD RETAINER

55971C 10.REMOVE NO. 1 SIDE DEFROSTER NOZZLE DUCT

82142 11.REMOVE NO. 2 INSTRUMENT PANEL WIRE
- HINT:
-
The illustrations are representative examples, and details may differ.
for LHD:

for RHD:

82144 12.REMOVE NO. 4 INSTRUMENT PANEL WIRE
- HINT:
-
The illustrations are representative examples, and details may differ.
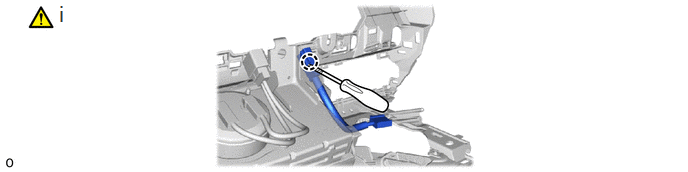
Using a thin-bladed screwdriver, detach the claw and remove the No. 4 instrument panel wire.
- HINT:
-
Tape the thin-bladed screwdriver tip before use.
73960A 13.REMOVE INSTRUMENT PANEL PASSENGER AIRBAG ASSEMBLY
|
|
Click here() |
55328 14.REMOVE NO. 1 INSTRUMENT PANEL PIN
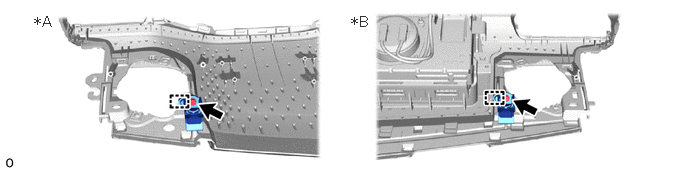
| *A | for LH Side | *B | for RH Side |
15.REMOVE INSTRUMENT PANEL HOLE COVER (for 9 Inch Display)

89120A 16.REMOVE AUTOMATIC LIGHT CONTROL SENSOR
17.REMOVE GLOVE COMPARTMENT DOOR LOCK CYLINDER ASSEMBLY
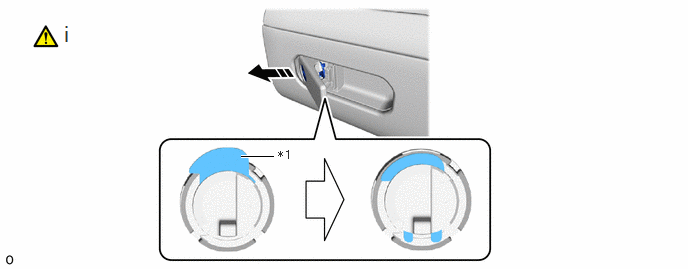
| *1 | Cylinder Lock | - | - |
|
|
Remove in this Direction | - | - |
Press the cylinder lock to release it and pull out the glove compartment door lock cylinder assembly from the glove compartment door assembly to remove it as shown in the illustration.
55557A 18.REMOVE GLOVE COMPARTMENT DOOR CHECK CUSHION
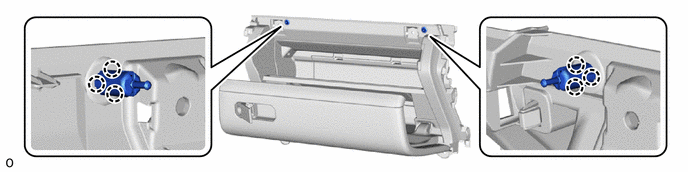
55501A 19.REMOVE GLOVE COMPARTMENT DOOR SUB-ASSEMBLY
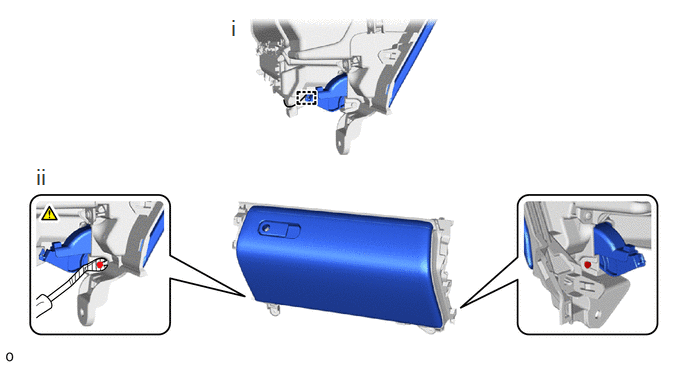
Detach the hook and disconnect the glove box door stopper.
Using clip remover, remove the 2 glove compartment hinge shafts.
- HINT:
-
Tape the clip remover tip before use.
55412D 20.REMOVE CENTER INSTRUMENT CLUSTER FINISH PANEL (w/o Audio)

55413D 21.REMOVE CENTER LOWER INSTRUMENT CLUSTER FINISH PANEL (w/o Audio)

86212C 22.REMOVE NO. 2 RADIO RECEIVER BRACKET (w/o Audio)

86211J 23.REMOVE NO. 1 RADIO RECEIVER BRACKET (w/o Audio)