WINDOW / GLASS BACK DOOR GLASS INSTALLATION
CAUTION / NOTICE / HINT
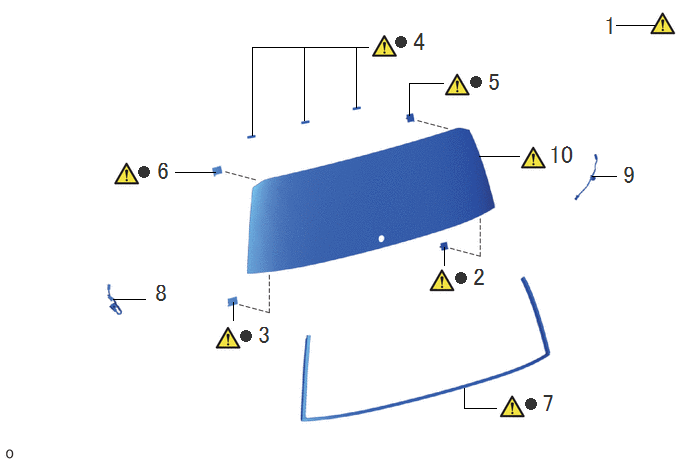
| Procedure | Part Name Code |

|

|

|
|
|---|---|---|---|---|---|
| 1 | CLEAN BACK DOOR GLASS | 68131 | ( ) |
- | - |
| 2 | NO. 1 BACK DOOR GLASS SPACER | 64818B | () |
- | - |
| 3 | NO. 2 BACK DOOR GLASS SPACER | 64819C | () |
- | - |
| 4 | BACK DOOR GLASS ADHESIVE DAM | 68294B | () |
- | - |
| 5 | BACK WINDOW GLASS CLIP RH | 64827A | () |
- | - |
| 6 | BACK WINDOW GLASS CLIP LH | 64828 | () |
- | - |
| 7 | BACK WINDOW OUTSIDE MOULDING | 75573C | () |
- | - |
| 8 | REAR NO. 2 WINDOW WIRE | 82187 | - | - | - |
| 9 | REAR NO. 1 WINDOW WIRE | 82186 | - | - | - |
| 10 | INSTALL BACK DOOR GLASS | 68131 | () |
- | - |
| ● | Non-reusable part | - | - |
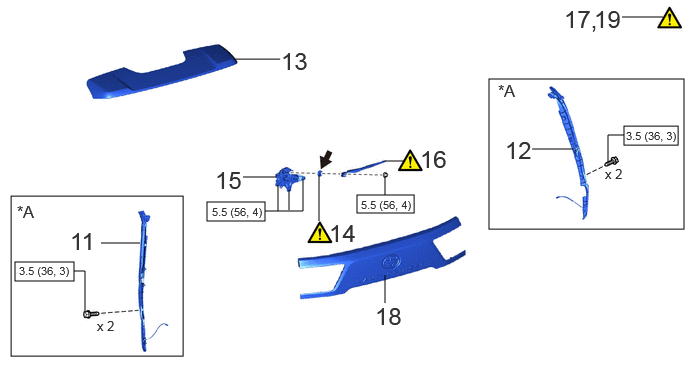
| Procedure | Part Name Code |
|
|
|
|
|---|---|---|---|---|---|
| 11 | POWER BACK DOOR SENSOR ASSEMBLY LH | 84280D | - | - | - |
| 12 | POWER BACK DOOR SENSOR ASSEMBLY RH | 84270G | - | - | - |
| 13 | REAR SPOILER SUB-ASSEMBLY | 76085 | - | - | - |
| 14 | REAR WIPER MOTOR GROMMET | 85143R | () |
- | - |
| 15 | REAR WIPER MOTOR ASSEMBLY | 85110R | - | - | - |
| 16 | INSTALL REAR WIPER ARM AND BLADE ASSEMBLY | - | () |
- | - |
| 17 | INSPECT REAR WIPER ARM AND BLADE ASSEMBLY | - | () |
- | - |
| 18 | BACK DOOR OUTSIDE GARNISH SUB-ASSEMBLY | 76801 | - | - | - |
| 19 | CHECK FOR LEAK AND REPAIR | - | () |
- | - |
| *A | w/ Power Back Door | - | - |

|
N*m (kgf*cm, ft.*lbf): Specified torque |

|
MP Grease |
PROCEDURE

 1. CLEAN BACK DOOR GLASS
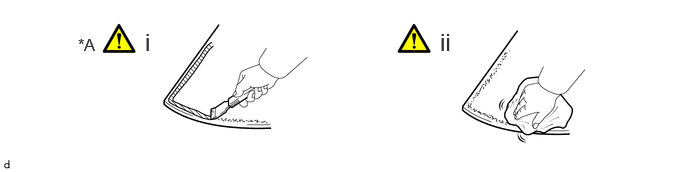
| *A | When reusing the Back Door Glass | - | - |
When reusing the back door glass:
Using a scraper, grind off the adhesive and double-sided tape left on the back door glass.
- NOTICE:
-
Do not damage the back door glass.
Using non-residue solvent, clean the outer edge of the back door glass.
- NOTICE:
-
Be sure to clean the back door glass even it is new.
64818B 2.INSTALL NO. 1 BACK DOOR GLASS SPACER
When reusing the back door glass:
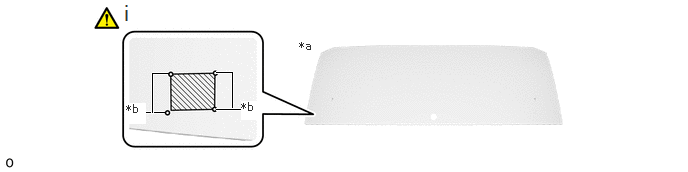
| *a | Backside | *b | Installation Alignment Mark |

|
Glass Primer | - | - |
Using a brush, apply primer to the installation area of the No. 1 back door glass spacer.
- NOTICE:
-
Do not apply too much glass primer.
Remove the peeling paper while making sure not to touch the adhesional surface.
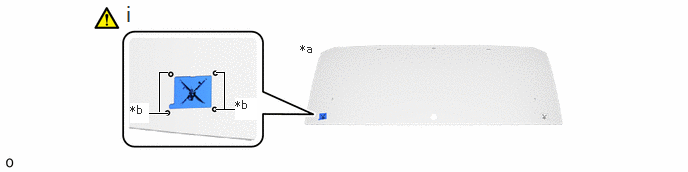
| *a | Backside | *b | Installation Alignment Mark |
Install the No. 1 back door glass spacer to the back door glass while aligning the No. 1 back door glass spacer with the alignment marks of the back door glass shown in the illustration.
- NOTICE:
-
After the primer dries (in approximately 3 minutes), install the No. 1 back door glass spacer.
64819C 3.INSTALL NO. 2 BACK DOOR GLASS SPACER
Use the same procedure as for the No. 1 back door glass spacer.
68294B 4.INSTALL BACK DOOR GLASS ADHESIVE DAM
When reusing the back door glass:
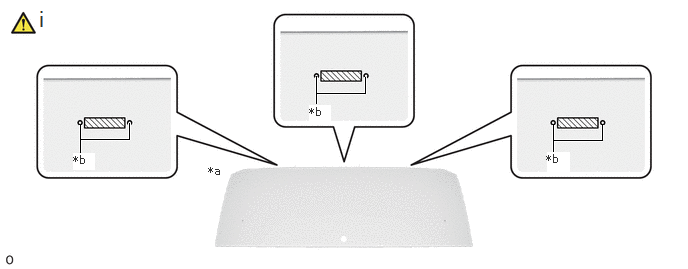
| *a | Backside | *b | Installation Alignment Mark |
|
|
Glass Primer | - | - |
Using a brush, apply primer to the installation area of the back door glass adhesive dam.
- NOTICE:
-
Do not apply too much glass primer.
Remove the peeling paper while making sure not to touch the adhesional surface.
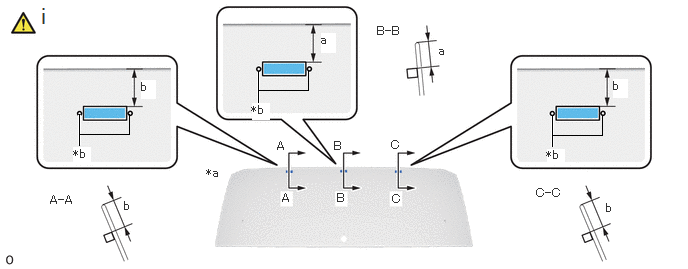
| *a | Backside | *b | Installation Alignment Mark |
Install the back door glass adhesive dam to the back door glass while aligning the back door glass adhesive dam with the alignment marks of the back door glass shown in the illustration.
- Standard Dimension:
-
Area Dimension a 14.4 to 17.4 mm (0.567 to 0.685 in.) b 18 to 21 mm (0.709 to 0.827 in.)
- NOTICE:
-
After the primer dries (in approximately 3 minutes), install the back door glass adhesive dam.
64827A 5.INSTALL BACK WINDOW GLASS CLIP RH
When reusing the back door glass:
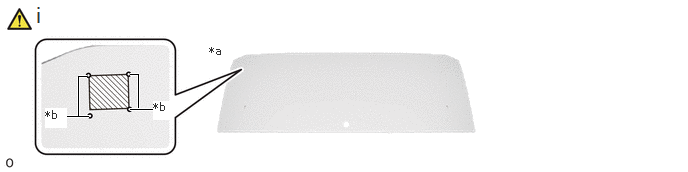
| *a | Backside | *b | Installation Alignment Mark |
|
|
Glass Primer | - | - |
Using a brush, apply primer to the installation area of the back window glass clip RH.
- NOTICE:
-
Do not apply too much glass primer.
Remove the peeling paper while making sure not to touch the adhesional surface.
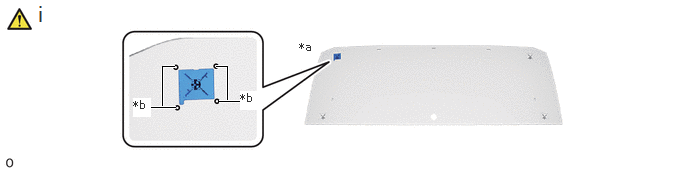
| *a | Backside | *b | Installation Alignment Mark |
Install the back window glass clip RH to the back door glass while aligning the back window glass clip RH with the alignment marks of the back door glass shown in the illustration.
- NOTICE:
-
After the primer dries (in approximately 3 minutes), install the back window glass clip RH.
64828 6.INSTALL BACK WINDOW GLASS CLIP LH
Use the same procedure as for the back window glass clip RH.
75573C 7.INSTALL BACK WINDOW OUTSIDE MOULDING
When reusing the back door glass:
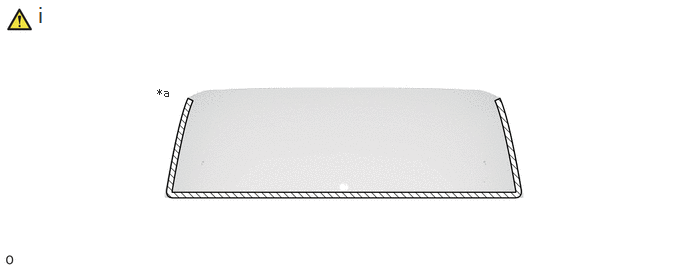
| *a | Backside | - | - |
|
|
Glass Primer | - | - |
Using a brush, apply primer to the installation area of the back window outside moulding.
- NOTICE:
-
Do not apply too much glass primer.
Remove the peeling paper while making sure not to touch the adhesional surface.
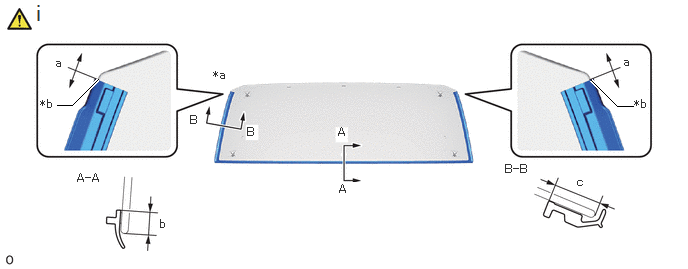
| *a | Backside | *b | R End |
Install the back window outside moulding at the position on the back door glass as shown in the illustration.
- NOTICE:
-
After the primer dries (in approximately 3 minutes), install the back window outside moulding.
| Area | Dimension |
|---|---|
| a | + / - 3.0 mm (0.118 in.) within |
| b | 8.9 mm (0.350 in.) |
| c | 18.3 mm (0.720 in.) |
82187 8.INSTALL REAR NO. 2 WINDOW WIRE
82186 9.INSTALL REAR NO. 1 WINDOW WIRE
68131 10.INSTALL BACK DOOR GLASS
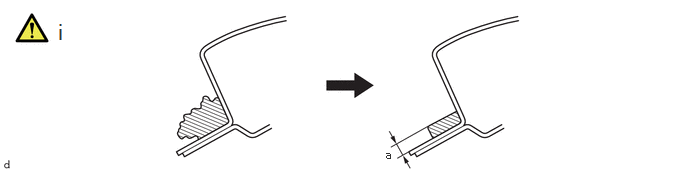
|
|
Adhesive | - | - |
Follow the procedure below to clean the installation surface of the vehicle body.
1. If the adhesive left on the installation surface of the vehicle body is significantly uneven, smooth it out using a utility knife, etc.
| Area | Dimension |
|---|---|
| a | 1.0 to 3.0 mm (0.0394 to 0.118 in.) |
- NOTICE:
-
Make sure to leave some adhesive.
2. Using non-residue solvent, clean the installation surface of the vehicle body.
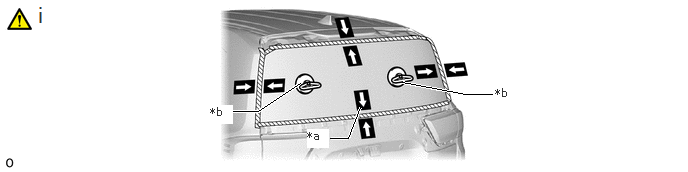
| *a | Matchmarks | *b | Suction Cups |
Follow the procedure below to perform work before installing the back door glass.
1. Install the suction cups to the back door glass.
2. Temporarily place the back door glass on the body and position it so that the gap between the body and the edge of the back door glass is the same width at the top and sides.
3. Attach adhesive tape on the back door glass and body panel, and place matchmarks for installation using a pen.(when new the back door glass)
- NOTICE:
-
·
From inside the cabin, check that the back door glass spacer and the back window glass clip can be attached.
·When reusing the back door glass, check and correct the matchmark positions.
4. Remove the back door glass.
5. Apply body primer to the exposed sections of the body surface on the vehicle side (where no adhesive remains).
- NOTICE:
-
·
When applying the body primer, take care of the panel joints and spot welds.
·Do not apply to the adhesive.
·Do not apply too much body primer.
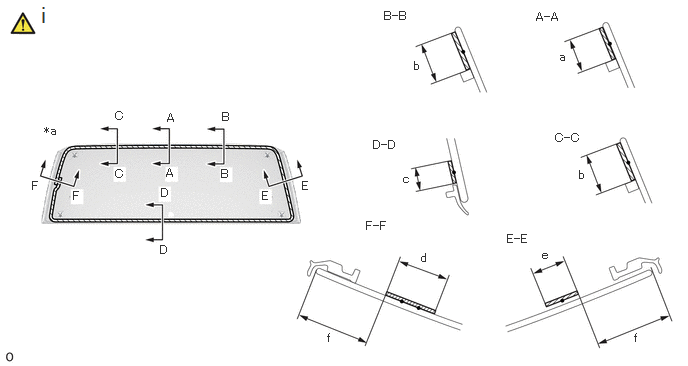
| *a | Backside | - | - |
|
|
Glass Primer | - | - |
Using a brush, apply primer to the entire perimeter of the adhesion area of the back door glass as shown in the illustration.
- NOTICE:
-
Do not apply too much glass primer.
| Area | Dimension |
|---|---|
| a | 15.9 mm (0.626 in.) |
| b | 19.5 mm (0.768 in.) |
| c | 10 mm (0.394 in.) |
| d | 22 mm (0.866 in.) |
| e | 14 mm (0.551 in.) |
| f | 33.9 mm (1.335 in.) |
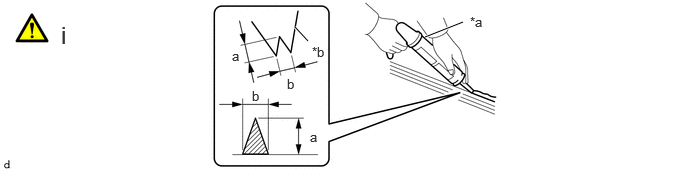
| *a | Sealant Gun | *b | Nozzle |
|
|
Adhesive | - | - |
Cut off the tip of the cartridge nozzle as shown in the illustration, and set the adhesive in the sealant gun.
| Area | Dimension |
|---|---|
| a | 12 to 15 mm (0.472 to 0.591 in.) |
| b | 8.0 to 11 mm (0.315 to 0.433 in.) |
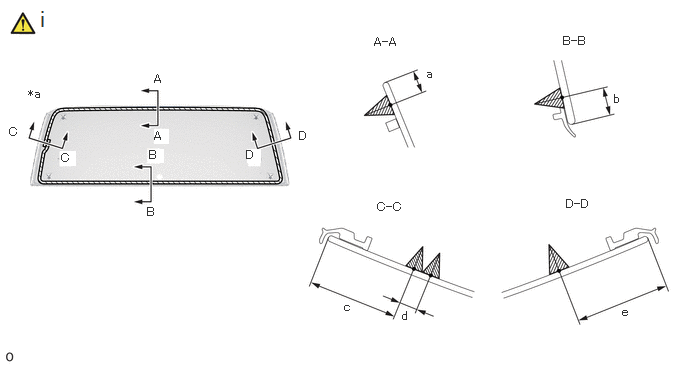
| *a | Backside | - | - |
|
|
Adhesive | ● | Ceramic Notch |
Apply a bead of adhesive as shown in the illustration.
- NOTICE:
-
After the primer dries (in approximately 3 minutes), apply the adhesive.
| Area | Dimension |
|---|---|
| a | 9.8 mm (0.386 in.) |
| b | 11.9 mm (0.469 in.) |
| c | 40.9 mm (1.61 in.) |
| d | 8.0 mm (0.315 in.) |
| e | 40.9 mm (1.61 in.) |
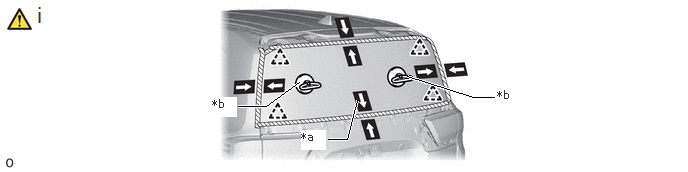
| *a | Matchmarks | *b | Suction Cups |
Follow the procedure below to perform back door glass installation.
1. Using the suction cups, align the matchmarks and install the back door glass.
- NOTICE:
-
·
After the body side primer dries (in approximately 3 minutes), install the back door glass.
·From inside the cabin, check that the back door glass spacer and the back window glass clip are attached.
2. Gently push the front surface of the back door glass from outside of vehicle to fully contact with the adhesive.
- HINT:
-
Pushing force: 98 N (10 kgf) or higher
3. Remove any excess adhesive or apply as necessary.
- NOTICE:
-
Apply adhesive up to the edge of the back door glass.
4. Remove any excess adhesive before it hardens.
5. Using protective tape, hold the back door glass in place until the adhesive hardens.
- NOTICE:
-
Follow the instructions for each adhesive manufacturer or the corresponding owner's manual for the minimum amount of time necessary for drying and prior to driving the vehicle after applying adhesive.
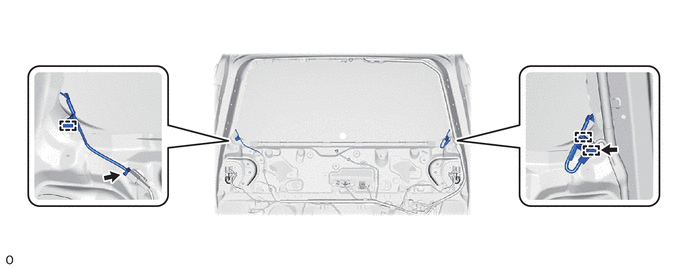
Attach the clamp and connect the 2 connectors.
84280D 11.INSTALL POWER BACK DOOR SENSOR ASSEMBLY LH (w/ Power Back Door)
84270G 12.INSTALL POWER BACK DOOR SENSOR ASSEMBLY RH (w/ Power Back Door)
Use the same procedure as for the Power Back Door Sensor Assembly LH.
76085 13.INSTALL REAR SPOILER SUB-ASSEMBLY
85143R 14.INSTALL REAR WIPER MOTOR GROMMET
|
|
Click here() |
85110R 15.INSTALL REAR WIPER MOTOR ASSEMBLY
16.INSTALL REAR WIPER ARM AND BLADE ASSEMBLY
|
|
Click here() |
17.INSPECT REAR WIPER ARM AND BLADE ASSEMBLY
|
|
Click here() |
76801 18.INSTALL BACK DOOR OUTSIDE GARNISH SUB-ASSEMBLY
19. CHECK FOR LEAK AND REPAIR
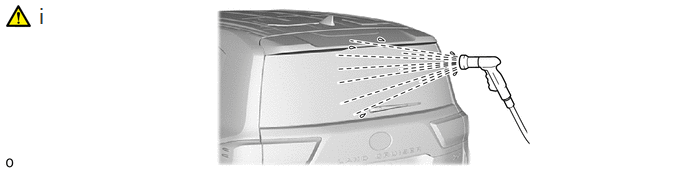
Follow the procedure below to check for water leak and repair.
1. Remove the protective tape.
2. After the adhesive has hardened, apply water from outside the vehicle and check for leaks from in the cabin.
3. If water leaks into the cabin, seal any leaks with adhesive after the water has dried.