AXLE AND DIFFERENTIAL REAR AXLE SHAFT INSTALLATION
CAUTION / NOTICE / HINT
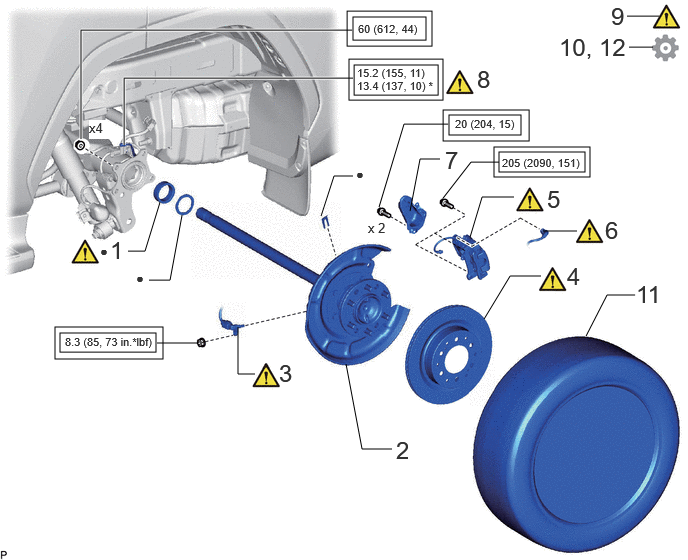
| Procedure | Part Name Code |

|

|

|
|
|---|---|---|---|---|---|
| 1 | REAR AXLE SHAFT OIL SEAL LH | 42312C | ( ) |
- | - |
| 2 | REAR AXLE SHAFT LH | 42312 | - | - | - |
| 3 | REAR SPEED SENSOR LH | 89546 | () |
- | - |
| 4 | REAR DISC | 42431 | () |
- | - |
| 5 | REAR DISC BRAKE CYLINDER ASSEMBLY LH | 47850 | () |
- | - |
| 6 | NO. 2 PARKING BRAKE WIRE ASSEMBLY | 890C0A | () |
- | - |
| 7 | PARKING BRAKE ACTUATOR PROTECTOR ASSEMBLY | 46170 | - | - | - |
| 8 | REAR BRAKE FLEXIBLE HOSE | - | () |
- | - |
| 9 | CONNECT CABLE TO NEGATIVE BATTERY TERMINAL | - | () |
- | - |
| 10 | BLEED BRAKE LINE | - | - | - | () |
| 11 | REAR WHEEL | - | - | - | - |
| 12 | INITIALIZATION AFTER RECONNECTING BATTERY TERMINAL | - | - | - | () |

|
Tightening torque for "Major areas involving basic vehicle performance such as moving/turning/stopping": N*m (kgf*cm, ft.*lbf) | * | For use with union nut wrench |
| ● | Non-reusable part | - | - |
CAUTION / NOTICE / HINT
- NOTICE:
-
·
Immediately after installing the brake pads, the braking performance may be reduced. Always perform a road test in a safe place while paying attention to the surroundings.
·After replacing the rear disc brake pads, the brake pedal may feel soft due to clearance between the rear disc brake pads and rear disc. Depress the brake pedal several times until the brake pedal feels firm.
·When removing or installing the rear disc brake cylinder assembly, pushing back the disc brake piston may cause a large clearance between the brake pads and brake disc. When the brake pedal is depressed with a large clearance between the brake pads and the brake disc, DTC C13DB00, C13DC00, C13DD00, C13DE00, C140000 and/or C140A00 related to abnormal brake fluid pressure may be stored. Make sure to clear any DTCs after performing this procedure.
·While the battery is connected, even if the ignition switch is off, the brake control system activates when the brake pedal is depressed or any door courtesy switch turns on. Therefore, when servicing the brake system components, do not operate the brake pedal or open/close the doors while the battery is connected.
- HINT:
-
·
Use the same procedure for the RH and LH sides.
·The procedure listed below is for the LH side.
PROCEDURE

 42312C 1.INSTALL REAR AXLE SHAFT OIL SEAL LH

Using SST and a hammer, tap in a new rear axle shaft oil seal LH.
- SST
-
09950-60021 (09951-00770)
09950-70010 (09951-07150)
- NOTICE:
-
Do not allow foreign matter, etc. to contact the axle shaft housing hole.
42312 2.INSTALL REAR AXLE SHAFT LH
- Torque:
- 60 N*m (612 kgf*cm, 44 ft.*lbf)
89546 3.INSTALL REAR SPEED SENSOR LH
|
|
Click here() |
42431 4.INSTALL REAR DISC
|
|
Click here() |
47850 5.CONNECT DISC BRAKE CYLINDER ASSEMBLY REAR LH

Connect the rear disc brake cylinder and install the 2 bolts.
- Torque:
- 205 N*m (2090 kgf*cm, 151 ft.*lbf)
- NOTICE:
-
·
Do not twist the rear flexible hose.
·Make sure that the bolts are free from damage and foreign matter.
·Do not overtighten the bolts.
890C0A 6.CONNECT NO. 2 PARKING BRAKE WIRE ASSEMBLY
|
|
() |
46170 7.INSTALL PARKING BRAKE ACTUATOR PROTECTOR ASSEMBLY (w/ PARKING BRAKE ACTUATOR PROTECTOR ASSEMBLY)
8.CONNECT REAR BRAKE FLEXIBLE HOSE
|
|
|
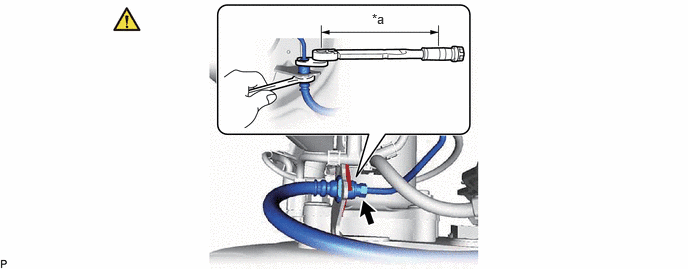
| *a | Torque Wrench Fulcrum Length | - | - |
Install the rear flexible hose with a new clip.
- NOTICE:
-
Install the clip as far as it will go.
Using a union nut wrench, connect the brake tube to the rear flexible hose while holding the rear flexible hose with a wrench.
- Torque:
- Specified tightening torque : 15.2 N*m (155 kgf*cm, 11 ft.*lbf)
- NOTICE:
-
·
Do not kink or damage the brake tube.
·Do not allow any foreign matter such as dirt or dust to enter the brake tube from the connecting parts.
- HINT:
-
·
Calculate the torque wrench reading when changing the fulcrum length of the torque wrench.
Click hereGeneral>INTRODUCTION>REPAIR INSTRUCTION>PRECAUTION
·When using a union nut wrench (fulcrum length of 22 mm (0.866 in.)) + torque wrench (fulcrum length of 162 mm (6.378 in.)): 13.4 N*m (137 kgf*cm, 10 ft.*lbf)
9.CONNECT CABLE TO NEGATIVE BATTERY TERMINAL
|
|
Click here() |
10.BLEED BRAKE LINE
11.INSTALL REAR WHEEL
12. INITIALIZATION AFTER RECONNECTING BATTERY TERMINAL
Click hereGeneral>SETUP>WHEN DISCONNECTING OR RECONNECTING BATTERY TERMINAL>WORK PROCEDURE
- HINT:
-
When disconnecting and reconnecting the battery, there is an automatic learning function that completes learning when the respective system is used.
-
Click hereGeneral>SETUP>WHEN DISCONNECTING OR RECONNECTING BATTERY TERMINAL>AUTOMATIC LEARNING CHART