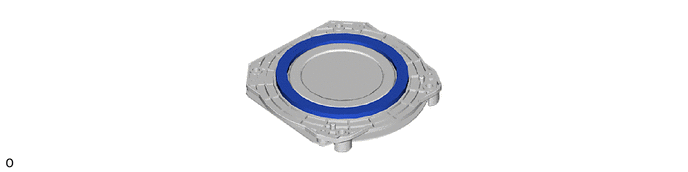
SEAT REAR NO. 1 SEAT ASSEMBLY(for LH Side) DISASSEMBLY
CAUTION / NOTICE / HINT
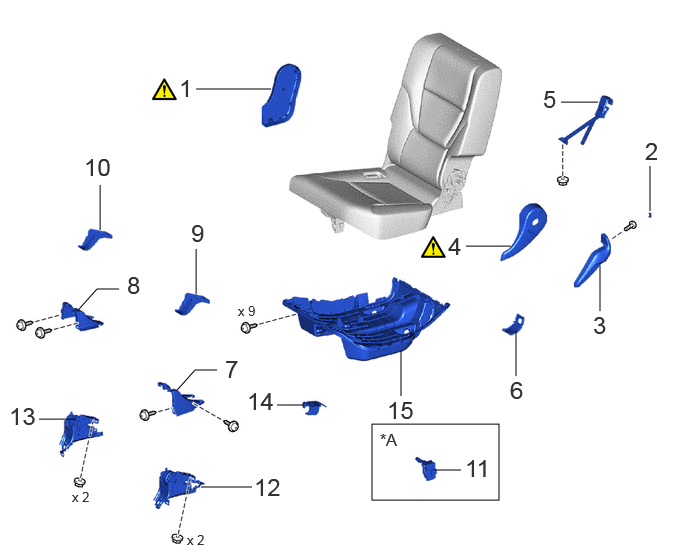
| Procedure | Part Name Code |

|

|

|
|
|---|---|---|---|---|---|
| 1 | NO. 1 SEAT NO. 2 RECLINING COVER RH | 71833V | ( ) |
- | - |
| 2 | REAR NO. 2 SEAT ADJUSTER BOLT COVER | 72329G | - | - | - |
| 3 | RECLINING ADJUSTER RELEASE HANDLE LH | 72526L | - | - | - |
| 4 | REAR NO. 2 SEAT RECLINING COVER LH | 71834X | () |
- | - |
| 5 | NO. 1 FOLD SEAT STOPPER BAND ASSEMBLY | 78950F | - | - | - |
| 6 | REAR UNDER COVER | 76971G | - | - | - |
| 7 | NO. 1 SEAT NO. 2 CUSHION COVER | 79952A | - | - | - |
| 8 | NO. 1 SEAT NO. 1 CUSHION COVER | 79951B | - | - | - |
| 9 | REAR NO. 1 SEAT NO. 4 LEG SIDE COVER | 79967W | - | - | - |
| 10 | REAR NO. 1 SEAT NO. 5 LEG SIDE COVER | 79967X | - | - | - |
| 11 | REAR SEAT WIRE LH | 82194 | - | - | - |
| 12 | REAR NO. 1 SEAT HINGE SUB-ASSEMBLY LH | 71302G | - | - | - |
| 13 | REAR NO. 1 SEAT HINGE SUB-ASSEMBLY RH | 71301H | - | - | - |
| 14 | REAR SEAT CUSHION COVER LH | 72998D | - | - | - |
| 15 | REAR SEAT CUSHION UNDER COVER LH | 72928E | - | - | - |
| *A | w/o Wire Harness | - | - |
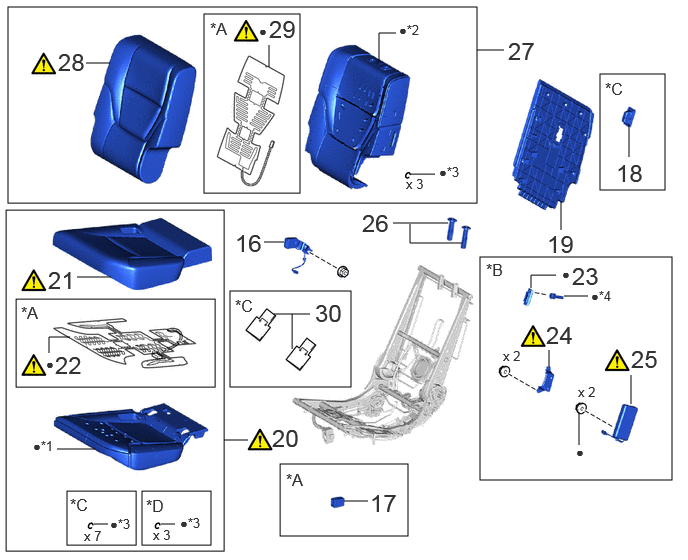
| Procedure | Part Name Code |
|
|
|
|
|---|---|---|---|---|---|
| 16 | REAR NO. 1 SEAT INNER BELT ASSEMBLY LH | 73390C | - | - | - |
| 17 | SEAT HEATER CONTROL SUB-ASSEMBLY LH | 87501F | - | - | - |
| 18 | REAR SEATBACK COVER | 72996H | - | - | - |
| 19 | REAR SEATBACK BOARD SUB-ASSEMBLY LH | 71702D | - | - | - |
| 20 | SEPARATE TYPE REAR SEAT CUSHION ASSEMBLY LH | - | () |
- | - |
| 21 | NO. 1 SEAT CUSHION COVER SUB-ASSEMBLY LH | 71076F | () |
- | - |
| 22 | REAR NO. 1 SEAT CUSHION HEATER ASSEMBLY LH | 87510Y | () |
- | - |
| 23 | REAR SEAT COVER HANGER | 71751D | - | - | - |
| 24 | REAR SEATBACK FRAME LH | 71252 | () |
- | - |
| 25 | REAR SEAT AIRBAG ASSEMBLY LH | 73940A | () |
- | - |
| 26 | REAR SEAT HEADREST SUPPORT ASSEMBLY | 71930Q | - | - | - |
| 27 | SEPARATE TYPE REAR SEATBACK ASSEMBLY LH | - | - | - | - |
| 28 | NO. 1 SEATBACK COVER SUB-ASSEMBLY LH | 79014B | () |
- | - |
| 29 | REAR NO. 1 SEATBACK HEATER ASSEMBLY LH | 87530 | () |
- | - |
| 30 | NO. 1 SEAT CUSHION CARPET | 79117D | - | - | - |
| *A | w/ Seat Heater System | *B | w/ Rear Seat Side Airbag |
| *C | w/ Child Restraint System Guide | *D | w/o Child Restraint System Guide |
| *1 | REAR NO. 1 SEAT CUSHION PAD LH | *2 | NO. 1 SEATBACK PAD LH |
| *3 | HOG RING | *4 | RIVET |
| ● | Non-reusable part | - | - |
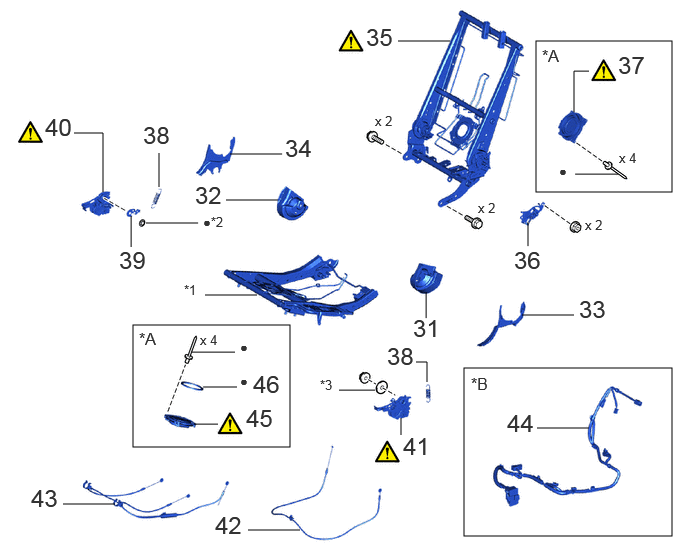
| Procedure | Part Name Code |
|
|
|
|
|---|---|---|---|---|---|
| 31 | SEAT RECLINING ADJUSTER INSIDE COVER LH | 71H76N | - | - | - |
| 32 | SEAT RECLINING ADJUSTER INSIDE COVER LH | 71H75R | - | - | - |
| 33 | SEAT RECLINING HINGE COVER LH | 72552P | - | - | - |
| 34 | SEAT RECLINING HINGE COVER LH | 72551R | - | - | - |
| 35 | NO. 1 SEATBACK FRAME SUB-ASSEMBLY LH | 79104A | () |
- | - |
| 36 | NO. 1 RECLINING CONTROL LINK SUB-ASSEMBLY LH | 72308C | - | - | - |
| 37 | NO. 1 SEAT SEATBACK CLIMATE CONTROL BLOWER LH | 85867E | () |
- | - |
| 38 | REAR SEAT CUSHION SPRING | 71461H | - | - | - |
| 39 | REAR LOWER REAR SEAT TRACK BRACKET LH | 72144 | - | - | - |
| 40 | REAR SEAT LOCK ASSEMBLY RH | 72650J | () |
- | - |
| 41 | REAR SEAT LOCK ASSEMBLY LH | 72660P | () |
- | - |
| 42 | RECLINING ADJUSTING CABLE ASSEMBLY LH | 72580E | - | - | - |
| 43 | SEAT FOLD SEAT LOCK CONTROL CABLE ASSEMBLY LH | 78910D | - | - | - |
| 44 | REAR SEAT WIRE LH | 82194 | - | - | - |
| 45 | NO. 1 SEAT CUSHION CLIMATE CONTROL BLOWER ASSEMBLY LH | 85860F | () |
- | - |
| 46 | REAR SEAT CUSHION PAD B | - | - | - | - |
| *A | w/ Climate Control Seat System | *B | w/ Wire Harness |
| *1 | NO. 1 SEAT CUSHION FRAME SUB-ASSEMBLY LH | *2 | SPRING NUT |
| *3 | PLATE WASHER | - | - |
| ● | Non-reusable part | - | - |
- CAUTION:
-
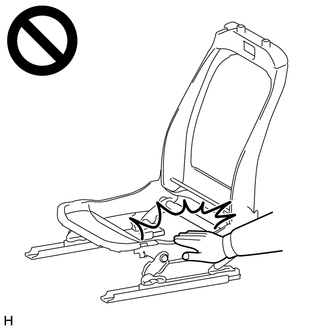
-
·
Wear protective gloves. Sharp areas on the parts may injure your hands.
·There is risk of injury.
PROCEDURE

 71833V 1.REMOVE NO. 1 SEAT NO. 2 RECLINING COVER RH

|
Remove in this Direction | - | - |
Using moulding remover D, detach the claw and guide as shown in the illustration.
Using moulding remover D, detach the claw and guide as shown in the illustration.
Using moulding remover D, detach the claw and guide as shown in the illustration.
Detach the guide and remove the No. 1 seat No. 2 reclining cover RH as shown in the illustration.
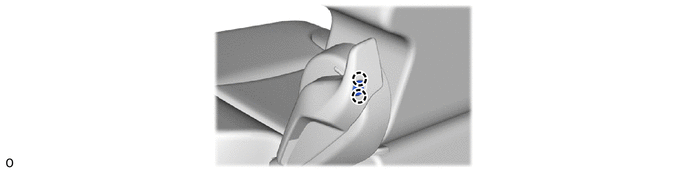
72329G 2.REMOVE REAR NO. 2 SEAT ADJUSTER BOLT COVER
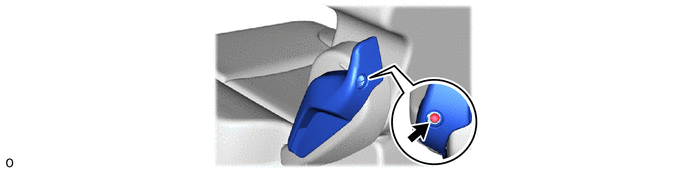
72526L 3.REMOVE RECLINING ADJUSTER RELEASE HANDLE LH
71834X 4.REMOVE REAR NO. 2 SEAT RECLINING COVER LH
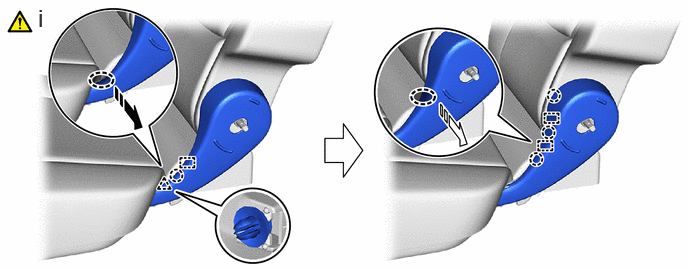

|
Place Hand Here |
|
Remove in this Direction (1) |

|
Remove in this Direction (2) | - | - |
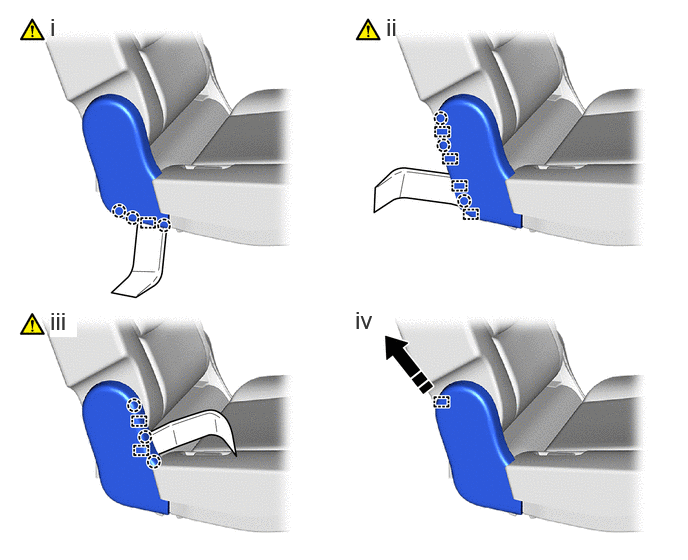
Follow the procedure below to detach the claw, clip and guide.
1. Place your hand at the position shown in the illustration and pull in the removal direction (1) to detach the clip, claw and guide.
2. Place your hand at the position shown in the illustration and pull in the removal direction (2) to detach the claw and guide.
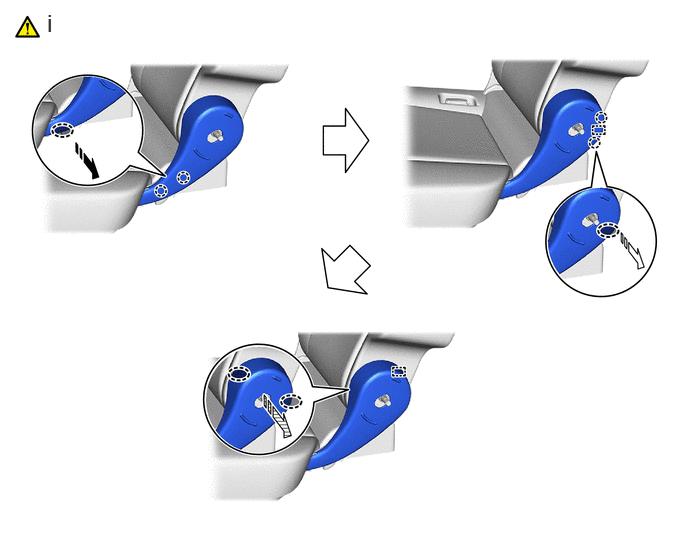
|
|
Place Hand Here |
|
Remove in this Direction (1) |
|
|
Remove in this Direction (2) |

|
Remove in this Direction (3) |
Follow the procedure below to remove the rear No. 2 seat reclining cover LH.
1. Place your hand at the position shown in the illustration and pull in the removal direction (1) to detach the claw.
2. Place your hand at the position shown in the illustration and pull in the removal direction (2) to detach the claw and guide.
3. Place your hands at the position shown in the illustration and pull in the removal direction (3) to detach the guide and remove the rear No. 2 seat reclining cover LH.
78950F 5.REMOVE NO. 1 FOLD SEAT STOPPER BAND ASSEMBLY
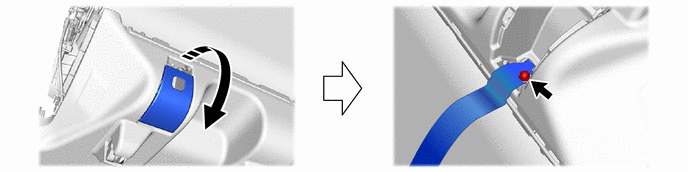
|
|
Open in this Direction | - | - |
76971G 6.REMOVE REAR UNDER COVER
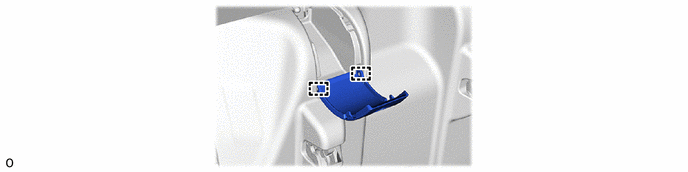
79952A 7.REMOVE NO. 1 SEAT NO. 2 CUSHION COVER
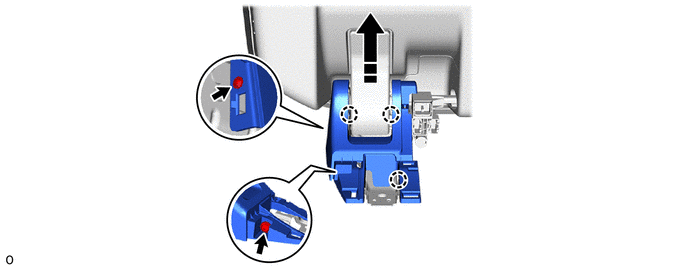
|
|
Remove in this Direction | - | - |
79951B 8.REMOVE NO. 1 SEAT NO. 1 CUSHION COVER
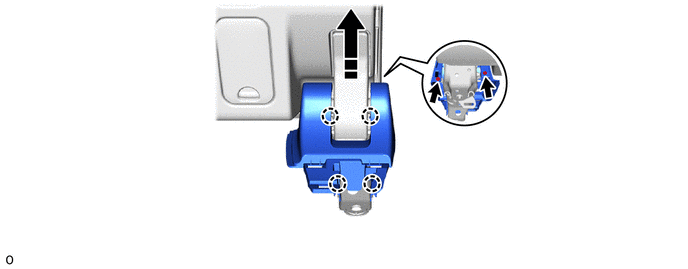
|
|
Remove in this Direction | - | - |
79967W 9.REMOVE REAR NO. 1 SEAT NO. 4 LEG SIDE COVER
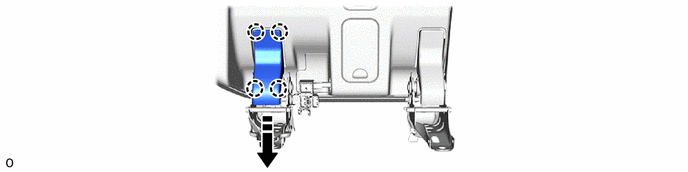
|
|
Remove in this Direction | - | - |
79967X 10.REMOVE REAR NO. 1 SEAT NO. 5 LEG SIDE COVER
Use the same procedure described for the rear No. 1 seat No. 4 leg side cover.
82194 11.REMOVE REAR SEAT WIRE LH (w/o Wire Harness)

|
|
Remove in this Direction | - | - |
71302G 12.REMOVE REAR NO. 1 SEAT HINGE SUB-ASSEMBLY LH

| *A | w/ Wire Harness | - | - |
|
|
Remove in this Direction | - | - |
71301H 13.REMOVE REAR NO. 1 SEAT HINGE SUB-ASSEMBLY RH
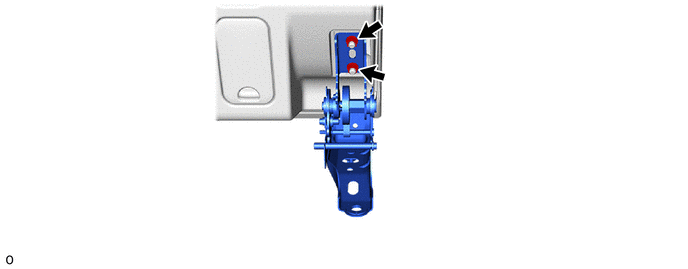
72998D 14.REMOVE REAR SEAT CUSHION COVER LH
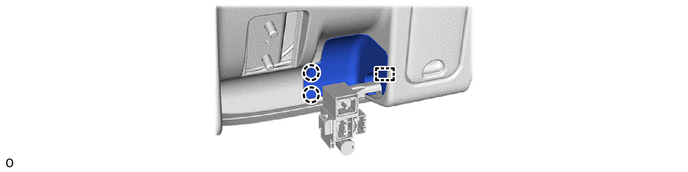
72928E 15.REMOVE REAR SEAT CUSHION UNDER COVER LH
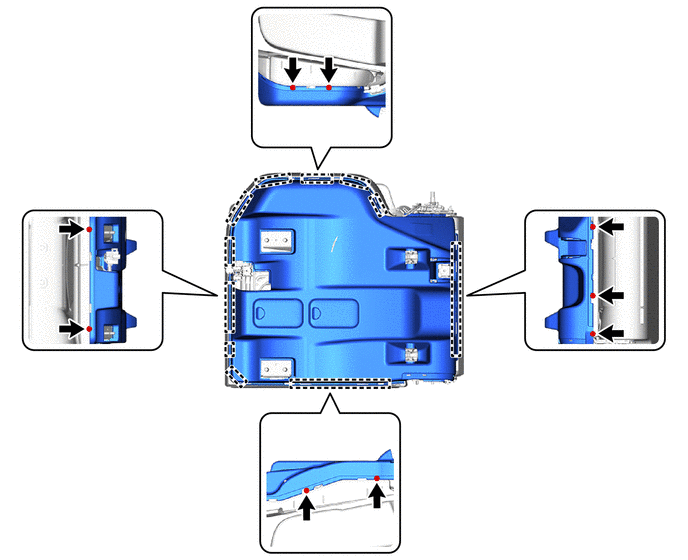
73390C 16.REMOVE REAR NO. 1 SEAT INNER BELT ASSEMBLY LH
87501F 17.REMOVE SEAT HEATER CONTROL SUB-ASSEMBLY LH (w/ Seat Heater System)
72996H 18.REMOVE REAR SEATBACK COVER (w/ Child Restraint System Guide)
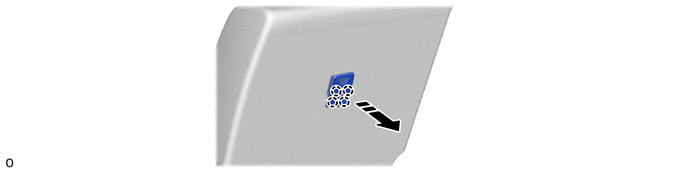
|
|
Remove in this Direction | - | - |
71702D 19.REMOVE REAR SEATBACK BOARD SUB-ASSEMBLY LH
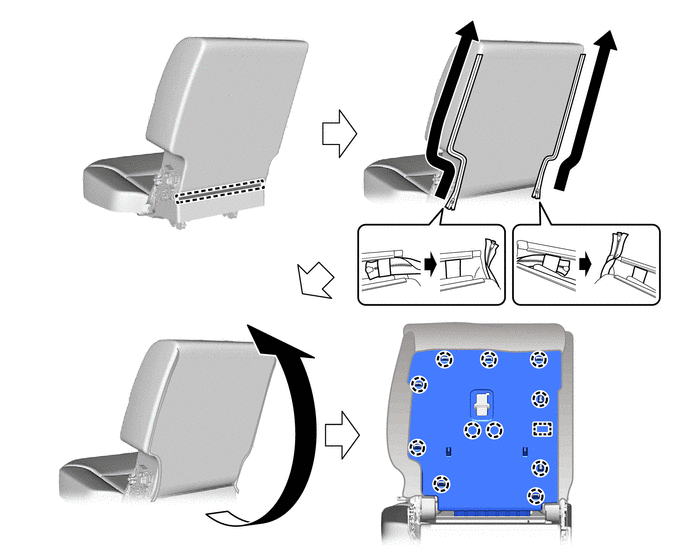
20.REMOVE SEPARATE TYPE REAR SEAT CUSHION ASSEMBLY LH
- HINT:
-
The illustrations are representative examples, and details may differ.
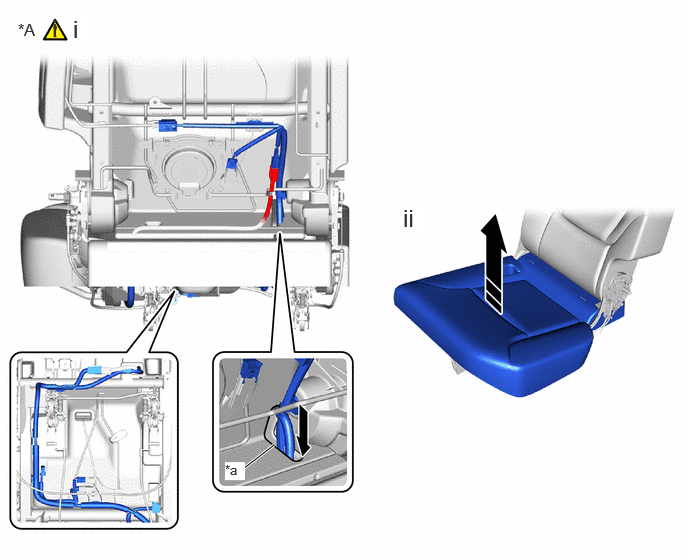
| *A | w/ Wire Harness | - | - |
| *a | Hole | - | - |
|
|
Remove in this Direction | - | - |
w/ Wire Harness:
1. Disconnect each connector and the clamp.
2. Thread the wire harness down through the hole in the No. 1 seatback pad LH and rear No. 1 seat cushion pad LH.
Remove the separate type rear seat cushion assembly LH as shown in the illustration.
71076F 21.REMOVE NO. 1 SEAT CUSHION COVER SUB-ASSEMBLY LH
|
|
|
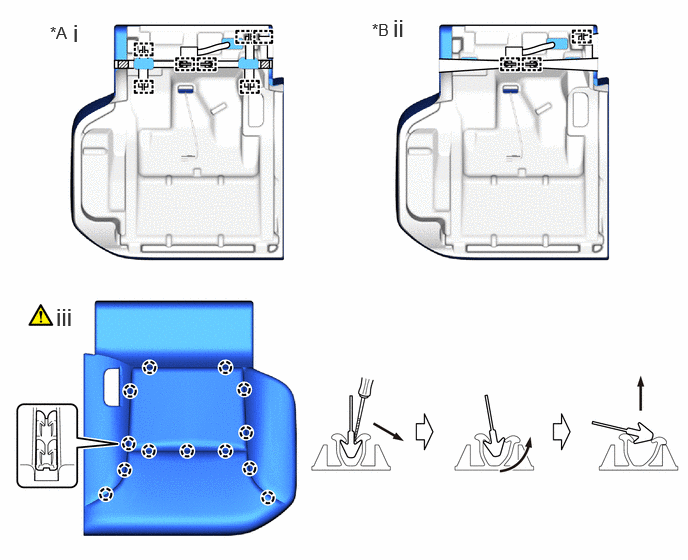
| *A | w/ Child Restraint System Guide | *B | w/o Child Restraint System Guide |

|
Fastener | - | - |
w/ Child Restraint System Guide:
1. Remove the 7 hog rings and 2 fasteners.
w/o Child Restraint System Guide:
1. Remove the 3 hog rings.
Using a thin-bladed screwdriver, detach the claw to remove the No. 1 seat cushion cover sub-assembly LH from the rear No. 1 seat cushion pad LH as shown in the illustration.
- HINT:
-
Tape the thin-bladed screwdriver tip before use.
87510Y 22.REMOVE REAR NO. 1 SEAT CUSHION HEATER ASSEMBLY LH (w/ Seat Heater System)
|
|
() |
71751D 23.REMOVE REAR SEAT COVER HANGER (w/ Rear Seat Side Airbag)
71252 24.REMOVE REAR SEATBACK FRAME LH (w/ Rear Seat Side Airbag)
|
|
() |
73940A 25.REMOVE REAR SEAT AIRBAG ASSEMBLY LH (w/ Rear Seat Side Airbag)
|
|
() |
71930Q 26.REMOVE REAR SEAT HEADREST SUPPORT ASSEMBLY
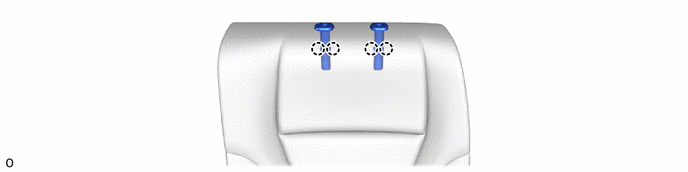
27.REMOVE SEPARATE TYPE REAR SEATBACK ASSEMBLY LH
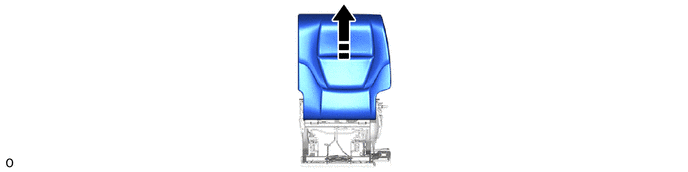
|
|
Remove in this Direction | - | - |
79014B 28.REMOVE NO. 1 SEATBACK COVER SUB-ASSEMBLY LH
|
|
|
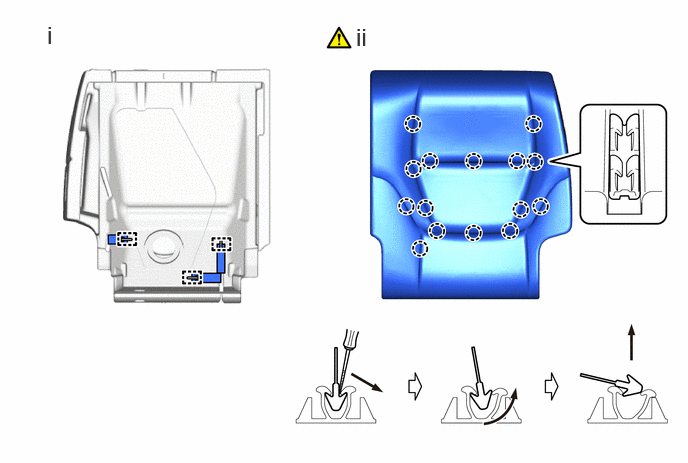
Remove the 3 hog rings.
Using a thin-bladed screwdriver, detach the claw to remove the No. 1 seatback cover sub-assembly LH from the rear No. 1 seatback pad LH as shown in the illustration.
- HINT:
-
Tape the thin-bladed screwdriver tip before use.
87530 29.REMOVE REAR NO. 1 SEATBACK HEATER ASSEMBLY LH (w/ Seat Heater System)
|
|
() |
79117D 30.REMOVE NO. 1 SEAT CUSHION CARPET (w/ Child Restraint System Guide)
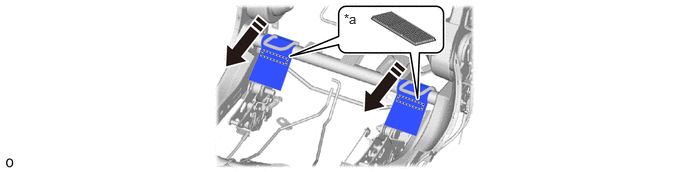
| *a | Fastener | - | - |
|
|
Remove in this Direction | - | - |
71H76N 31.REMOVE SEAT RECLINING ADJUSTER INSIDE COVER LH

71H75R 32.REMOVE SEAT RECLINING ADJUSTER INSIDE COVER LH

72552P 33.REMOVE SEAT RECLINING HINGE COVER LH
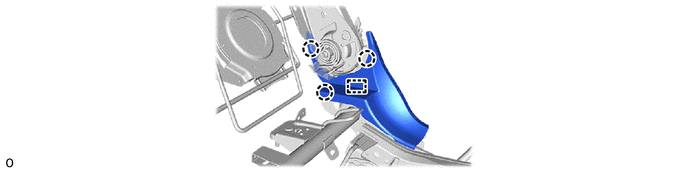
72551R 34.REMOVE SEAT RECLINING HINGE COVER LH
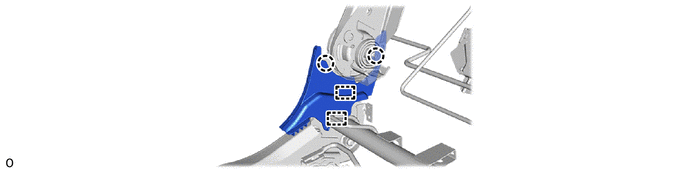
79104A 35.REMOVE NO. 1 SEATBACK FRAME SUB-ASSEMBLY LH
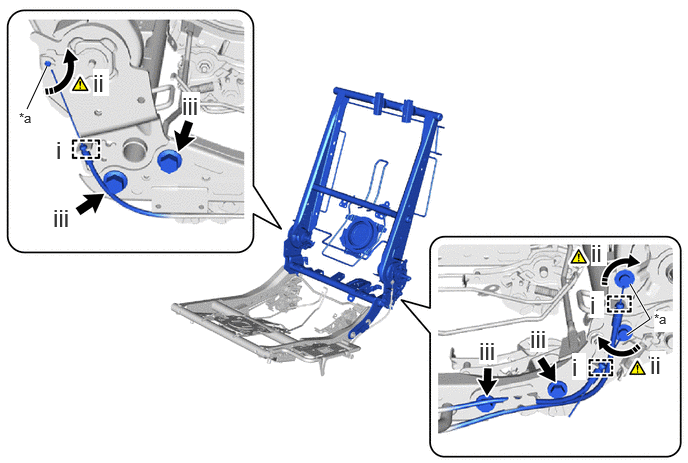
| *a | Cable End | - | - |
|
|
Remove in this Direction | - | - |
Detach each casing cap.
Turn each cable end in the removal direction shown in the illustration and disconnect the cable end.
Remove the 4 bolts and No. 1 seatback frame sub-assembly LH.
72308C 36.REMOVE NO. 1 RECLINING CONTROL LINK SUB-ASSEMBLY LH
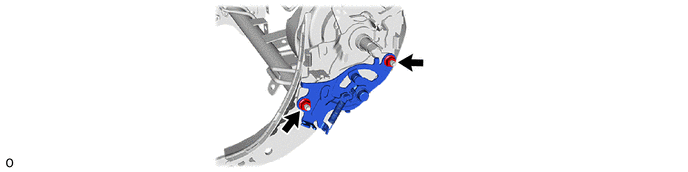
85867E 37.REMOVE NO. 1 SEAT SEATBACK CLIMATE CONTROL BLOWER LH (w/ Climate Control Seat System)
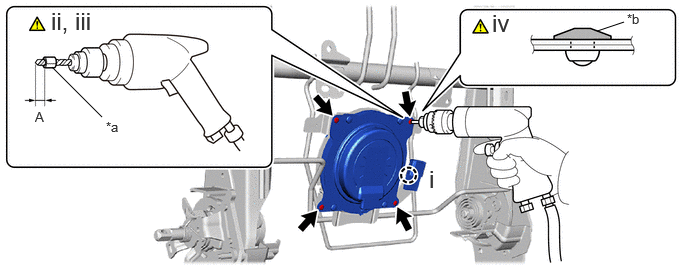
| *a | Tape | *b | Flange |
Detach the claw.
Insert a 4.0 mm (0.157 in.) drill bit into a drill.
Tape the 4.0 mm (0.157 in.) drill bit 5.0 mm (0.197 in.) from the tip as shown in the illustration.
- Standard Measurement:
-
Area Measurement Area Measurement A 5.0 mm (0.197 in.) - -
- NOTICE:
-
Tape the 4.0 mm (0.157 in.) drill bit to prevent the drill bit from going too deep.
Lightly press the drill against the rivets to drill off the rivet flanges to remove the 4 rivets and No. 1 seat seatback climate control blower LH.
- CAUTION:
-
Be careful of the drilled rivets, as they may be hot.
- NOTICE:
-
·
Pressing the drill too firmly will cause the rivet to turn and result in the rivet not being drilled through.
·Prying the rivets with the drill may damage the rivet installation holes or drill bit.
71461H 38.REMOVE REAR SEAT CUSHION SPRING
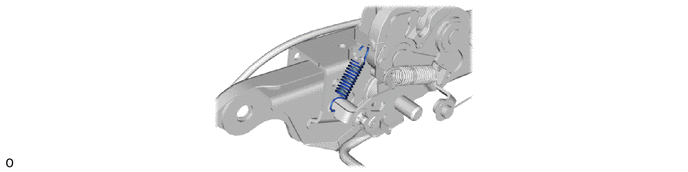
- HINT:
-
Use the same procedure for the other side.
72144 39.REMOVE REAR LOWER REAR SEAT TRACK BRACKET LH

72650J 40.REMOVE REAR SEAT LOCK ASSEMBLY RH

| *a | Cable End | - | - |
|
|
Remove in this Direction (1) |
|
Remove in this Direction (2) |
Detach the casing cap.
Turn the cable end in the removal direction (1) shown in the illustration and disconnect the cable end.
Slide in the removal direction (2) shown in the illustration to remove the rear seat lock assembly RH.
72660P 41.REMOVE REAR SEAT LOCK ASSEMBLY LH

| *a | Cable End | - | - |
|
|
Remove in this Direction (1) |
|
Remove in this Direction (2) |
Remove the nut and plate washer.
Detach the casing cap.
Turn the cable end in the removal direction (1) shown in the illustration and disconnect the cable end.
Slide in the removal direction (2) shown in the illustration to remove the rear seat lock assembly LH.
72580E 42.REMOVE RECLINING ADJUSTING CABLE ASSEMBLY LH
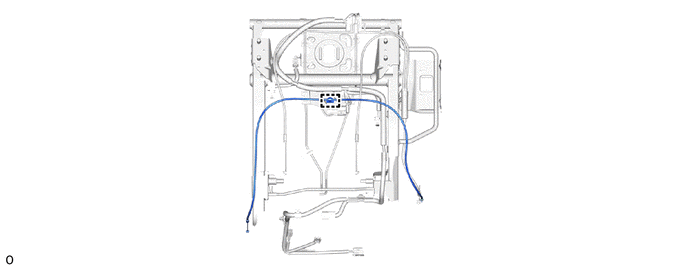
78910D 43.REMOVE SEAT FOLD SEAT LOCK CONTROL CABLE ASSEMBLY LH
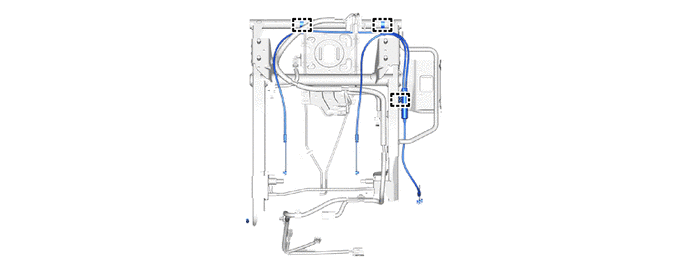
82194 44.REMOVE REAR SEAT WIRE LH (w/ Wire Harness)
- HINT:
-
The illustrations are representative examples, and details may differ.
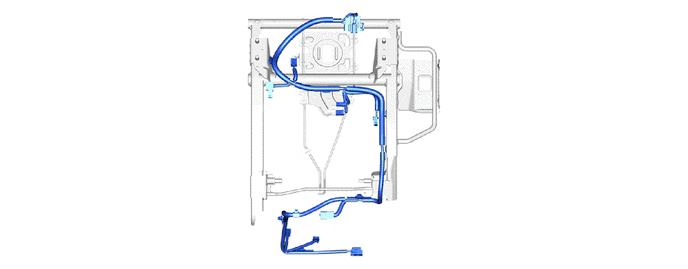
85860F 45.REMOVE NO. 1 SEAT CUSHION CLIMATE CONTROL BLOWER ASSEMBLY LH (w/ Climate Control Seat System)
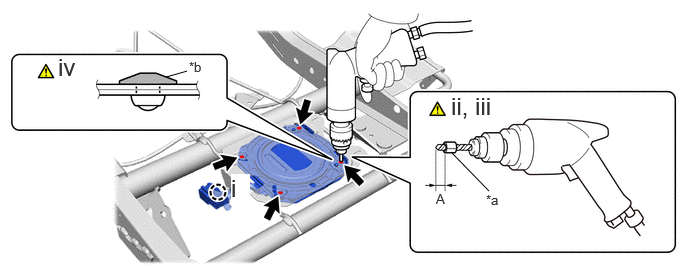
| *a | Tape | *b | Flange |
Detach the claw.
Insert a 4.0 mm (0.157 in.) drill bit into a drill.
Tape the 4.0 mm (0.157 in.) drill bit 5.0 mm (0.197 in.) from the tip as shown in the illustration.
- Standard Measurement:
-
Area Measurement Area Measurement A 5.0 mm (0.197 in.) - -
- NOTICE:
-
Tape the 4.0 mm (0.157 in.) drill bit to prevent the drill bit from going too deep.
Lightly press the drill against the rivets to drill off the rivet flanges to remove the 4 rivets and No. 1 seat cushion climate control blower assembly LH.
- CAUTION:
-
Be careful of the drilled rivets, as they may be hot.
- NOTICE:
-
·
Pressing the drill too firmly will cause the rivet to turn and result in the rivet not being drilled through.
·Prying the rivets with the drill may damage the rivet installation holes or drill bit.
46.REMOVE REAR SEAT CUSHION PAD B (w/ Climate Control Seat System)